Linux is widely used on servers, in development environments, and on many other computing devices. Everyday Linux work revolves around terminals, files, permissions, processes, and networking: using commands to manage files and software, run programs, inspect logs, and investigate problems step by step.
This tutorial starts from the basics and combines concepts with practical operations. It uses Ubuntu 24.04 LTS, Bash, and a small HTTP service to introduce file operations, permissions, log analysis, development environments, processes, and networking before moving on to service management and Shell automation. All example code is included in the article.
You do not need to learn Python first or rent a cloud server. Windows users can use WSL 2. An existing installation of a recent Ubuntu release also works, although software versions and some command output may differ.
1. Reading Path and Example Conventions
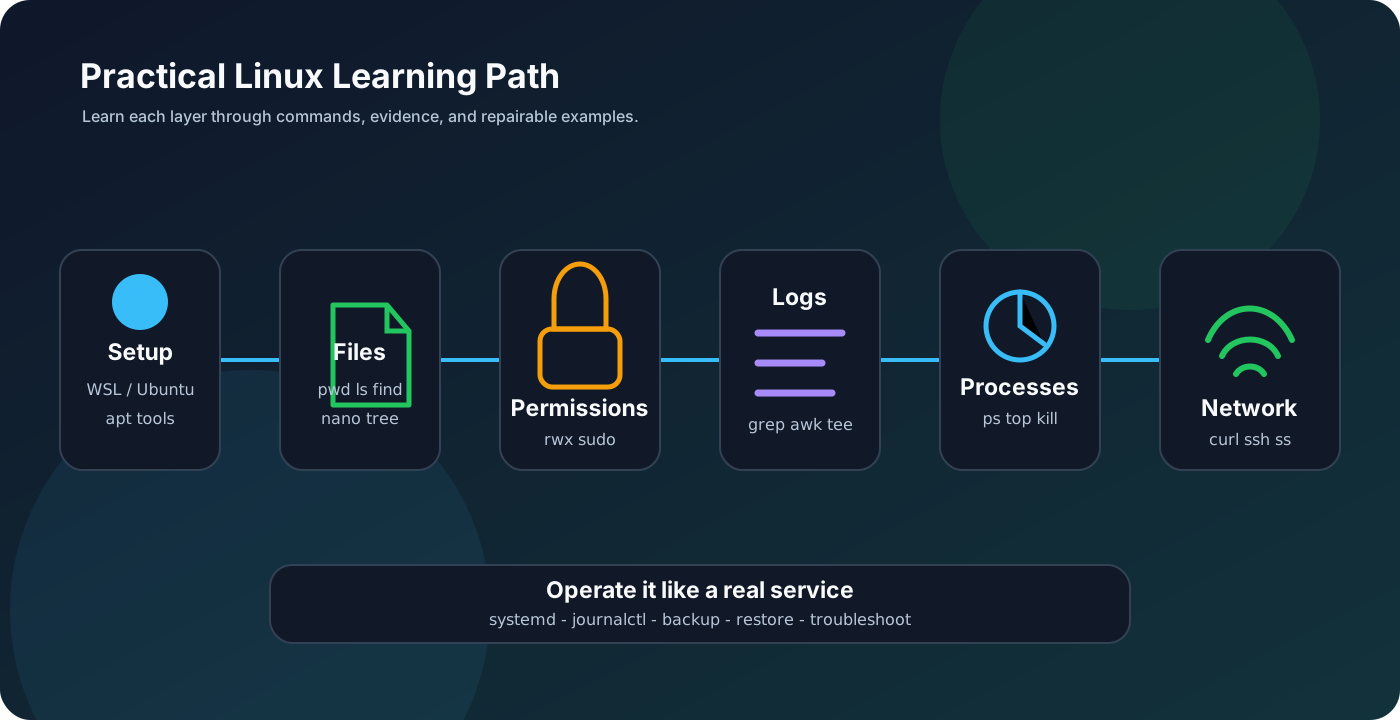
If you are new to Linux, work through the sections in order and run the examples. Once you know the basics, use individual sections as a reference. Here is how the topics fit together:
| Topic | Main operations | Sections |
|---|---|---|
| Environment and files | Set up Linux; create, edit, find, and manage files | 2–3 |
| Permissions and logs | Understand access permissions; combine commands to analyze text and logs | 4–5 |
| Development and processes | Configure dependencies, run programs, and inspect processes and system resources | 6–7 |
| Networking and SSH | Check connections, log in remotely, and transfer files | 8 |
| Services and automation | Manage a service with systemd, write scripts, and back up and restore files | 9–10 |
| Troubleshooting | Use logs, permissions, configuration, and port information to locate problems | 11 |
The examples follow these conventions. Check where a command belongs before copying it:
| Notation | Where it belongs |
|---|---|
powershell block |
Windows PowerShell; administrator access is called out when required |
bash block |
An Ubuntu terminal as a regular user; commands needing elevated privileges include sudo |
text, ini, or python block |
Example output or file contents; do not execute the entire block as Shell commands |
| “Local machine” and “server” | The machine running the SSH client and the target reached through SSH; keep the roles distinct even when they are the same computer |
Commands omit the $ prompt so they are easy to copy. Lines beginning with # are comments. Replace placeholders such as YOUR_SERVER_IP with real values. Do not paste angle-bracket placeholders directly into the Shell, because < and > have special meanings.
File exercises use ~/linux-lab, and backups go in ~/linux-lab-backups. The service management section explicitly creates /opt/linux-lab and its systemd configuration; run those steps on your own practice machine.
2. Setting Up a Usable Linux Environment
Start by separating three concepts. The Linux kernel handles processes, memory, devices, and other low-level operations. A distribution such as Ubuntu combines the kernel with software packages and system tools. Bash is a Shell that interprets the commands you type. A terminal is the window that presents input and output. Opening a dark command window does not necessarily mean you are running Linux.
On Windows, open PowerShell as administrator, list the available distributions, and install the chosen version:
|
|
Use the distribution name shown in the list. Restart if prompted, open Ubuntu, and create a Linux username and password. Password entry usually displays no characters or asterisks; that is normal. This password is separate from your Windows sign-in password.
If Ubuntu is already installed, use that environment. Inspect the installations and enter the appropriate one:
|
|
An existing distribution might simply be named Ubuntu; in that case, use wsl -d Ubuntu. Its VERSION column should show 2. Only if you need to convert an older installation, use wsl --set-version Ubuntu 2, substituting the actual distribution name. See the Microsoft WSL installation guide for requirements and installation troubleshooting.
On macOS, you can set up an Ubuntu virtual machine; choose an ARM64 image on Apple Silicon. If you already have a Linux computer or Ubuntu VM, continue there. The system tools available through the macOS terminal differ from GNU/Linux tools, so the native macOS environment is not a substitute for the Linux environment used here.
Once inside Ubuntu, run:
|
|
These commands identify your current user, working directory, distribution, kernel version, and process 1. The service sections require the last command to report systemd.
If systemd is not enabled in WSL, check the WSL version with wsl --version in PowerShell and run wsl --update if needed. Then run sudo nano /etc/wsl.conf in Ubuntu. Preserve any existing configuration and set the following option in the existing [boot] section, or add that section if it is absent:
|
|
Save your work, then run wsl --shutdown in PowerShell. This stops all running WSL distributions. Reopen Ubuntu and check PID 1 again. systemd support requires WSL 0.67.6 or later; see the Microsoft systemd documentation. A practice service inside WSL is not an always-online server when WSL has stopped or Windows is shut down or asleep.
Install the tools used in the examples:
|
|
apt update refreshes the package index; it does not upgrade every installed package. apt install installs packages, and -y accepts the installation confirmation. A \ before a newline continues the command onto the next line; do not put spaces after it. These commands use the distribution’s package repositories, so you do not need to send an installation script from the web straight into sudo bash.
In WSL, /mnt/c and /mnt/d correspond to Windows drives. This tutorial uses the Linux filesystem under ~ to avoid the different permission behavior and performance characteristics of Windows-mounted paths. Run explorer.exe . inside Ubuntu to view the current directory in Windows File Explorer. With VS Code and its WSL extension installed, you can run code . from Ubuntu; check that the editor is connected to WSL. See Microsoft’s filesystem guidance.
Hands-on exercise: Close and reopen the terminal, enter Ubuntu, identify the current user and distribution, and return to ~/linux-lab without following the commands above.
3. Files, Paths, and Editors
Linux filenames are case-sensitive: App.py and app.py are different names. Paths use /. The path / is the filesystem root, ~ is the current user’s home directory, . is the current directory, and .. is its parent. /root is the root user’s home directory.
| Directory | Usual purpose | Typical contents |
|---|---|---|
/home/username |
Regular users’ files | Source code, practice data, and personal configuration |
/etc |
System configuration | SSH, service, and other software configuration |
/var/log |
Logs | System and application activity records |
/tmp |
Temporary files | Temporary experiments; do not rely on long-term retention |
/usr/bin |
Executables installed by the system | Often the location of commands such as python3 and git |
/opt |
Additional deployed software | The service files used later in this tutorial |
/proc |
Process and system information exposed by the kernel | A virtual interface, not an ordinary directory of disk files |
Work through a small sequence of file operations:
|
|
-l shows details, -a includes hidden files whose names begin with a dot, and -h displays sizes in readable units. cp copies files; mv moves or renames them. The -i option asks before overwriting an existing file. Quote paths containing spaces.
Next, try these navigation commands:
|
|
cd - returns to the previous working directory, and cd ~ returns home. Relative paths are interpreted from the current directory; absolute paths start at /. If a command says a file does not exist, checking pwd is often more useful than repeatedly changing the command.
Reading and editing. Use cat for small files and less for larger ones. Inside less, type /keyword to search, n for the next match, and q to quit. Use tail -n 50 filename to see the last 50 lines, or tail -f filename to watch new log entries; press Ctrl+C to stop watching. If log rotation renames the file, tail -F can continue following its name.
|
|
In Nano, type directly, press Ctrl+O and Enter to save, and press Ctrl+X to exit. Also learn enough Vim to handle an unfamiliar machine: vim filename opens a file, i enters Insert mode, Esc returns to Normal mode, :wq saves and exits, :q! discards changes and exits, and /keyword searches. If typing does not behave as expected, first check the editor’s current mode.
Finding files and searching their contents are different operations.
|
|
find searches by file attributes. grep searches text: -R is recursive, -I skips binary files, and -n displays line numbers. Quoting '*.txt' lets find interpret the pattern instead of having the current Shell expand it first.
A symbolic link stores a path pointing to another location:
|
|
The relative target notes/day1.txt is interpreted from the link’s containing directory, ~/linux-lab. If the target is moved or deleted, the link may stop working. Deleting the link itself does not automatically delete its target. When a program path is a link, readlink -f path resolves it to the actual target.
Check the target before deleting. The following commands delete only the copy created earlier:
|
|
rm generally does not move files to a recycle bin. rmdir removes only empty directories. Check pwd and the target path before recursive operations; knowing about rm -rf does not make it the right default for everyday deletion. -- ends option parsing: for example, rm -i -- ./-demo.txt correctly handles a filename beginning with -.
Look up options when you need them.
|
|
Inside man, search with /keyword and quit with q. cd is a Shell builtin, whereas python3 is usually an external program. You do not need to memorize every command, but you should know how to look up its options. Use Tab completion, the arrow keys for command history, and Ctrl+R to search history. Ctrl+L clears the screen. If you accidentally press Ctrl+S and the display stops updating, Ctrl+Q can resume it.
Hands-on exercise: Create a directory with a space in its name, edit a file inside it, find the file by searching its contents, copy it to another directory, and delete only that copy.
4. Users and Permissions: Understanding Permission Denied
Run id to see your UID, primary group, and supplementary groups, then inspect a file:
|
|
The output may look like this:
|
|
The first character is the file type: - means a regular file, d a directory, and l a symbolic link. The next three groups of characters describe permissions for the owner, group, and everyone else. The two occurrences of alice are the owner and group names, respectively.
| Permission | For a regular file | For a directory |
|---|---|---|
r, value 4 |
Read its contents | List the names inside it |
w, value 2 |
Modify its contents | Add, remove, or rename entries, usually together with x |
x, value 1 |
Allow direct execution | Traverse the directory to access paths inside it |
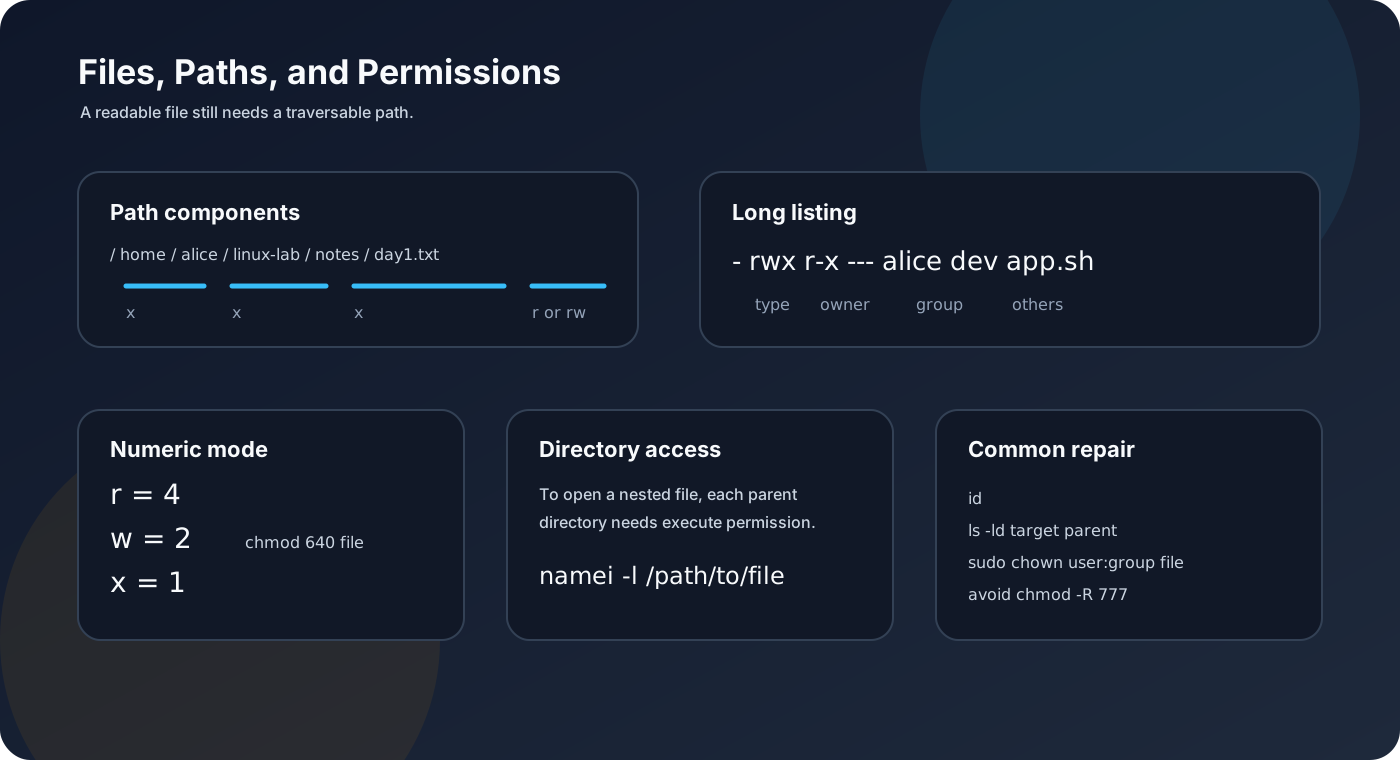
Thus, 644 gives the owner read and write access and everyone else read access. 755 gives the owner read, write, and execute access and everyone else read and execute access. 600 gives only the owner read and write access. Each digit adds up the permissions within one group; it is not an arbitrary code to memorize.
|
|
The x permission on directories is especially important. Even if a file has mode 644, someone who cannot traverse its parent directory still cannot read it. Deleting a file mainly depends on the parent directory’s permissions and can also be restricted by the sticky bit, ACLs, and other controls. Looking only for w on the file is not enough.
sudo runs a command as another identity, commonly root, according to its configuration. Installing system software requires elevated privileges; editing your own code usually does not. Running an editor or build tool with sudo can leave root-owned files in your project.
Practice correcting a file with the wrong owner:
|
|
$(...) inserts a command’s output into an argument; here it supplies the current username and primary group. Change only the named file. Do not recursively make yourself the owner of all of /usr, /etc, or a shared project.
Another common trap is sudo echo content > /etc/some-file. The current Shell handles >, so elevating echo does not grant the outer Shell permission to write the file. For system configuration, use sudoedit filename, or explicitly use printf 'content\n' | sudo tee filename. The latter overwrites by default, so check the target first.
Troubleshooting order: Use id to check your identity → ls -ld on the target and its parent directories to inspect permissions → namei -l full-path to examine each component → confirm whether you should be modifying the file. Do not jump straight to chmod -R 777; it gives more users write and execute access and can conceal the real ownership problem.
Hands-on exercise: Explain -rwxr-x--- without looking it up, describe one reason a readable file might still be inaccessible, and fix the root-owned file created above.
5. Shell, Pipelines, and Logs: Combining Commands
The Shell processes variables, quotes, wildcards, pipelines, and redirections before a program runs. Many apparently strange command failures happen because the arguments have already changed before the program receives them.
|
|
The first printf prints the path; the second prints the literal text $lab_dir. Variable assignments have no spaces around =. Double quotes allow variable expansion while keeping spaces in a path from splitting it into separate arguments. Single quotes preserve literal text. The ~ in "~/linux-lab" does not expand; use "$HOME/linux-lab" instead. See the Bash quoting documentation.
Input, output, and errors. An ordinary command has standard input 0, standard output 1, and standard error 2:
| Syntax | Effect |
|---|---|
command > out.log |
Write standard output to a file, replacing its previous contents |
command >> out.log |
Append standard output to a file |
command 2> err.log |
Write standard error to a separate file |
command > all.log 2>&1 |
Redirect standard output first, then make standard error follow it |
a | b |
Pass a’s standard output to b’s standard input |
a | tee out.log |
Display the output and write it to a file |
> all.log 2>&1 and 2>&1 > all.log are different: redirections are processed from left to right. An ordinary | does not automatically pass standard error along. Do not use the same file as both input and redirected output in grep ... file > file; the Shell truncates the file first. See the Bash redirection documentation.
Create a log with known results. The cat <<'EOF' construct below is a here-document: it writes the content between the delimiters into a file. The closing EOF must be on a line of its own. Quoting the opening delimiter prevents variable expansion within the content.
|
|
Inspect the data one step at a time instead of memorizing a long pipeline:
|
|
You should find 6 lines and 3 responses with status 500. The final command produces:
|
|
By default, awk separates fields on whitespace: $5 is the fifth field and $6 the sixth. The first sort places identical paths next to one another. uniq -c counts only adjacent identical lines. The final sort -nr sorts numerically in descending order. This pipeline depends on the log format used here; it cannot be applied unchanged to arbitrary JSON or fields containing spaces.
Next, practice viewing context and editing text:
|
|
grep -C 1 shows context around each matching line, and sed -n '2,4p' displays lines 2 through 4. The substitution writes to a new file so you can compare the results. With real service logs, look at timestamps, request IDs, error types, and surrounding context instead of simply counting the word ERROR.
Exit status matters for reliable automation.
|
|
$? is the previous command’s exit status, so read it immediately. Usually, 0 means success and a nonzero value indicates another outcome. For grep, 1 means no match and 2 means an error; they are not interchangeable. a && b runs b if a succeeds, and a || b runs b if a fails.
A pipeline normally returns the exit status of its last command. In a script, set -o pipefail makes failures in earlier stages easier to detect, but it does not make the entire script’s logic automatically correct. See the Bash pipeline documentation.
Hands-on exercise: Count the 404 responses in the sample log. Save all 500-response lines to a new file while also displaying them in the terminal. Explain why sorting is needed before uniq -c.
6. Development Environments: Running the Right Program
When setting up a project on a new machine, start with its README and version requirements, then inspect the system and tools. A missing program is not a reason to copy unrelated installation commands at random.
|
|
PATH is the colon-separated list of directories the Shell searches for commands. Typing python3 searches those directories; ./script.sh explicitly selects a script in the current directory. The current directory is usually not in PATH, so seeing a file in the directory does not mean you can run it by typing its name alone.
Ubuntu and Debian commonly use apt, while Fedora and RHEL-family systems commonly use dnf. The system package manager handles system-level dependencies; tools such as pip and npm handle dependencies for their respective languages. Understand that distinction before looking up commands for your distribution and project.
Practice dependency isolation with a Python virtual environment. The application in this tutorial has no third-party dependencies, but creating an environment makes the startup workflow resemble a real project:
|
|
After activation, the interpreter path should be inside ~/linux-lab/app/.venv/bin/. If a real project provides requirements.txt, run python -m pip install -r requirements.txt after activating its environment. This example does not require that step. Do not modify the system Python with sudo pip install or bypass system-environment protection by casually adding --break-system-packages.
source filename executes a file in the current Shell and can therefore change the current environment. bash filename starts a child Shell whose variables do not automatically propagate back to its parent. Only source files you wrote or have inspected and trust.
Environment variables also have a scope:
|
|
export makes a variable available to child processes started afterward. An assignment immediately before a command affects only that invocation. A new terminal does not automatically inherit another terminal’s temporary settings, and an already-running service does not change with them. .bashrc usually contains personal settings for interactive Bash sessions. systemd services do not obtain their configuration by reading your .bashrc.
Basic Git operations on Linux. Make a local commit in a separate practice directory without pushing anything:
|
|
The Git identity settings here apply only to this practice repository, not to other projects. With a team’s actual repository, the usual starting point is to run git clone repository-url, enter the directory, read the README, switch to a working branch, install dependencies, and run tests. Inspect git status and git diff before making changes. Do not clear unfamiliar modifications with git reset --hard. Private keys, tokens, and real .env files should not be committed.
Hands-on exercise: Demonstrate that a program is using the virtual environment’s Python, explain the difference between export and a one-command environment assignment, and make a local commit after inspecting its diff.
7. Processes and Resources: What Is Running and Why It Is Slow
A process is a running program with a PID, user, state, working directory, and environment. A program can create multiple processes, and a process can contain multiple threads.
Use sleep to practice background jobs without modifying any data:
|
|
& runs the command in the background. $! is the PID of the most recently started background job. jobs lists only jobs managed by the current Shell, whereas ps inspects system processes. Prefer the program’s normal shutdown mechanism or TERM when stopping it. kill -9 sends KILL, which the process cannot catch to perform cleanup; use it only after confirming the target and finding that normal shutdown does not work.
Start sleep 300 again, press Ctrl+Z to suspend it, and run jobs -l to inspect its stopped state. Use bg to resume it in the background, fg to bring it to the foreground, and finally Ctrl+C to end it. Suspending a process is not the same as exiting; the process still exists.
| Need | Suitable tools | Limitations to understand |
|---|---|---|
| Run temporary work concurrently in the current terminal | &, jobs, fg, bg |
A background job is not automatically a reliable persistent service |
| Resume interactive work after SSH disconnects | tmux |
You can reattach to the session, but it does not survive a machine shutdown |
| Run a temporary task that ignores hangup signals | nohup command > run.log 2>&1 & |
Does not provide automatic restarts, health checks, or startup at boot |
| Run a long-lived application | systemd |
Manages the lifecycle, logging, and restart policy |
To get started with tmux, run tmux new -s linux-lab and work inside it. Press Ctrl+B, release the keys, and then press D to detach. List sessions with tmux ls and reattach with tmux attach -t linux-lab. To finish, stop your tasks inside the session and type exit.
Inspect the system as a whole instead of focusing on one number.
|
|
In top, press P to sort by CPU usage, M to sort by memory usage, and q to quit. The load averages reported by uptime cover 1, 5, and 15 minutes. They include runnable tasks and tasks in uninterruptible sleep; they are not CPU percentages. Interpret them alongside CPU count and I/O activity.
|
|
| Symptom | First checks | Interpretation |
|---|---|---|
| Very little memory appears to be “free” | The available column in free -h |
Linux uses memory for caching, so free alone is insufficient |
| Disk writes fail | df -h, df -i |
Storage space or inodes may be exhausted |
| A project directory becomes unexpectedly large | Use du to narrow the search one directory level at a time |
Identify the specific logs, caches, or data before taking action |
| A program is suddenly killed | journalctl -k -b, with sudo if needed |
Look for OOM or other evidence; the word Killed alone does not prove an OOM event |
| Deleting a log does not free disk space | sudo lsof +L1 |
A process may still have the file open; after confirming, release it through normal service log rotation or a restart |
df reports filesystem-level usage, while du measures the files under a path. Their numbers do not have to match. lsof lists files opened by processes; on Linux it can also inspect objects such as network sockets.
Hands-on exercise: Find and stop a process you started, explain the differences between background execution, suspension, and exit, and locate a directory that uses disk space without deleting arbitrary system files.
8. Networking and SSH: From Local Services to Remote Machines
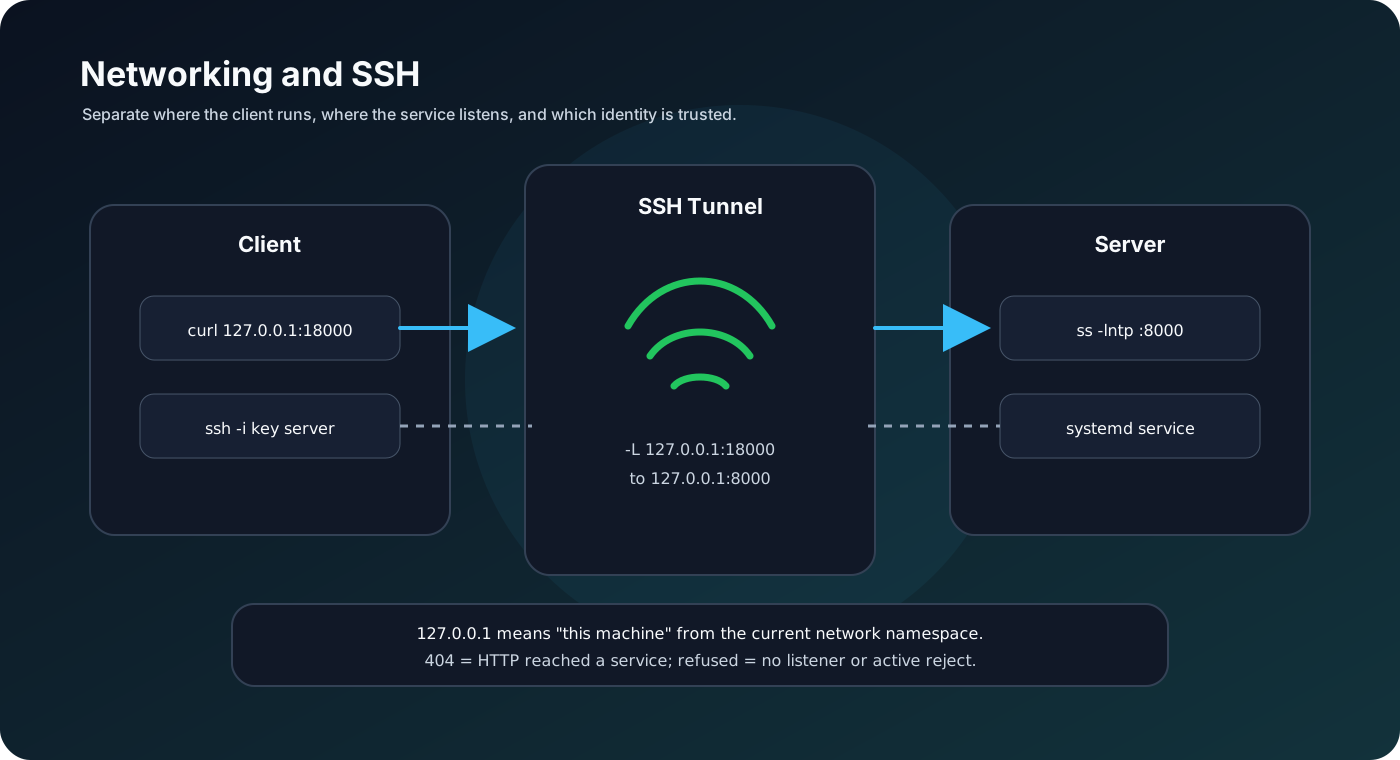
Start with the addresses. 127.0.0.1 is the IPv4 loopback address of the current network environment itself. As a listening address, 0.0.0.0 means all IPv4 interfaces; it is not the server address to enter in a browser. Ports distinguish services on the same machine. WSL, containers, and the host have their own network boundaries, so do not assume localhost means the same thing on both sides.
Begin with a small network experiment you can immediately troubleshoot. In terminal A, run:
|
|
This serves static files from the current data directory. Leave terminal A running and use a second Ubuntu terminal, B, for these checks:
|
|
The first command should show LISTEN and 127.0.0.1:8000. You can usually see process information when running as the same user; use sudo ss if necessary. The second command returns 200 and hello over HTTP; the third returns 404. A 404 means you reached an HTTP service, and the problem is at the route or resource level.
Return to A and stop the server with Ctrl+C. Request the same address from B again; it will usually report a refused connection. This is a different layer of failure from the earlier 404. Leave port 8000 free after this experiment, since the application in the next section will use it.
| Symptom | Next step | What you cannot conclude from the symptom alone |
|---|---|---|
Could not resolve host |
getent hosts domain, dig domain |
Does not establish that the application is down |
Connection refused |
Check the target address, port, and ss -lntp |
Usually means no listener or an active rejection, not an HTTP 500 |
| Connection timeout | Check routes, firewalls, security groups, and target reachability | Does not identify the failing layer by itself |
| TLS certificate verification fails | Check the hostname, system time, and certificate chain | curl -k should not become a permanent fix |
| HTTP 401 / 403 | Check authentication and access permissions | Does not necessarily indicate a Linux file-permission error |
| HTTP 404 / 500 | Check paths, request parameters, and application logs | Changing DNS cannot resolve every application error |
Useful commands for checking each layer include:
|
|
ping uses ICMP, which the destination may block. A failed ping does not prove HTTP is unreachable, and a successful ping does not prove the application is healthy. getent uses system name resolution, which may include /etc/hosts. dig primarily examines DNS, so their answers can differ.
With curl, -i displays response headers, -v displays connection details, -L follows redirects, and -o filename saves a response. A normal curl request does not necessarily return a nonzero exit status for HTTP 404 or 500. In scripts, you can use curl --fail-with-body --silent --show-error --max-time 5 URL. --connect-timeout limits the connection-establishment phase, while --max-time limits the entire transfer. See the official curl manual.
If access works inside Linux but fails in a Windows browser, identify the direction of access and WSL networking mode before checking Windows firewall or proxy settings. NAT and mirrored networking behave differently; see the Microsoft WSL networking documentation. The checks in this tutorial use curl inside Ubuntu as their baseline.
You can practice SSH without renting a server. Install an SSH server on your own Ubuntu practice machine and connect to it from the same environment. The following installation normally enables an inbound SSH service, so use it only in your own practice environment. There is no need to reinstall SSH on a company server that already provides it:
|
|
When the first connection displays a fingerprint, compare its SHA256 value with the preceding command’s output before accepting it and entering your Linux user’s password. For a real remote machine, obtain the host fingerprint independently from an administrator or a trusted console. The host fingerprint identifies the server, while a user’s key identifies the person logging in; these are separate roles.
After logging in, run whoami, hostname, and pwd, then type exit to return to the client. When connecting to the same machine, the username and hostname may be unchanged. Checking them is still a useful habit.
Next, create a separate practice key on the SSH client—the Ubuntu terminal after leaving the remote session. If a file with the same name already exists, reuse it or choose another name rather than overwriting an existing key:
|
|
You can protect the key with a passphrase. A later prompt for that passphrase is different from a server-password prompt. Keep the private key, id_ed25519_linux_lab, on the client; the .pub public key can be installed in the server’s ~/.ssh/authorized_keys. Recommended permissions are 700 for .ssh and 600 for private keys and authorized_keys; also check ownership and parent-directory permissions. The client records server host keys in known_hosts.
Some cloud servers disable password authentication by default. You may need to connect with an existing key or install a public key through the cloud console. Do not assume ssh-copy-id can always use a password for the first login. Connection, key, and forwarding options are documented in the OpenSSH manual.
Type exit again to return to the client, then transfer a file and verify it:
|
|
The hashes should match. The relative path after the colon starts from the remote user’s home directory, and its parent directory must already exist. For a real server, use ssh -p PORT USER@SERVER_ADDRESS; scp uses an uppercase -P for its port option.
For repeated connections, use nano ~/.ssh/config to add a Host alias. Replace YOUR_LINUX_USER below with the output of id -un. You can then connect with ssh linux-lab:
|
|
Preview directory synchronization first, then remove n to perform it. The trailing / means to copy the directory’s contents:
|
|
To access port 8000 on a server that listens only on loopback, open a tunnel from the client:
|
|
The left-hand 127.0.0.1:18000 is the client’s listening address. The right-hand 127.0.0.1:8000 is reached from the SSH server’s perspective. Leave this terminal running and visit http://127.0.0.1:18000/health from another client terminal to reach the application deployed in the next section. The application is not running yet, so verify the tunnel after starting it there. Close the tunnel with Ctrl+C.
If SSH fails, use ssh -v linux-lab to inspect connection and authentication details. Review logs before sharing them publicly. Before applying a server configuration change, check its syntax with sudo sshd -t, keep the original connection open, and verify a new connection in another window. If a host key changes, first check whether the server was rebuilt or replaced rather than disabling host-key checks. See the sshd configuration-check and permission guidance.
Hands-on exercise: Explain the difference between HTTP 404 and a refused connection, log in with an SSH key, and verify a transferred file’s hash. If you have access to a real remote machine, repeat the operations across machines.
9. Putting It Together: Deploying and Managing an HTTP Service
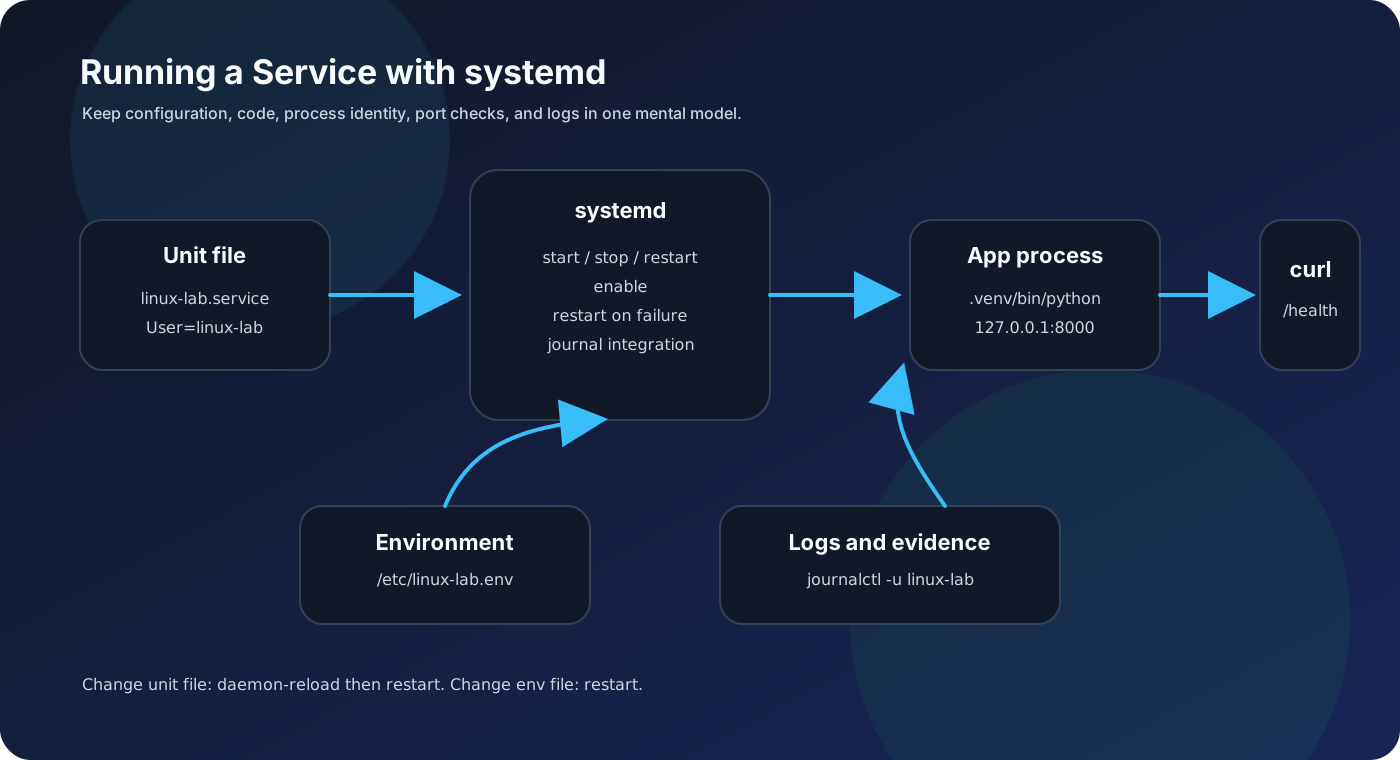
This section combines the earlier skills. The application has just three behaviors: /health returns a health status, / returns a message from an environment variable, and other paths return 404. You do not need to study Python syntax here. Focus on where the program lives, which user runs it, how configuration reaches it, and where its logs appear.
First, get it working in the foreground. Run nano ~/linux-lab/app/app.py, paste the complete contents below, then save and exit:
|
|
In terminal A, run:
|
|
Verify it in terminal B:
|
|
The health endpoint should return {"status": "ok", "service": "linux-lab"}. The root path returns the message My first Linux service, and an unknown path returns 404. Watch terminal A: each request produces a log entry containing path= and status=, with timestamps in UTC. These live logs are separate from the fixed sample log in section 5; do not expect their counts to match.
If you see Address already in use, first check whether the static server from section 8 is still running. Once foreground verification is complete, press Ctrl+C in A to stop the application and release the port.
This local application uses Python’s standard-library http.server to teach operational tasks. It is not a production web framework, and the official documentation advises against using that module directly in production. For a real project, follow the framework’s requirements for the application server, traffic entry points, and access controls. See the Python http.server documentation.
Next, make the runtime environment explicit. Run the following on your own Ubuntu practice machine. If the user, /opt/linux-lab directory, or service already exists, confirm that it belongs to this exercise before reusing it.
|
|
These commands create a dedicated system user without interactive login. Root owns the application code; the service user needs only read and execute access. Create a fresh virtual environment for deployment instead of moving the one from your home directory, because virtual environments can contain absolute paths.
Write the configuration:
|
|
Then create the service unit:
|
|
| Setting | Purpose in this example |
|---|---|
User, Group |
Explicitly run as a regular service user |
WorkingDirectory |
Set the working directory independently of where you start the service |
EnvironmentFile |
Supply configuration explicitly; the system service manager reads it |
ExecStart |
Use absolute paths for the interpreter and application |
-u |
Disable Python output buffering so logs appear promptly |
Restart=on-failure |
Attempt a restart after an abnormal failure; a manual stop does not trigger it |
RestartSec=3 |
Wait 3 seconds between restart attempts rather than looping tightly |
WantedBy |
Establish the startup relationship with a target when the unit is enabled |
EnvironmentFile is not a general-purpose Shell script: do not put export, command substitution, or arbitrary script logic in it. ExecStart also does not automatically interpret >, |, and ~ as Bash would. After=network.target specifies ordering; it does not guarantee that the internet or a database is already reachable. See the systemd service documentation source and execution-environment documentation source.
Check the configuration, start the service, and verify the responses:
|
|
Expect active (running), an ok response from the health endpoint, and Managed by systemd at the root path. There can be a brief interval between process startup and the port becoming ready. If an immediate request fails, inspect the logs and check again. An active systemd state describes the process state; you still need an HTTP request to verify application readiness.
Keep these operations distinct:
| Operation | Effect |
|---|---|
sudo systemctl start linux-lab |
Start the service now |
sudo systemctl stop linux-lab |
Stop it now |
sudo systemctl restart linux-lab |
Stop it and start it again |
sudo systemctl enable linux-lab |
Configure future startup at the appropriate system stage; does not start it immediately |
sudo systemctl disable linux-lab |
Remove future automatic startup; does not stop it immediately |
sudo systemctl daemon-reload |
Reread unit configuration after changes; does not restart the application |
sudo journalctl -u linux-lab -f |
Follow service logs; press Ctrl+C to stop watching |
After changing a .service file, normally run daemon-reload and then restart the service. If you change only the referenced env file, restarting the application is enough to reread it. Not every service supports systemctl reload; this example does not configure that operation.
Edit APP_MESSAGE with sudo nano /etc/linux-lab.env, save, run sudo systemctl restart linux-lab, and request the root path to confirm the change. Try setting only export APP_MESSAGE=... in an interactive terminal and observe that it does not alter the running service.
Inspect the service identity and restart count:
|
|
To verify automatic recovery after a failure, first confirm that the target is this practice service, note its MainPID, and run the following command once. This deliberately simulates a forcibly killed process. Continue using systemctl stop for normal shutdown:
|
|
After a few seconds, repeat systemctl show and the health check. You should see a new PID, an increased restart count, and a working endpoint. In contrast, systemctl stop should leave the service stopped until you explicitly start it.
Finally, verify startup recovery. In a regular VM, save your work and reboot. In WSL, save all WSL work, run wsl --terminate Ubuntu-24.04 in PowerShell using the actual distribution name, and enter the distribution again. Check systemctl is-enabled linux-lab, systemctl is-active linux-lab, and the health endpoint. This verifies service recovery after the Linux environment starts again.
When you are finished practicing, sudo systemctl disable --now linux-lab stops the service and disables automatic startup. You can keep the configuration, code, and notes for later review.
Hands-on exercise: Run the service as linux-lab without keeping a terminal open to sustain it. Change its configuration, inspect logs, restart it, access it through an SSH tunnel, and verify recovery after the environment restarts.
10. Shell Automation: A Backup Must Be Restorable
A useful script needs clear inputs, meaningful failure reporting, correct handling of filenames with spaces, and predictable behavior when run repeatedly. A backup script provides a practical way to work through those requirements.
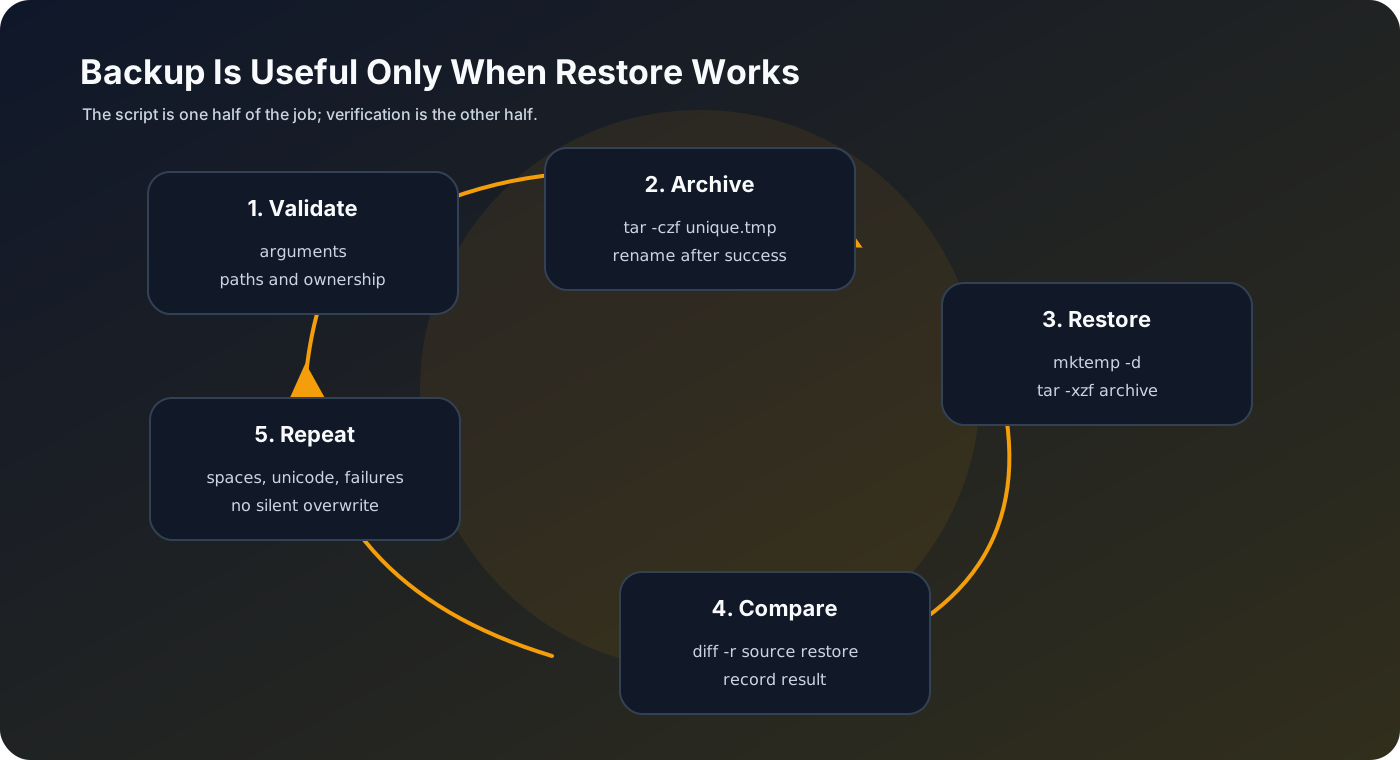
Start with two common combinations. A loop repeats an operation for a group of files:
|
|
This prints each note’s line count, with note holding one path on each iteration. The variable portion is quoted, while the *.txt outside the quotes can still expand. The file check skips the unexpanded pattern when no files match. Do not use for file in $(ls) to process filenames: spaces and newlines can split them incorrectly.
Functions and conditional branches turn repeated checks into a reusable operation. Make sure the service from the previous section is running, then execute:
|
|
Here, if uses the exit status of the function’s last command. This check establishes that the HTTP request succeeded; a stricter application check should also parse the response’s status field. Add a Bash shebang if you save this as a script. To report failure to a caller, explicitly use exit 1 in the failure branch: a successful final printf does not mean the service is healthy.
Next, learn the basic archive operations. Make sure data contains the files from the earlier exercises:
|
|
With tar, c creates an archive, x extracts it, t lists its contents, z uses gzip, f is followed by the archive filename, and -C sets the working directory. Repeating this introductory example overwrites data-demo.tar.gz; the script below will use a unique name for each backup instead. No output from diff -r, together with exit status 0, means the contents match. Each restore goes into a new temporary directory without overwriting the original data.
Extract only trusted archives this way, and inspect the listing first when an archive is unfamiliar. Copying a directory or using tar cannot guarantee a consistent backup of a database that is actively being written. Use the database’s own backup tools for that; this example handles static practice files.
Run nano ~/linux-lab/scripts/backup.sh and enter the complete script:
|
|
Understand the important lines before running it:
| Syntax | Purpose |
|---|---|
#!/usr/bin/env bash |
Select Bash as the interpreter when executing the script directly |
$#, $1, $2 |
The argument count, first argument, and second argument |
[[ ... ]], if |
Bash conditions, such as directory existence and argument-count checks |
>&2, exit 1 |
Write an error to standard error and return a nonzero status |
set -u |
Expose references to unset variables |
set -e, pipefail |
Stop early for many command failures; understand exceptions involving conditions and pipelines |
realpath |
Resolve actual paths, including symbolic links, to avoid writing backups inside the source directory |
mktemp |
Create a unique file so repeated runs do not overwrite one another |
trap ... EXIT |
Remove this run’s incomplete archive if the script fails |
The script accepts ordinary directory backups, rejects /, and requires the backup directory to be outside the source directory. Otherwise it could archive the backup it is currently creating. It is intended for practice directories you control, not complicated cases such as multiple users changing directory paths concurrently.
Run these commands in Ubuntu:
|
|
bash -n checks syntax, and ShellCheck checks common Shell mistakes. bash script does not require an executable permission bit on the script; ./script requires execute permission and a valid interpreter. If editing on Windows produces an error such as /usr/bin/env: 'bash\r': No such file or directory, inspect line endings with file script, switch the editor to LF and UTF-8, and save again.
The script prints Backup created: full-path. Replace the first line below with the archive path it printed, then verify restoration:
|
|
There is no outer data/ directory here because the script uses -C source-directory .. Compare against the restore directory itself. Expect no diff output and exit status 0. The existence of an archive alone does not prove the backup is usable.
Deliberately trigger failure cases as well:
|
|
The first pair should display usage instructions and return 64. The second should reject a destination inside the source directory and return 1. Try a source directory whose name contains spaces to verify the value of quoting. Do not debug a script containing real passwords with bash -x; it prints expanded commands.
Scheduled execution is an optional extension. Install and start cron on your practice machine:
|
|
Assuming your Linux username is alice, add the following file contents in the editor. Replace every /home/alice with the actual home directory shown by echo "$HOME". The log directory must already exist:
|
|
The first five fields are minute, hour, day of month, month, and day of week. This example runs every day at 19:00 in the machine’s timezone. Check the time with date and timedatectl, and list saved jobs with crontab -l. Cron’s environment differs from an interactive terminal, so use absolute paths and an explicit PATH. Run the same command manually first, confirm it succeeds, then wait for a scheduled run and inspect the log and new archive.
Ordinary cron does not catch up on jobs missed while the machine was shut down. You also cannot rely on it to back up files while WSL is not running. After practicing, use crontab -e to remove the line you added while preserving other jobs. For more robust server-side scheduling, systemd timers are a useful next topic, but they are beyond the scope of this section.
Hands-on exercise: Generate a restorable backup on a successful run, return a nonzero status for invalid arguments, handle directories containing spaces, and keep two distinct archives after two consecutive runs.
11. Diagnosing and Recovering from Common Failures
Port conflicts, insufficient permissions, invalid configuration values, and misspelled paths are common service problems. Use the example service to reproduce these four cases and observe their symptoms and solutions. Reproduce one problem at a time, restore the service, and verify its health before continuing. Perform these operations only in your own practice environment.
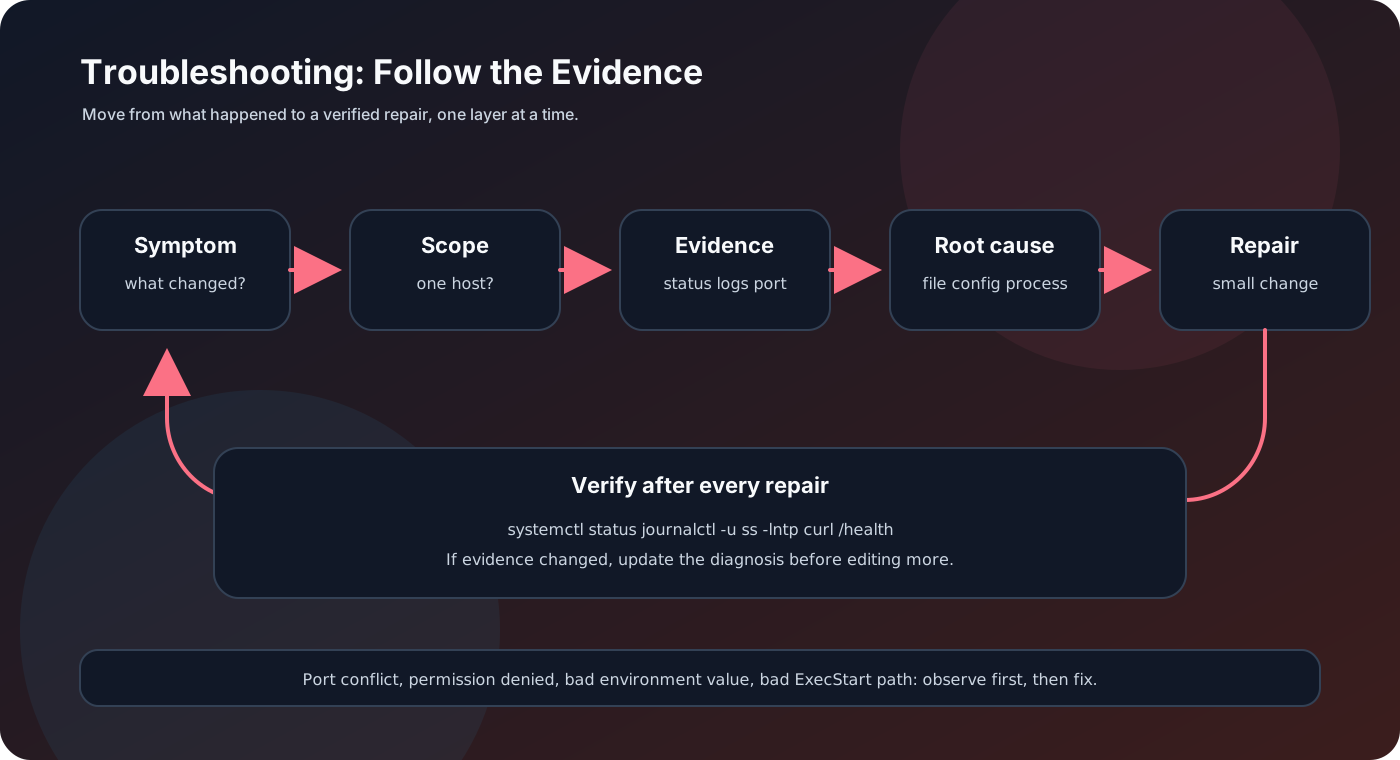
Before starting, confirm that the service from section 9 is healthy and save its working configuration. If backup files already exist, decide whether to preserve them; do not overwrite your only working baseline:
|
|
Organize your investigation in this order:
|
|
Failure A: Another program owns the port. Stop the practice service and start a temporary server in terminal A:
|
|
Leave A running and execute sudo systemctl start linux-lab in B. Request /health; it may return 404 because the port is currently served by the static file server. Checking only that “port 8000 is open” would give you the wrong conclusion.
Task: Identify the process actually listening on the port and explain why the systemd service failed to start. Restore the correct service and verify the JSON returned by /health.
Failure B: The program exists, but the service user cannot read it. After stopping the temporary server in A and restoring the practice service, run:
|
|
Task: Use the logs and permissions to find the cause. Do not fix it by running the service as root, setting the whole directory to 777, or reinstalling Python.
Failure C: An environment variable contains an invalid value. After fixing B, run sudo nano /etc/linux-lab.env, change APP_PORT=8000 to APP_PORT=oops, save, and run sudo systemctl restart linux-lab.
Task: Confirm that Python fails while reading the port configuration. Explain why export APP_PORT=8000 in the current terminal does not fix the service. Correct the file the service actually reads and verify it again.
Failure D: The interpreter path is misspelled. After fixing C, run sudo nano /etc/systemd/system/linux-lab.service. In ExecStart, change only .venv/bin/python to .venv/bin/python-missing, then run:
|
|
Task: Use the systemd state and logs to distinguish “Python started and reported an error” from “the interpreter could not be executed.” After repairing the path, explain why this change requires daemon-reload.
Reference: diagnostic evidence and recovery steps
Start with these read-only checks. Gather evidence before changing configuration:
|
|
| Failure | Typical evidence | Recovery |
|---|---|---|
| A | Logs contain Address already in use; the PID in ss belongs to the temporary static server |
Press Ctrl+C in terminal A, where you started that server, then start linux-lab |
| B | Python reports Permission denied when opening app.py; the file mode is ---------- |
Run sudo chmod 644 /opt/linux-lab/app.py and keep the regular service user |
| C | Python logs contain ValueError, and the port value is oops |
Set the port in /etc/linux-lab.env back to 8000 |
| D | The state commonly shows 203/EXEC, and the interpreter path does not exist |
Restore .venv/bin/python, then run daemon-reload |
In B, the interpreter starts successfully, so failure to read the application file usually appears as a Python exit status. In D, executing the interpreter itself fails. Exact log messages vary by version; use the actual output as your evidence.
If repeated failures trigger the service’s start-rate limit, fix the cause, run sudo systemctl reset-failed linux-lab, and then start it. Do not repeatedly reset the failed state without repairing the underlying problem.
After all four cases, you can restore the original configuration from the baseline you checked earlier:
|
|
Confirm that the temporary static server has stopped, then check the service state, listening process, /health contents, and latest logs. Verify each failure’s repair individually, not just once after all four cases.
For problems outside this tutorial, use the same sequence to narrow the search:
|
|
Hands-on exercise: Observe and compare the state and logs for all four failures, and check the endpoint response after every repair.
12. Command Reference and Further Reading
The following table brings together concepts that are easy to confuse:
| Common question | Key points |
|---|---|
| What should I check first when a service is unreachable? | Confirm the machine and address, inspect the process and logs, then check the listener and the layer indicated by curl’s error |
| Why is the endpoint wrong even though the port is open? | The wrong process may own the port; correlate its PID with the actual response contents |
| Why does a program work in my terminal but fail under systemd? | Check differences in user, directory, interpreter path, permissions, and environment variables |
Why is chmod 777 not a general fix? |
It can conceal ownership or parent-directory problems while broadening access |
How do nohup and systemd differ? |
The former mainly handles hangups; the latter manages lifecycle, logging, and restarts |
| Does low free memory mean the machine is out of memory? | Consider available memory, caches, processes, and OOM evidence |
| How do I prove a backup succeeded? | Restore it to a new directory and compare the contents; an archive’s existence is insufficient |
| What makes a Shell script reliable? | Argument validation, quoting, exit status, failure handling, and behavior across repeated runs |
When you need to perform an operation, start with these commands:
| Purpose | Useful starting points |
|---|---|
| Identify who and where you are | whoami, id, hostname, pwd |
| Find files and inspect contents | find, grep -n, less, tail -F |
| Inspect permissions | ls -ld, namei -l |
| Inspect processes and resources | ps, top, free -h, df -h, df -i, du |
| Inspect connections | ss -lntp, curl -v, getent hosts |
| Inspect services | systemctl status, systemctl cat, journalctl -u |
| Log in and transfer files | ssh, scp, rsync |
| Look up help | command --help, man command |
Once you are comfortable with these basics, follow your actual needs into Docker, reverse proxies, database administration, CI, or deeper system monitoring. Kernel compilation, driver development, and advanced kernel tracing are more specialized topics to explore when relevant problems arise.
Official references: Bash manual, GNU Coreutils manual, Ubuntu Server documentation, OpenSSH manual, and systemd documentation. If an option differs from this article, start with the practice machine’s local man pages, which usually match the installed version more closely.