K8s Container Cloud Deployment: From Dockerfile Image Build to Release
When deploying services to an internal Kubernetes container cloud platform, the console form is only the final step. The real deployment path is: the code builds reliably, the Dockerfile produces a correct image, the image runs locally, the image is pushed to a registry, and Kubernetes can pull and run it with healthy probes.
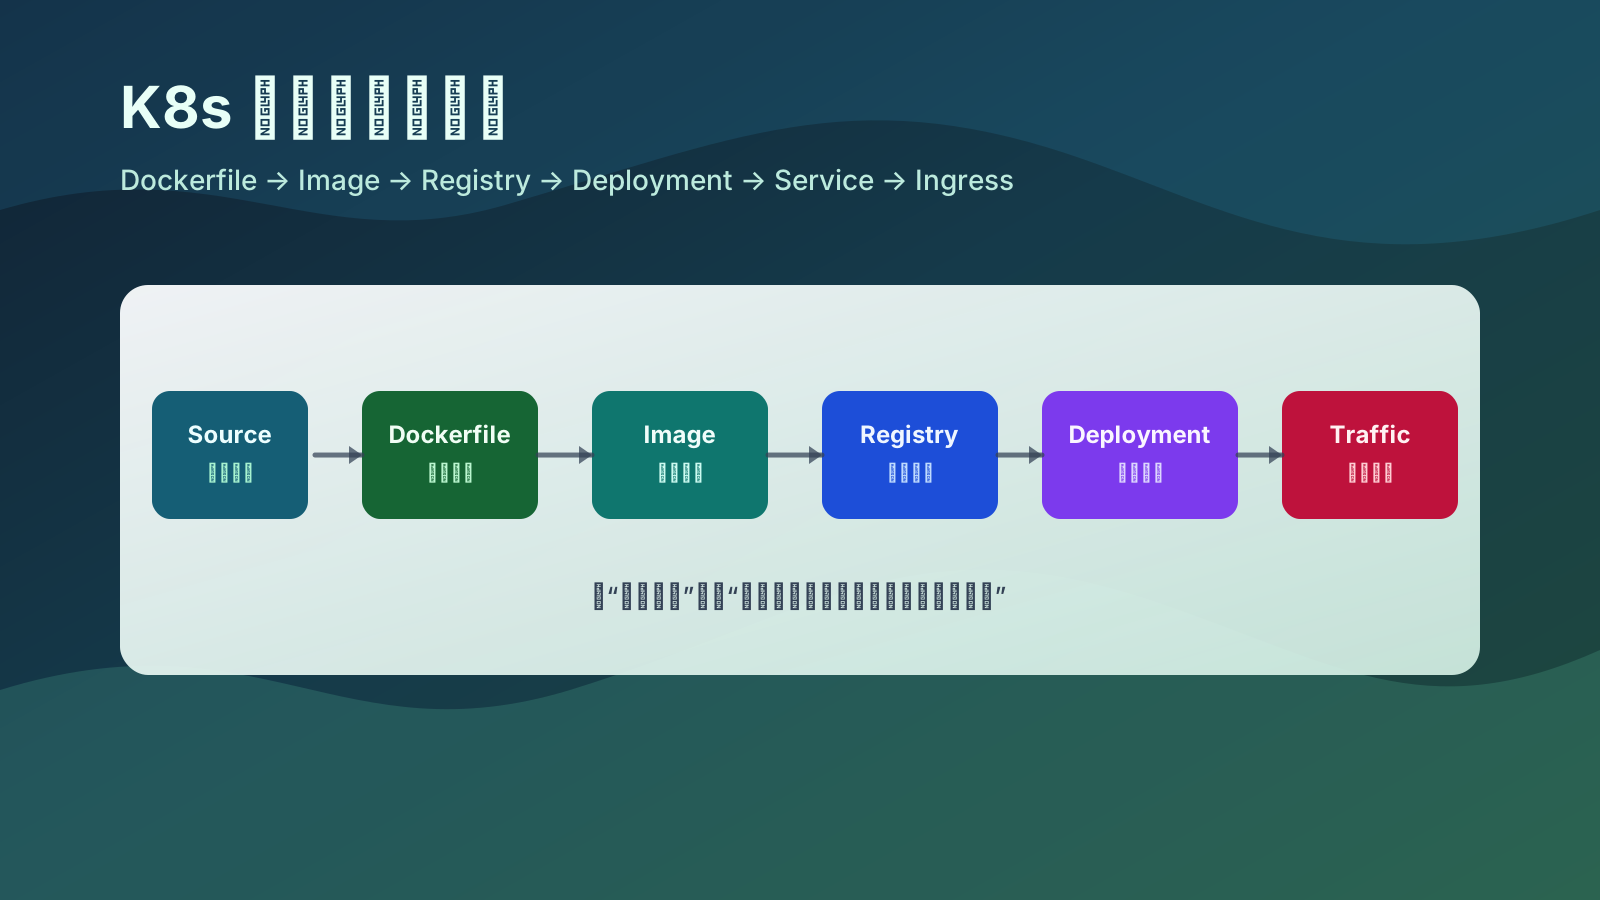
This article follows the order of a real deployment and uses the China Telecom Cloud CeakE Container Service CKE console for the UI walkthrough. Other consoles may use different labels, but the underlying Kubernetes concepts—workloads, Services, Ingress, probes, and rolling updates—map closely.
1. What to confirm before deployment
Write down the deployment inputs before touching the platform page.
| Item | What to confirm | Example |
|---|---|---|
| Startup command | How the service starts and which port it listens on | java -jar app.jar, ./server, npm start, port 8080 |
| Dockerfile | Whether the project has a repeatable image build | Dockerfile, .dockerignore |
| Registry | Registry address, project path, credentials | registry.example.com/team/order-api |
| Namespace | Target project or Kubernetes namespace | team-dev, team-test, team-prod |
| Configuration | Runtime config and secrets | APP_ENV, database URL, tokens |
| Network exposure | Internal-only or external access | ClusterIP, Ingress, Route, gateway |
| Resources | CPU, memory, storage, replicas | requests: 200m/256Mi, limits: 1/1Gi |
| Health checks | Endpoint used by the platform to judge health | /healthz, /actuator/health |
Most platform UI fields are wrappers around Kubernetes objects:
| Platform term | Kubernetes object | Purpose |
|---|---|---|
| Application / workload | Deployment |
Manages replicas, rolling updates, and rollback |
| Instance / container group | Pod |
Smallest unit that runs containers |
| Service | Service |
Stable in-cluster endpoint for Pods |
| Route / domain / gateway | Ingress or platform entry object |
External HTTP/HTTPS entry |
| Configuration | ConfigMap |
Non-sensitive configuration |
| Secret | Secret |
Passwords, tokens, certificates |
| Registry credential | imagePullSecret |
Allows nodes to pull from private registries |
The platform hides some YAML, but Kubernetes is still the execution layer underneath.
2. The key part: building an image from Dockerfile
Kubernetes does not run source code directly. A Deployment points to an image, the node pulls that image from a registry, and the container runtime starts it as a container.
Many deployment failures actually start at the image layer:
- the build artifact was not copied into the final image;
- the container startup command is wrong;
- the service listens on
127.0.0.1instead of0.0.0.0; - required runtime config was neither baked into the image nor injected by the platform;
- the image architecture does not match cluster nodes;
- the private registry address, tag, or credential is wrong.
Dockerfile instructions you should recognize
| Instruction | Purpose | Note |
|---|---|---|
FROM |
Selects the base image | Prefer explicit versions over latest |
WORKDIR |
Sets the working directory | Affects later COPY, RUN, and CMD |
COPY |
Copies files from build context | Prefer COPY unless ADD is truly needed |
RUN |
Runs commands during image build | Used for dependency install and compilation |
ARG |
Build-time variable | Not normally kept as runtime env |
ENV |
Runtime environment default | Do not store passwords here |
EXPOSE |
Documents the container port | It does not publish the port by itself |
USER |
Selects runtime user | Avoid running production containers as root |
ENTRYPOINT |
Fixed executable entry | Good for the main process |
CMD |
Default command or arguments | Can be overridden by docker run |
The final . in this command is the build context:
|
|
Everything inside that context can be sent to the Docker builder, so add a .dockerignore:
|
|
This improves build speed, reduces image risk, and helps Docker layer caching behave predictably.
A practical image build flow
First confirm the project builds without Docker:
|
|
Dockerfile should make a stable build repeatable. It should not hide a broken local build.
Go service example
|
|
Useful details:
| Detail | Reason |
|---|---|
Copy go.mod and go.sum before source files |
Dependency download can use cache |
Set CGO_ENABLED=0 GOOS=linux GOARCH=amd64 |
Produces a Linux amd64 binary for common cluster nodes |
| Use a separate runtime stage | Keeps source and build cache out of the final image |
Run as app user |
Avoids root runtime by default |
Build and run locally:
|
|
If this local check fails, fix the image before touching Kubernetes. Check the actual port, bind address, startup command, health endpoint, and required environment variables.
Java Spring Boot example
|
|
If the service needs JVM options, keep them configurable:
|
|
Then inject runtime values from the platform:
|
|
Remember that JAVA_OPTS only works if the entrypoint actually reads it.
Node.js service example
|
|
For a static frontend, the runtime image can be Nginx instead of Node:
|
|
Image tag strategy
Avoid using only latest in production. It is hard to trace and hard to rollback.
Better options:
|
|
Example:
|
|
At minimum, keep the Git SHA:
|
|
If the platform supports image digests, production can pin an immutable reference:
|
|
Tags are readable; digests are immutable.
Match image architecture with cluster nodes
If the image is built on ARM but the cluster runs amd64 nodes, the Pod may fail with exec format error.
Build amd64 explicitly:
|
|
Push to registry
Check the local image:
|
|
Log in:
|
|
Retag if needed:
|
|
Push:
|
|
The cluster will not use images stored only in your local Docker daemon. A real platform pulls from the registry.
3. Create the workload on the platform
Once the image exists in the registry, create the workload. The screenshots below show the complete console flow.
Check the cluster and available capacity
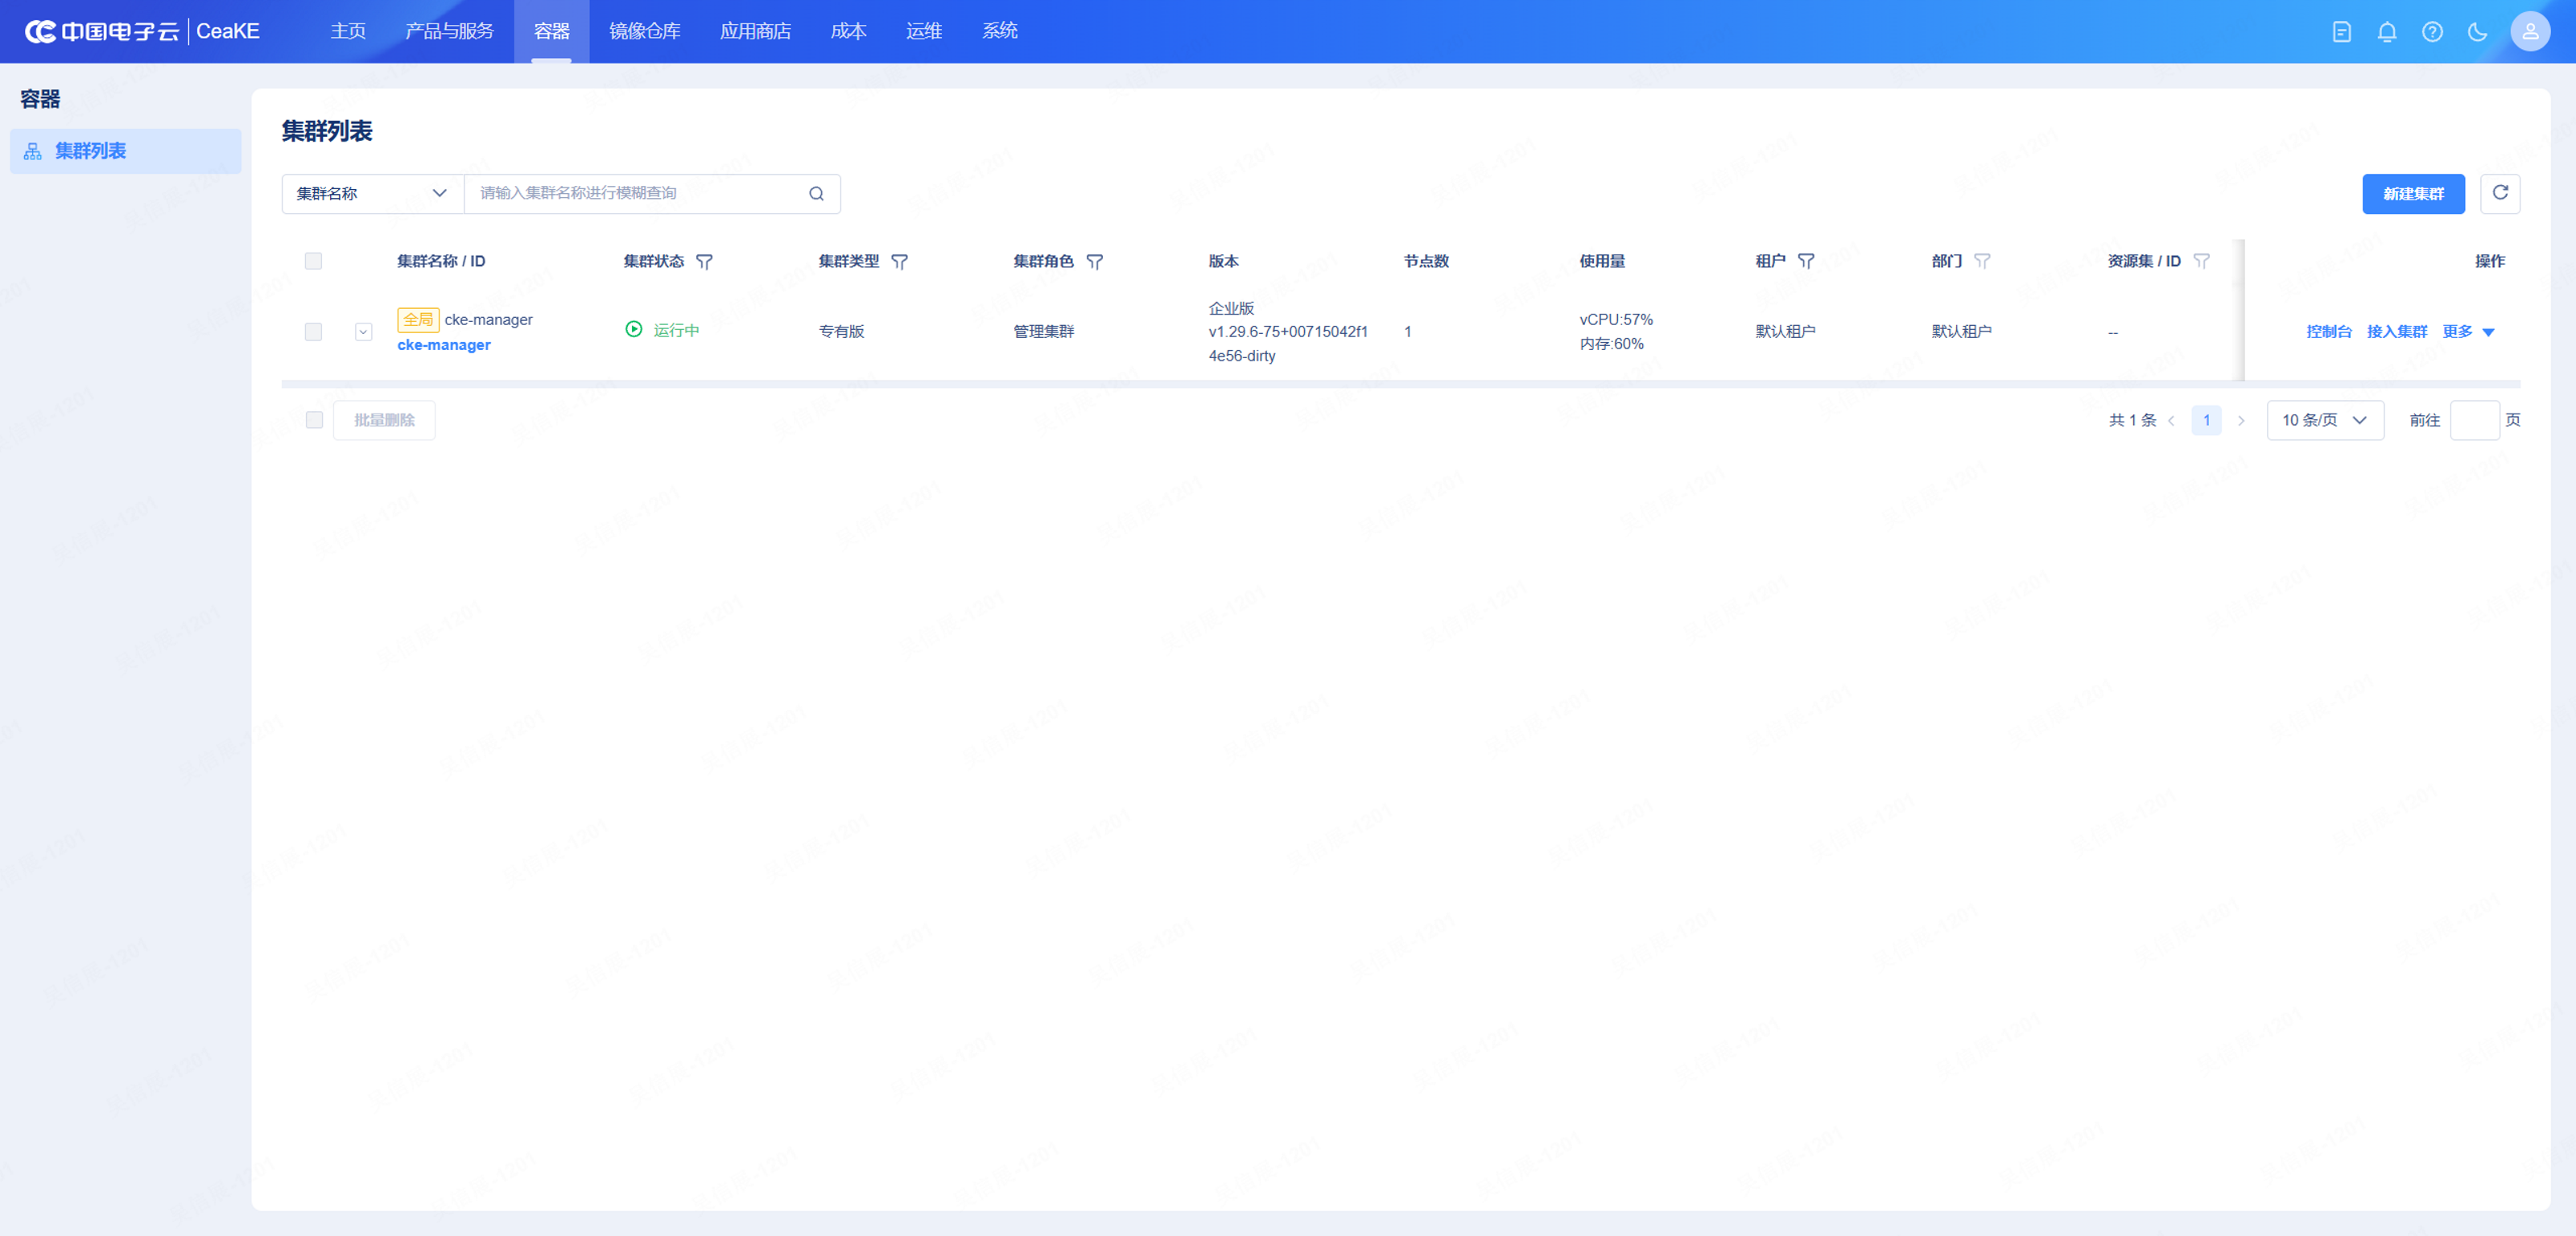
Open Container → Cluster List, locate the target cluster, and confirm that it is running. Check the cluster type, version, node count, and tenant before entering the console so the service is not deployed to the wrong environment.
The cluster overview summarizes Deployment, StatefulSet, DaemonSet, Job, CronJob, and Pod counts together with node health and CPU, memory, and disk usage.
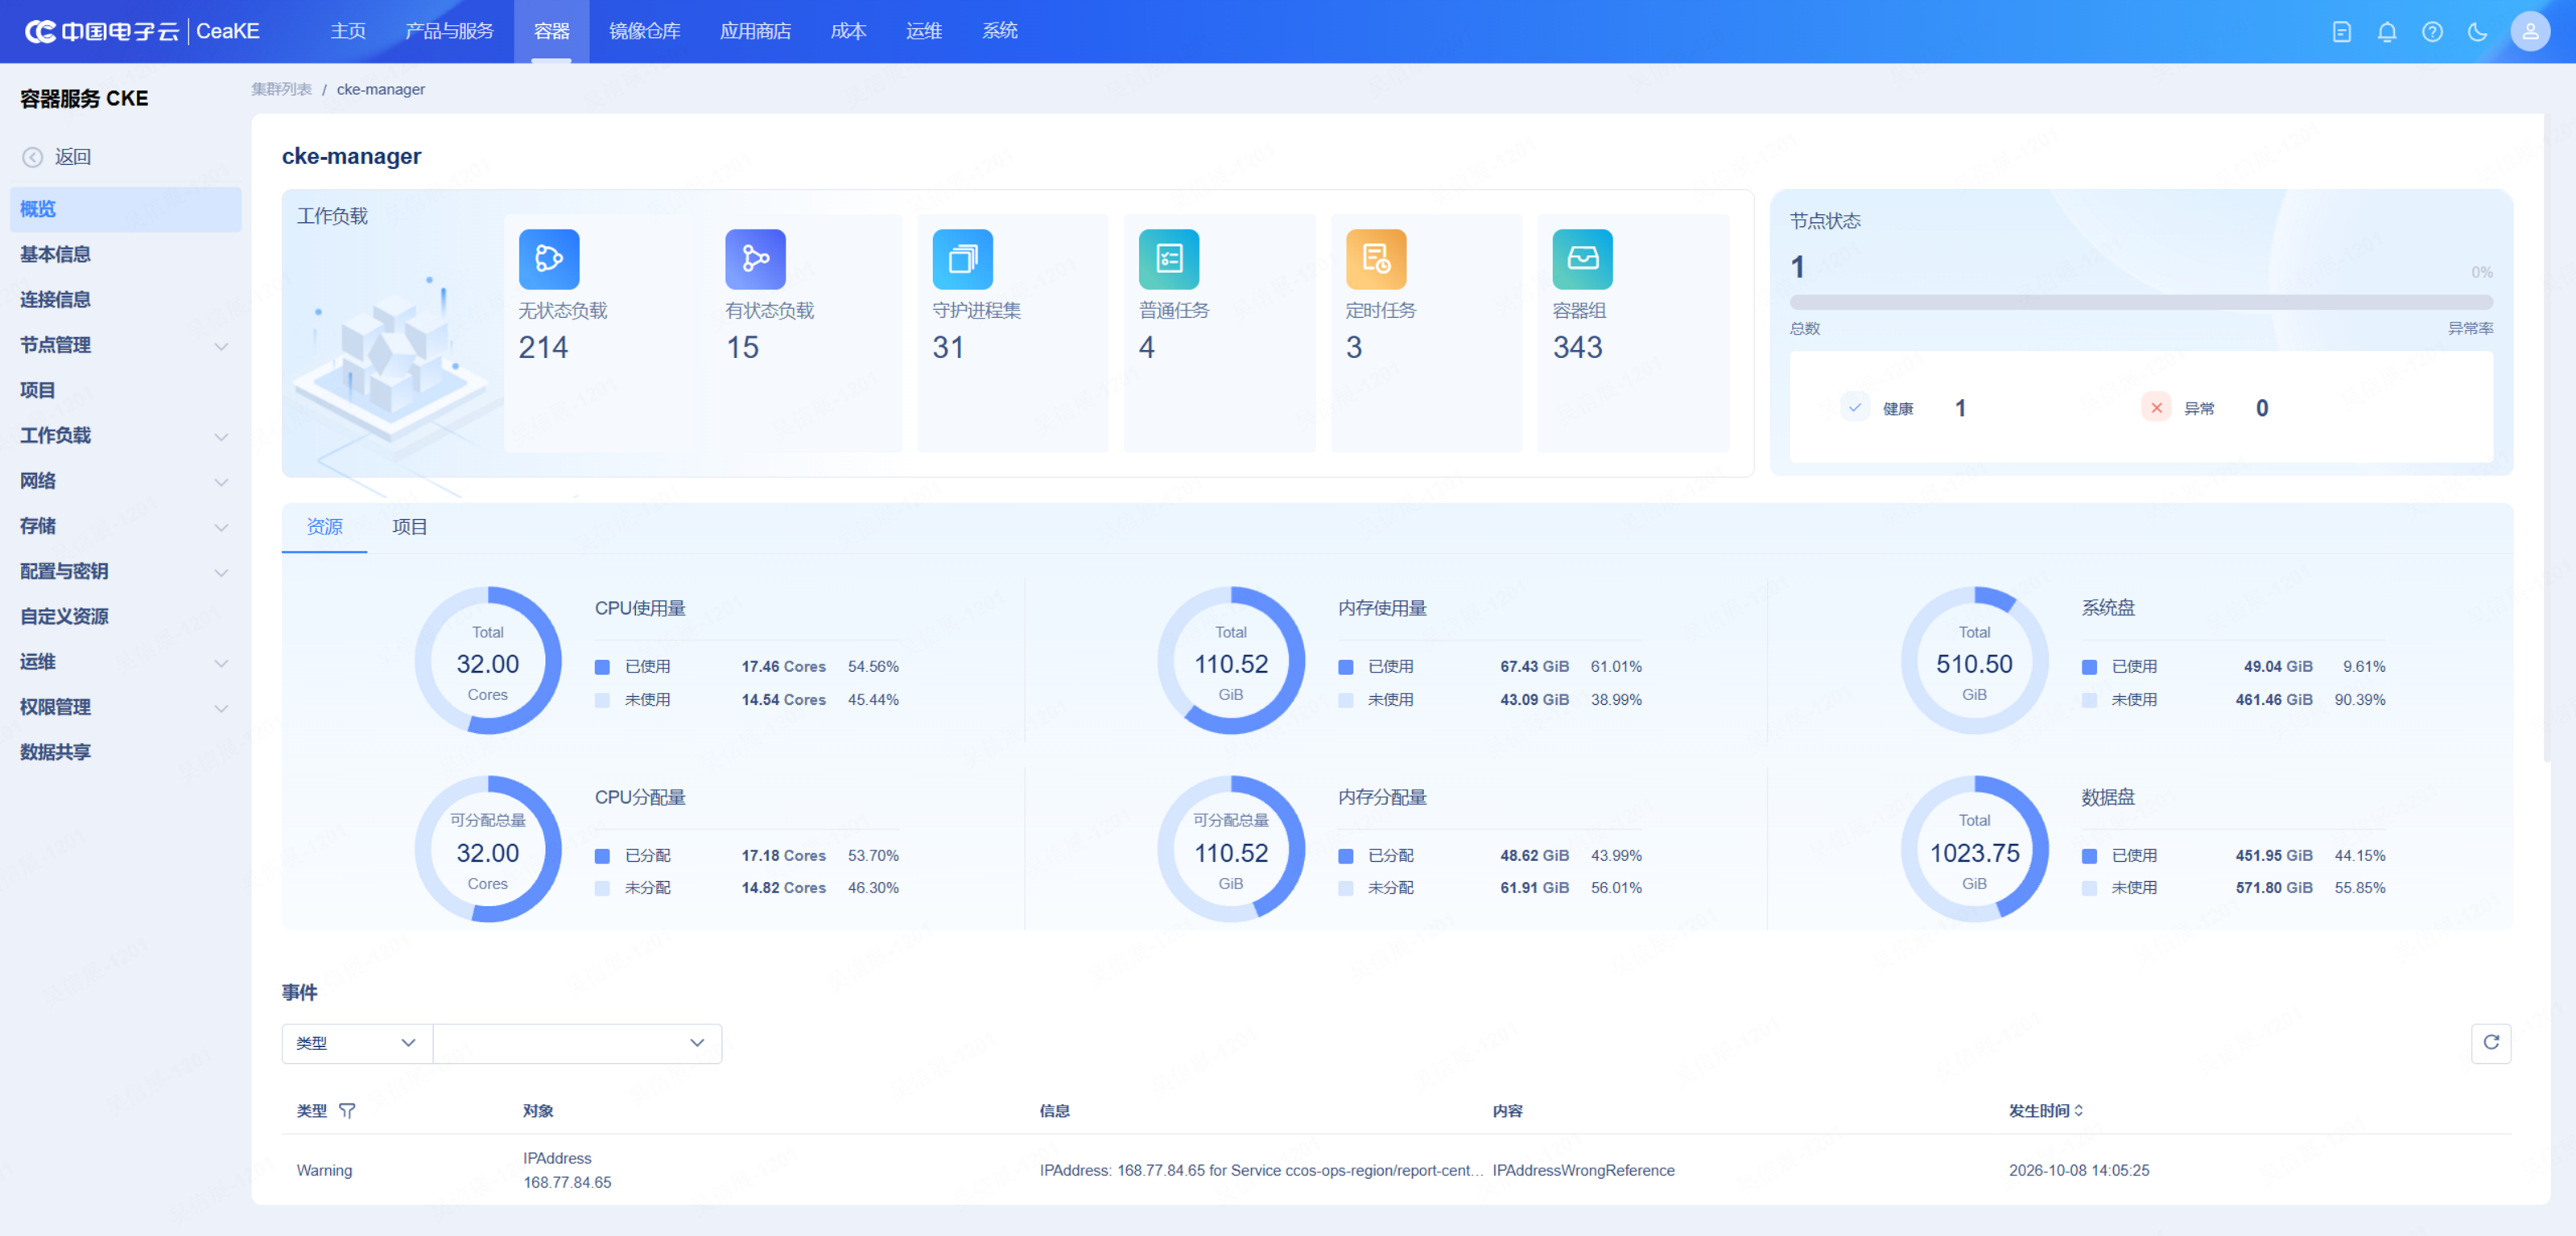
Do not rely on the green node status alone. Check resource headroom and recent warning events as well. If requests exceed the remaining allocatable resources, a new Pod can stay Pending even when every node is healthy.
Choose the correct workload type
The Workloads menu contains more than Deployment. Choose the controller based on how the process should run:
| Console entry | Kubernetes object | Best fit |
|---|---|---|
| Stateless workload | Deployment |
Replaceable and horizontally scalable web or API services |
| DaemonSet | DaemonSet |
One instance per node, such as logging or monitoring agents |
| Stateful workload | StatefulSet |
Stable identity, ordered rollout, or persistent storage |
| Job | Job |
One-time work that exits after completion |
| CronJob | CronJob |
Work executed periodically from a Cron schedule |
| Pod | Pod |
Inspecting and troubleshooting runtime instances; rarely a direct long-lived deployment choice |
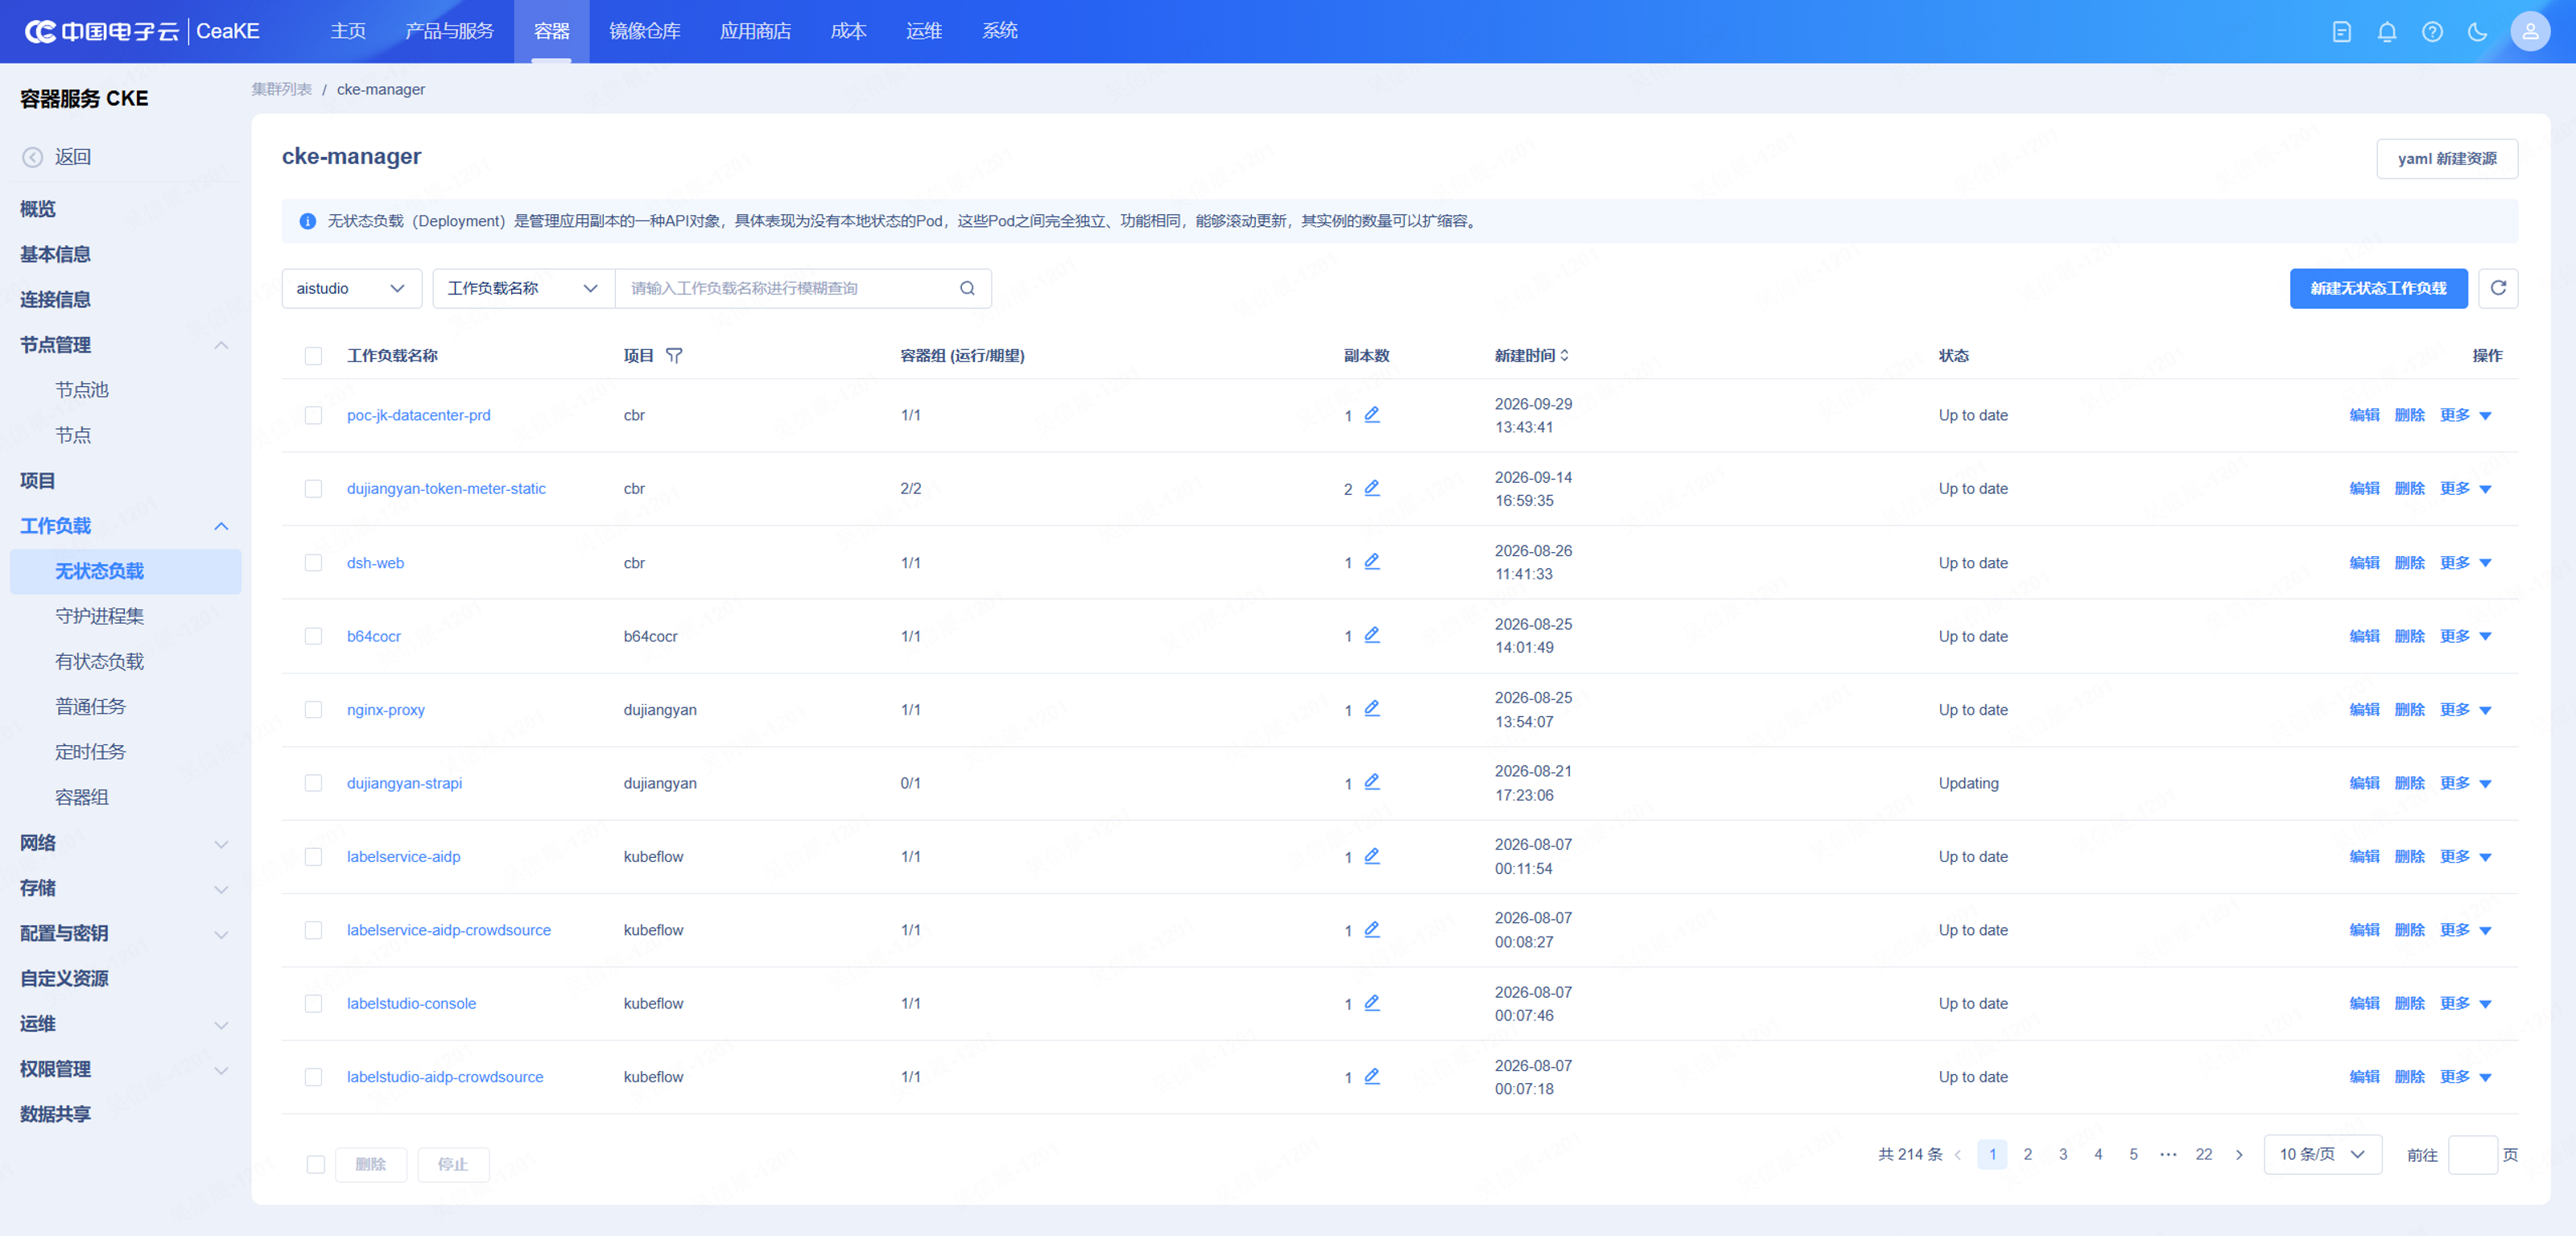
The running/desired Pod count, replica count, and status provide a quick rollout check. A row showing 0/1 and Updating, for example, has not reached the desired state.
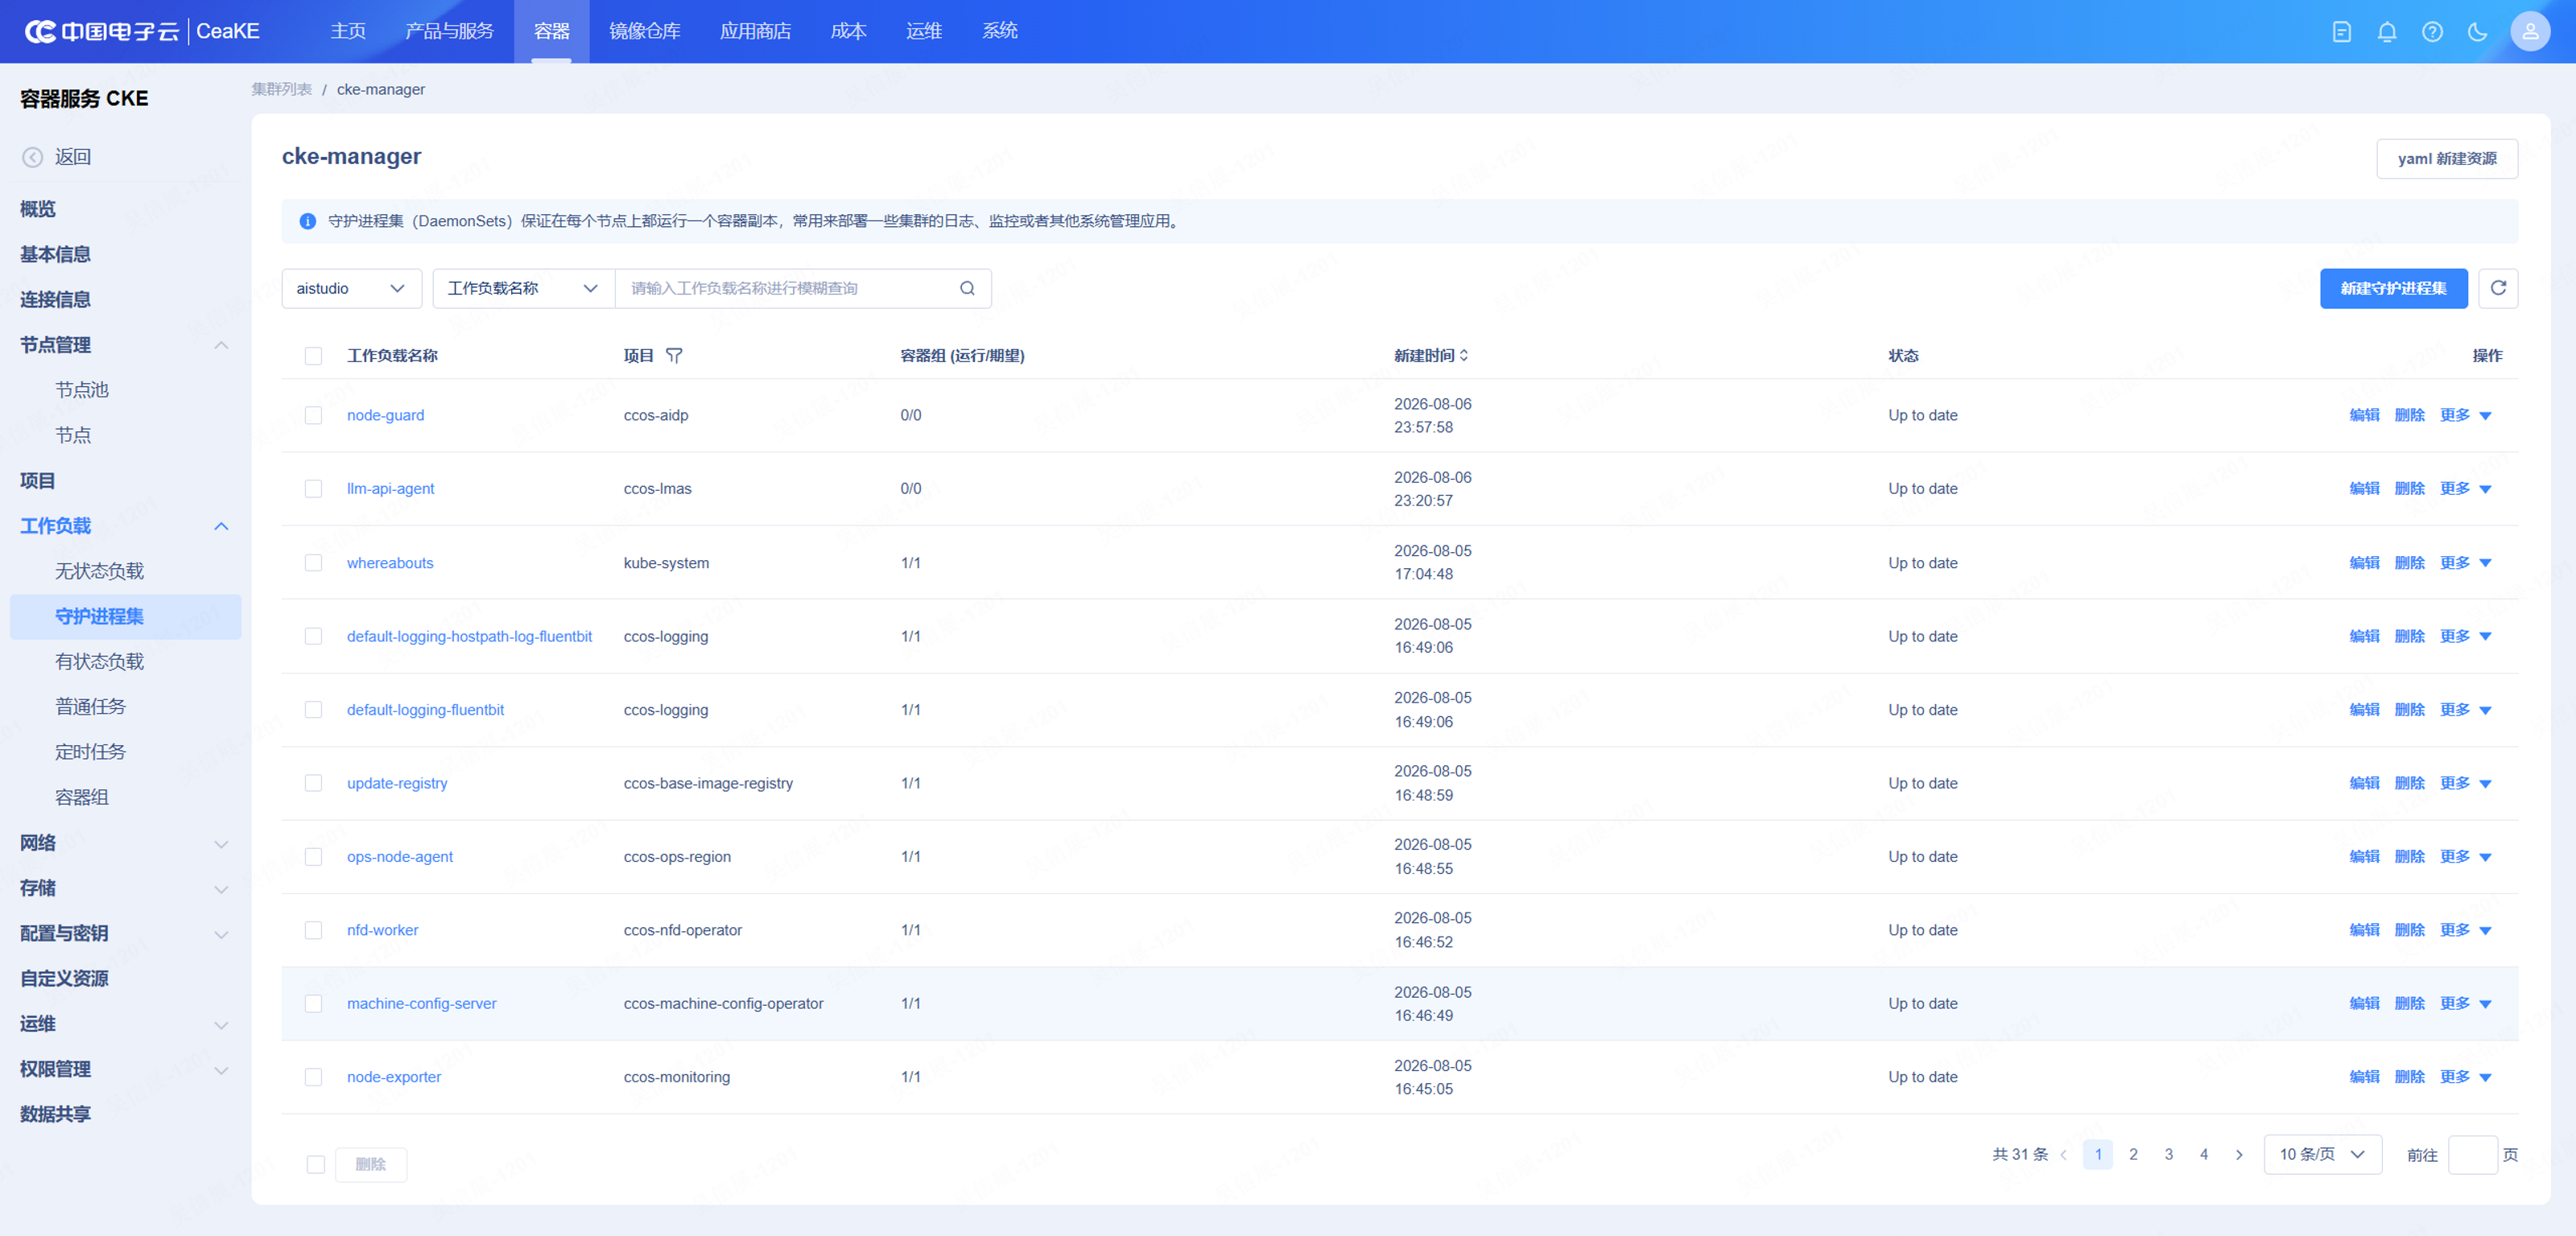
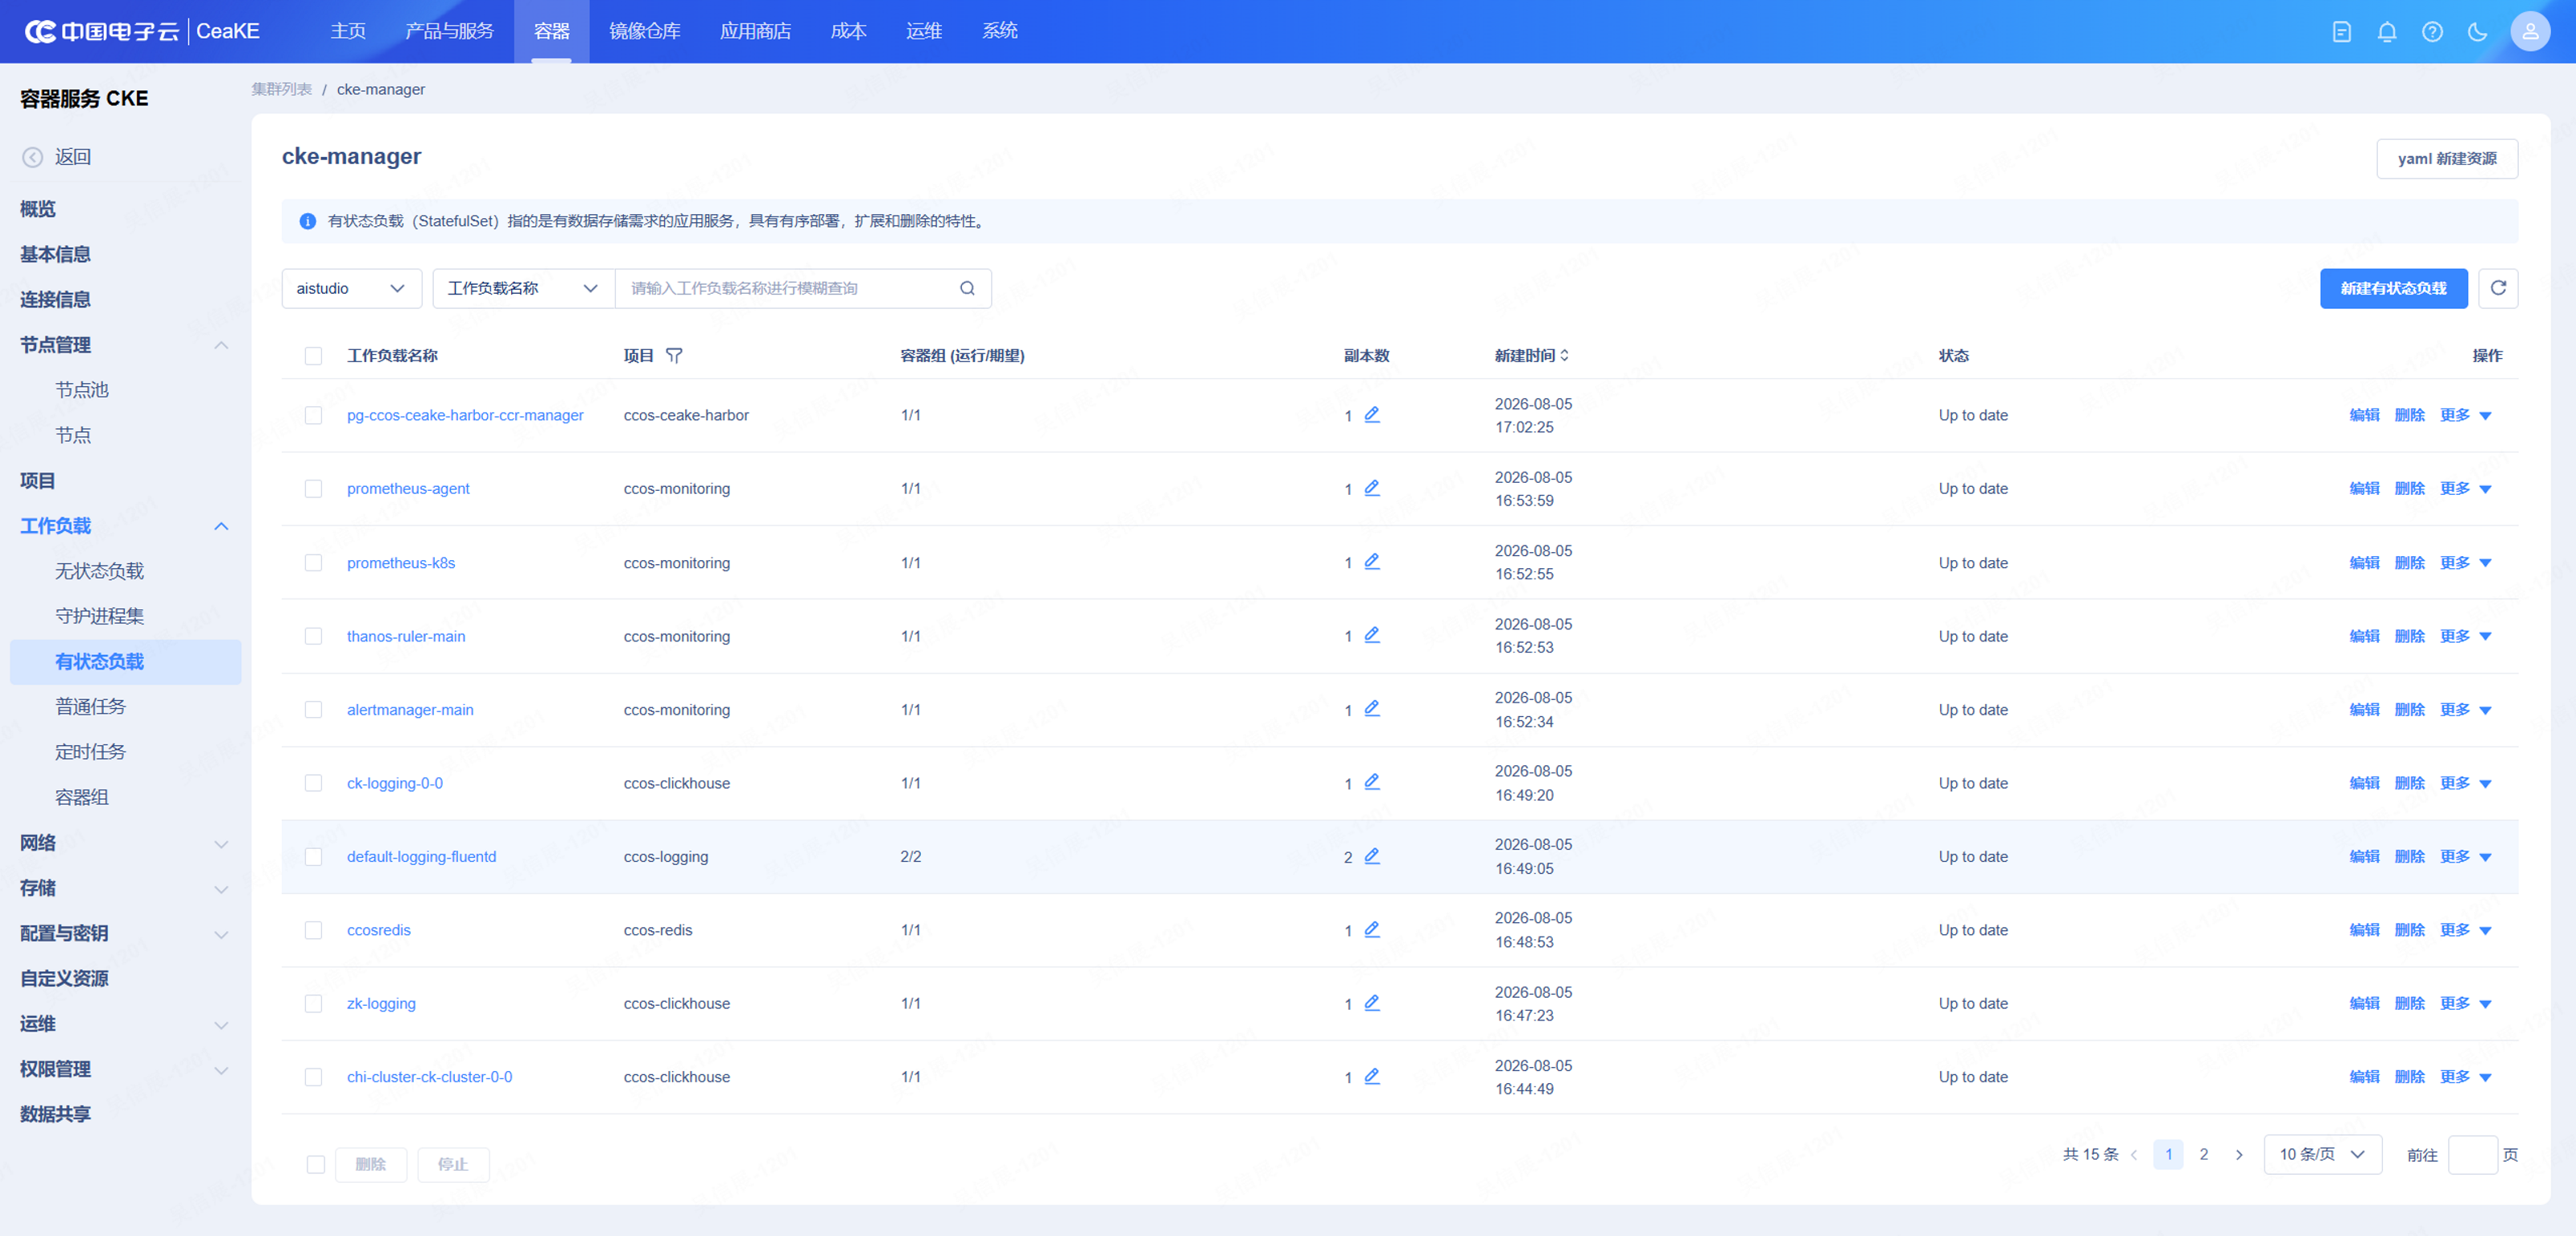
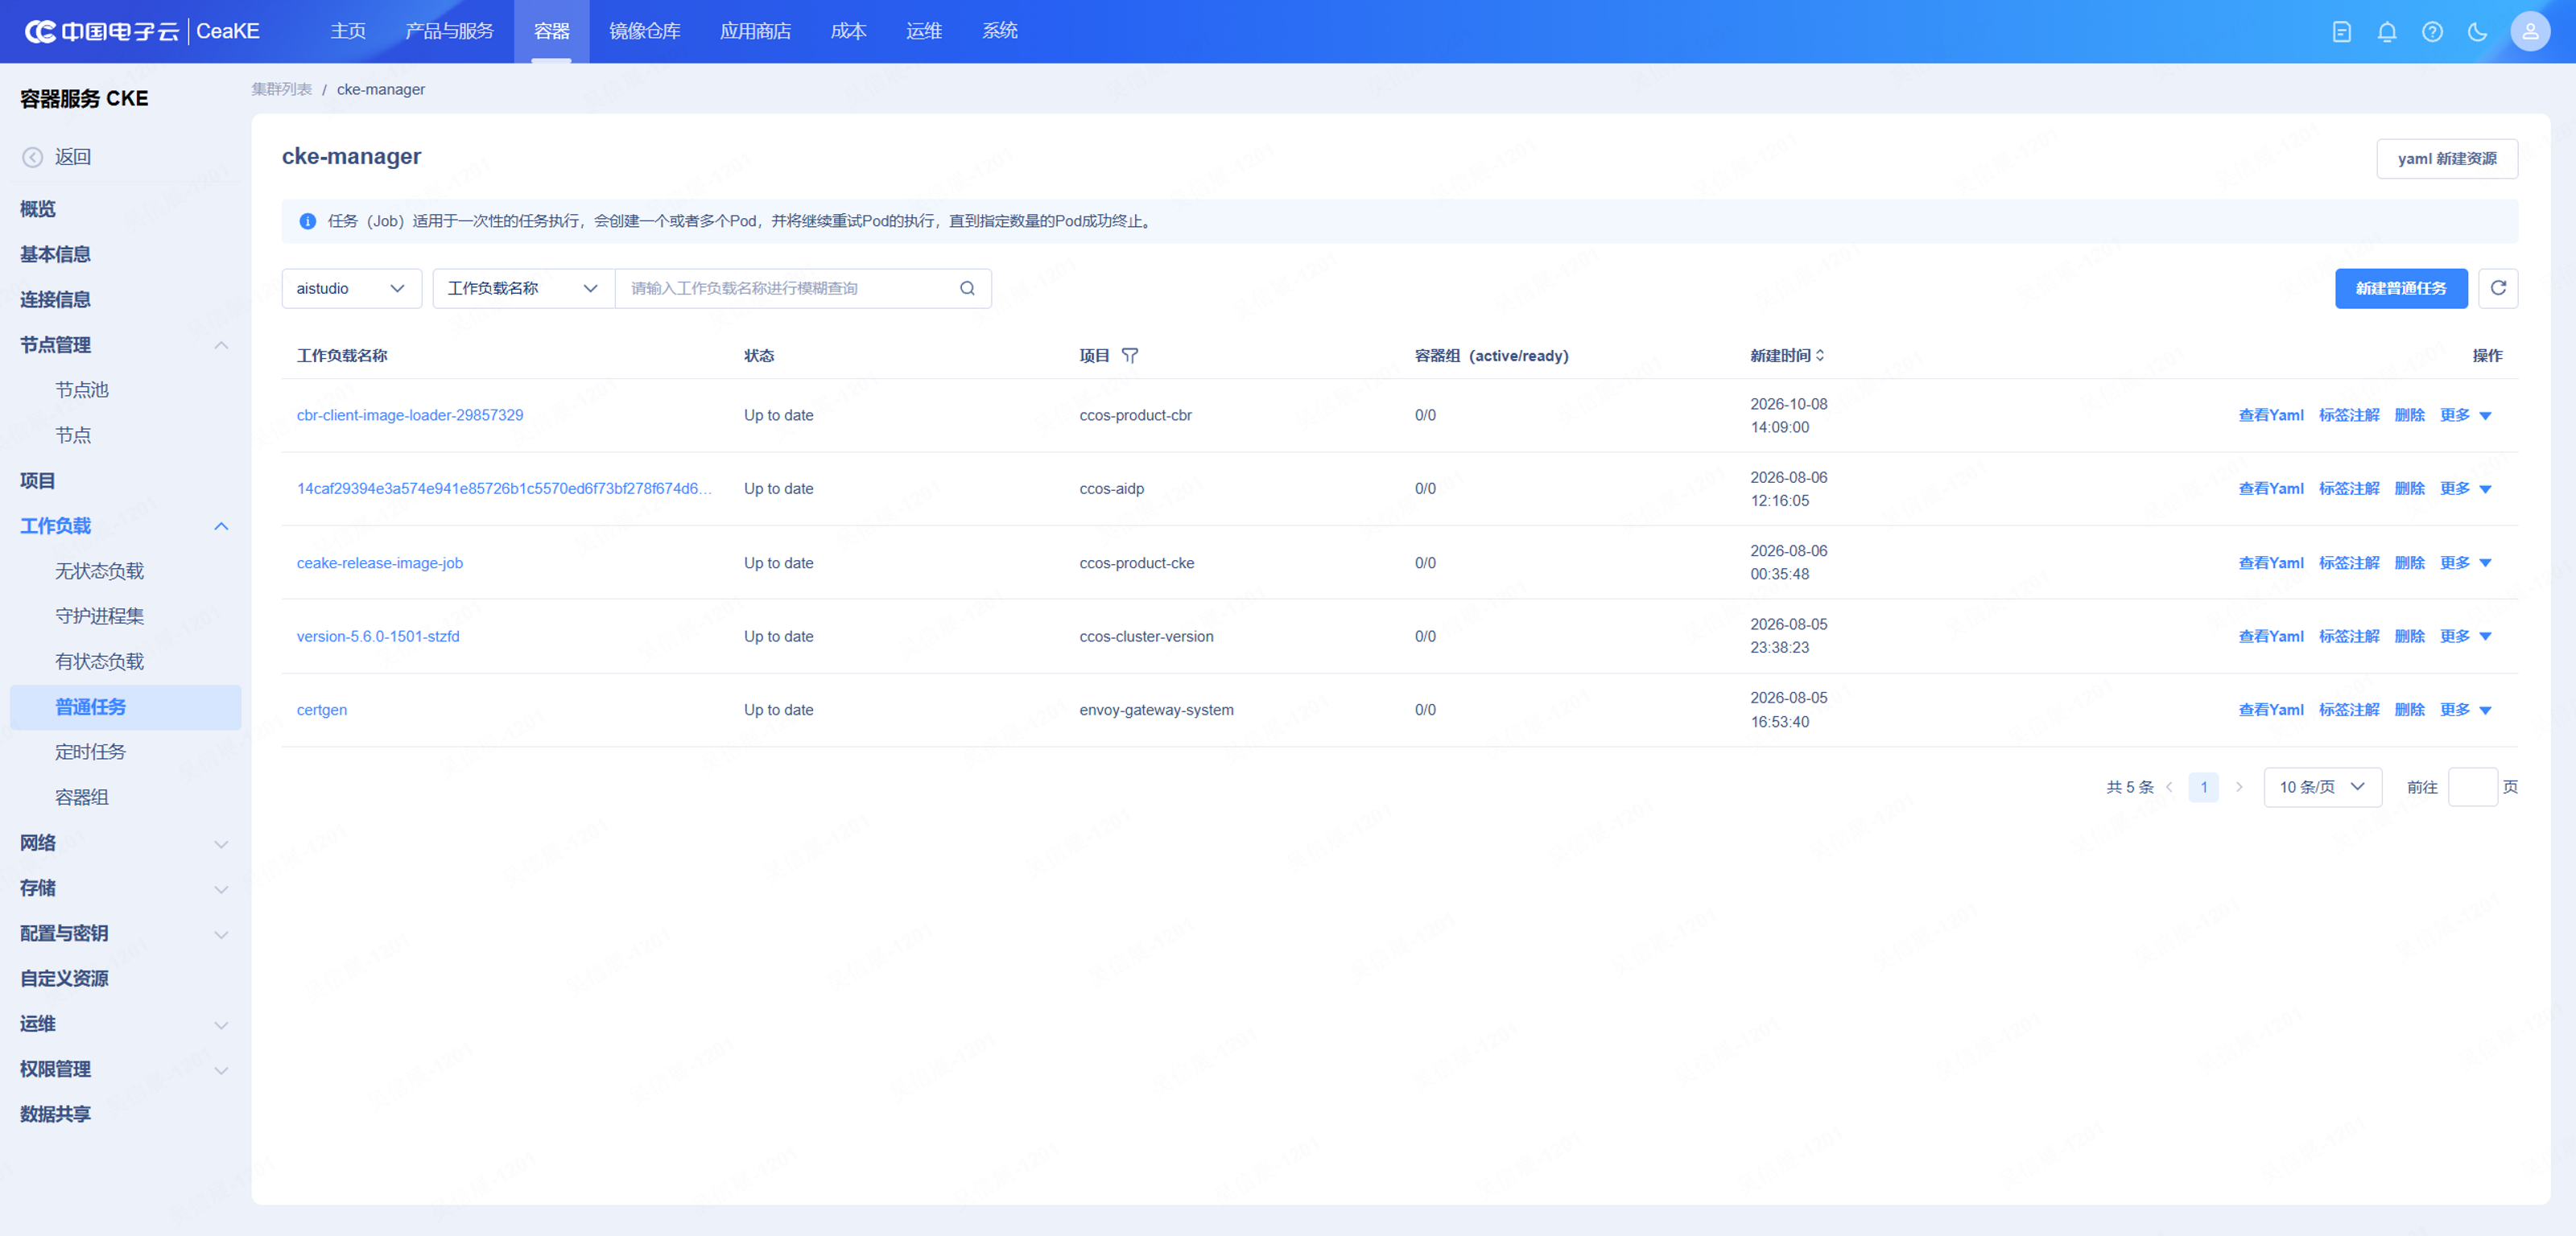
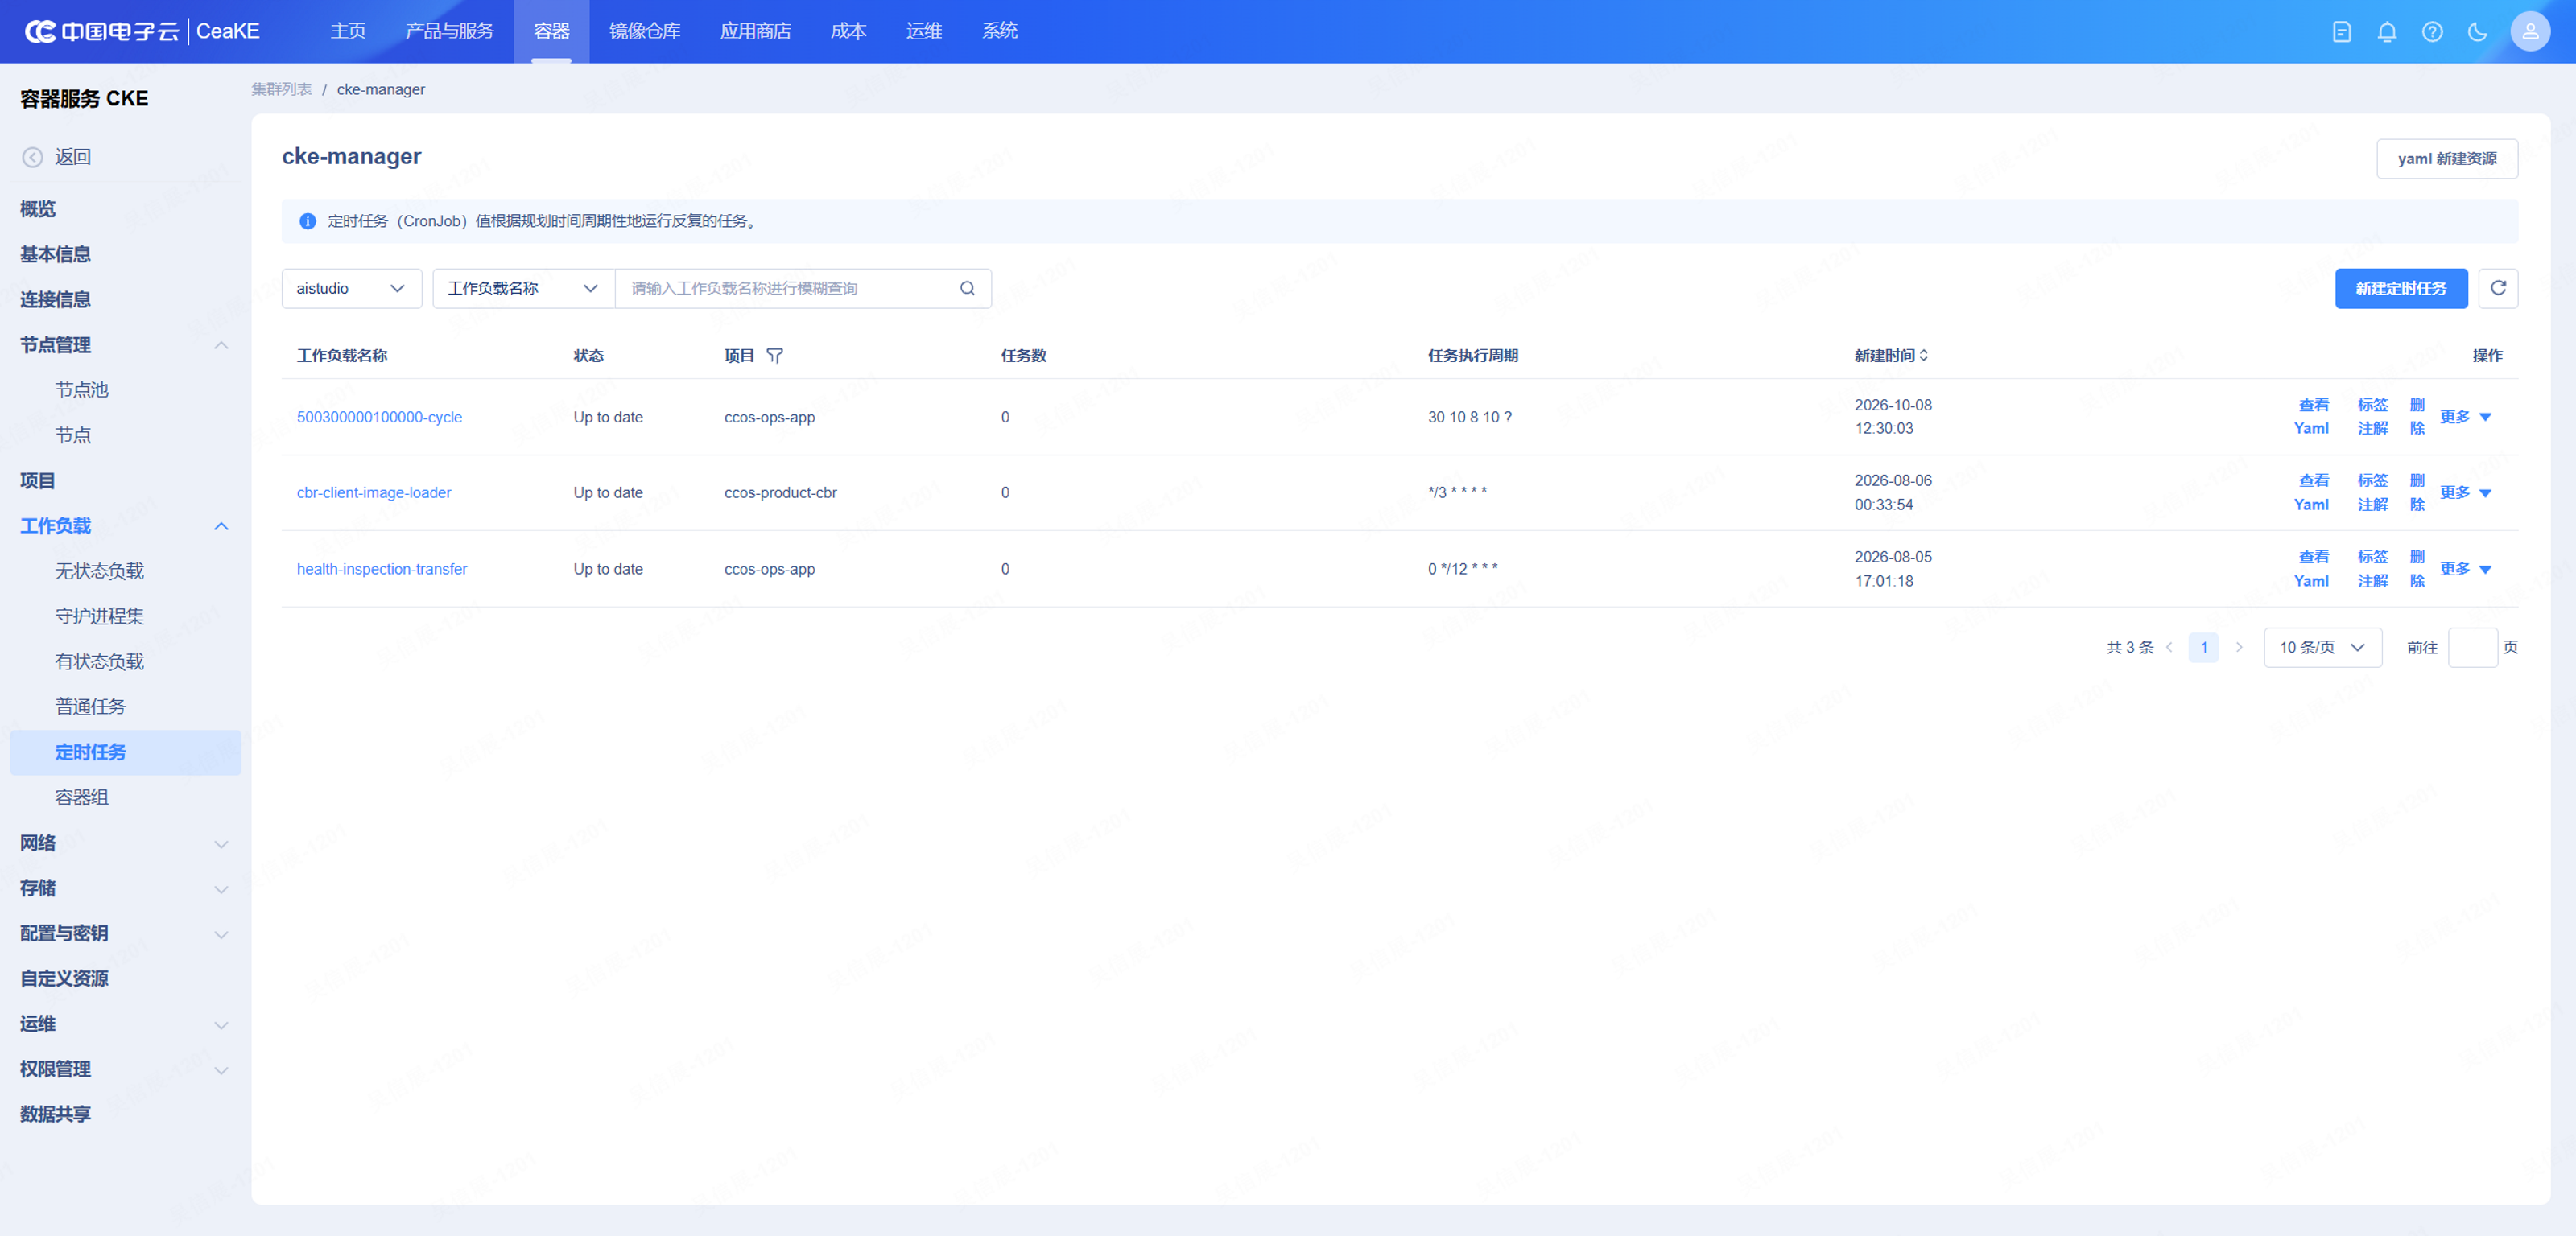
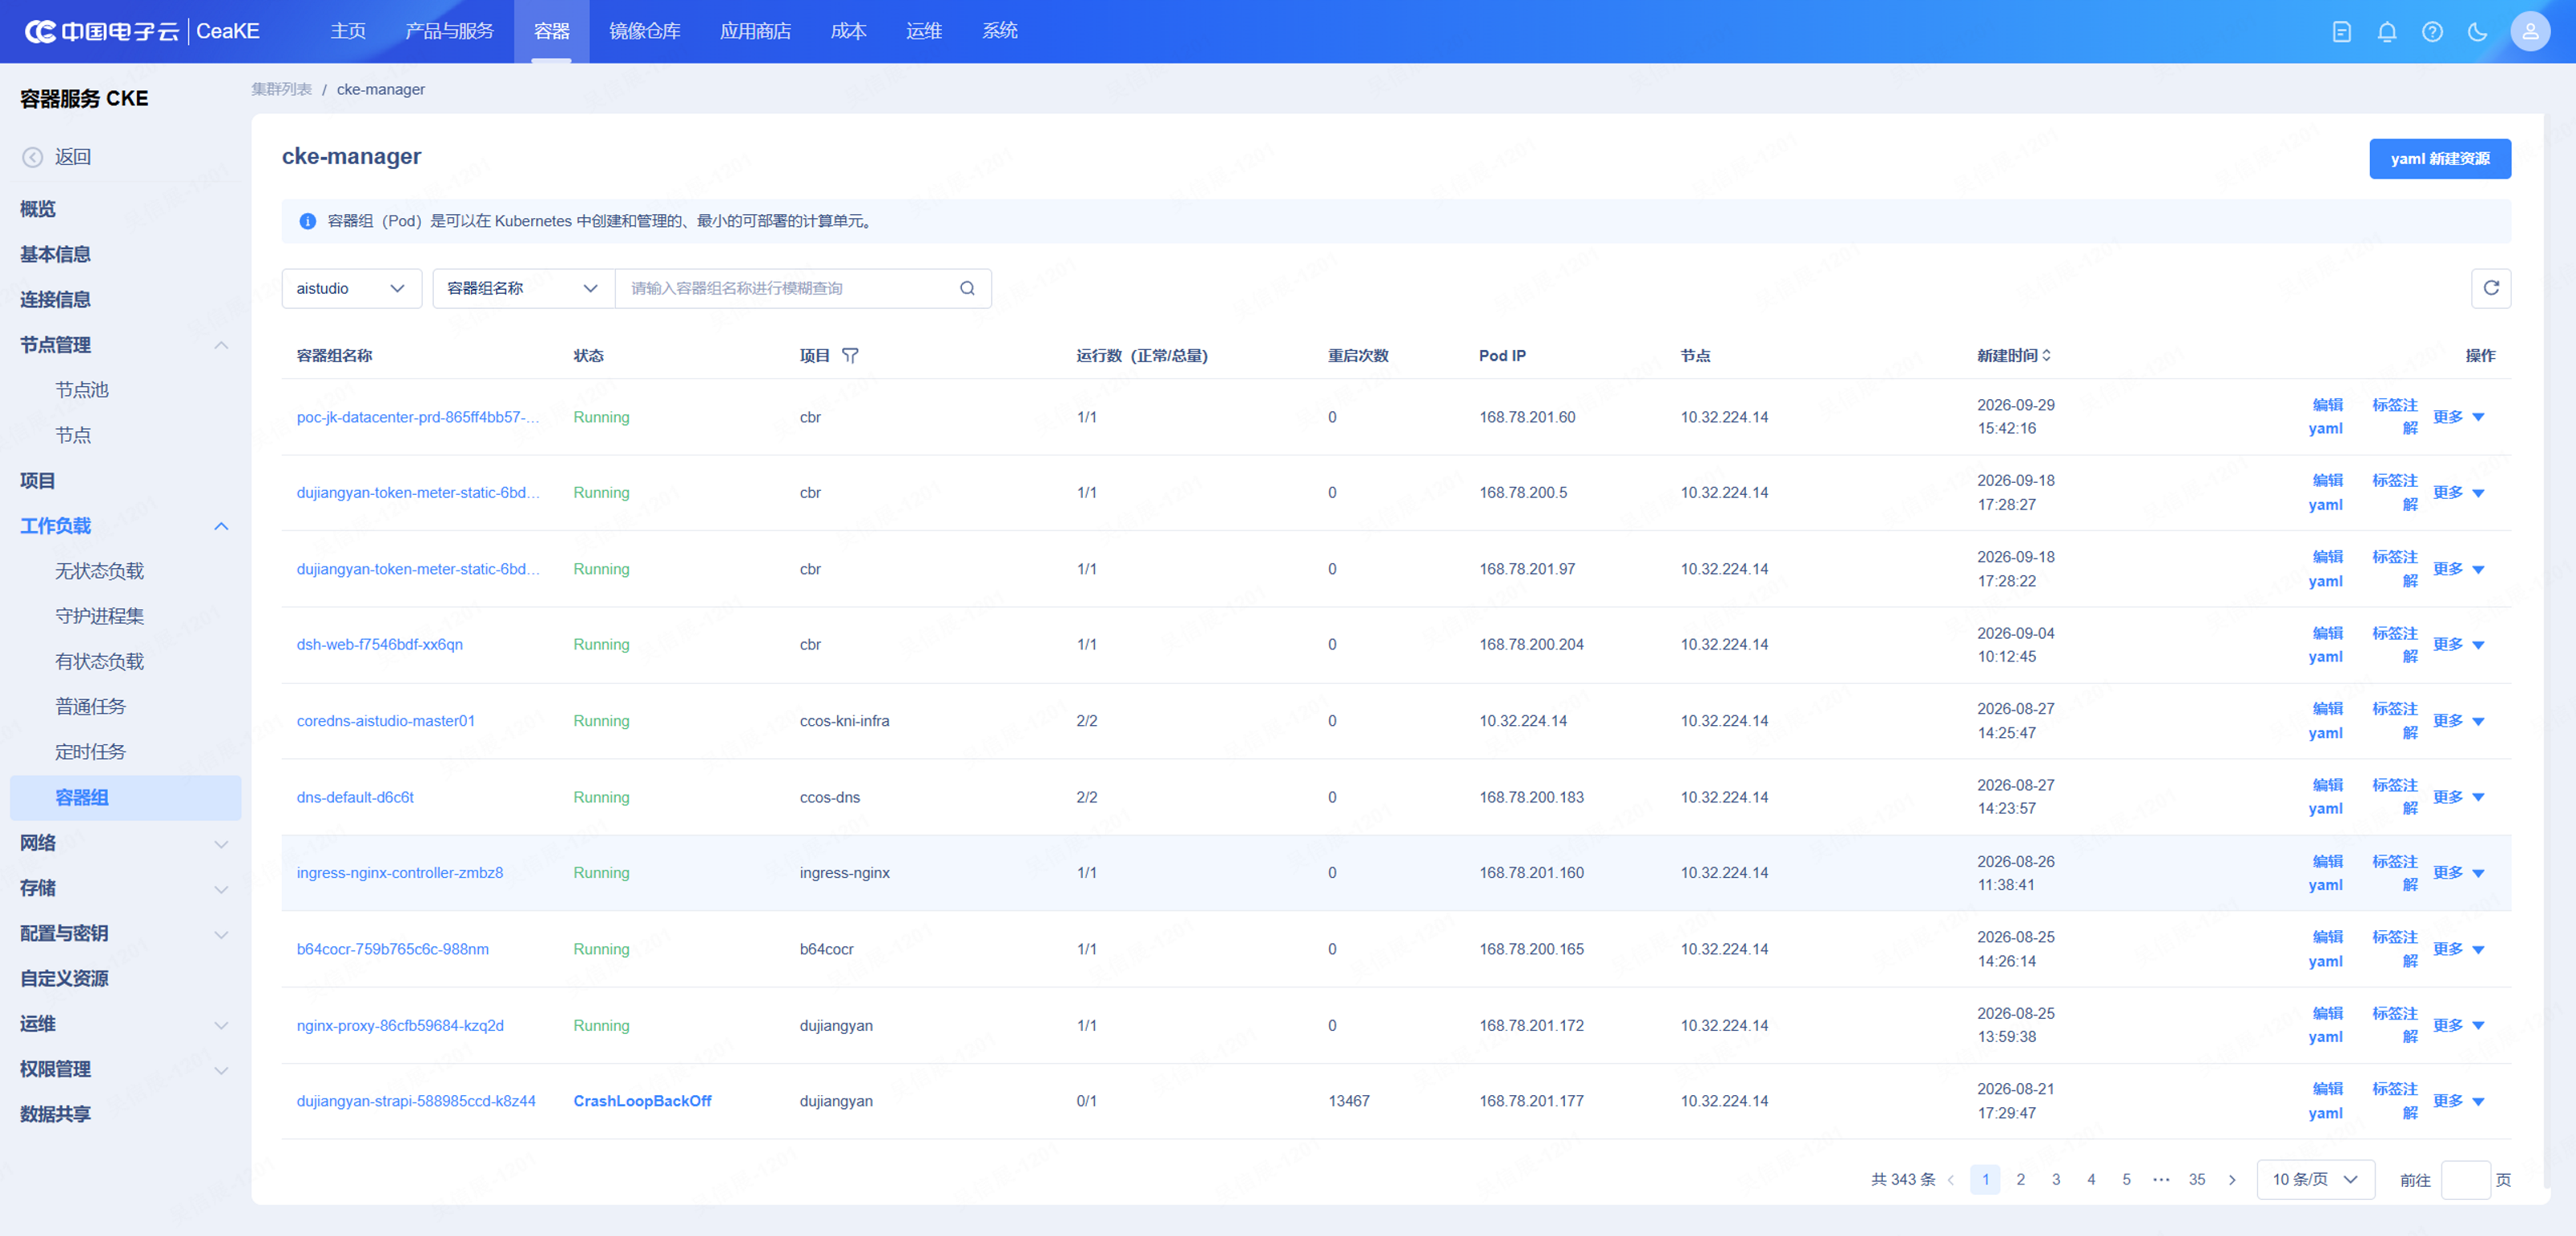
The Pod page is especially useful during incidents because it shows status, ready containers, restart count, Pod IP, and node. The CrashLoopBackOff row and very high restart count in the screenshot are direct failure signals; inspect container logs, previous logs, and Pod events before changing Service or Route settings.
Create a Deployment with the four-step wizard
From Stateless Workload, select Create Stateless Workload. The wizard is divided into Basic Information, Container Configuration, Service Configuration, and Advanced Configuration.
Step 1: basic information
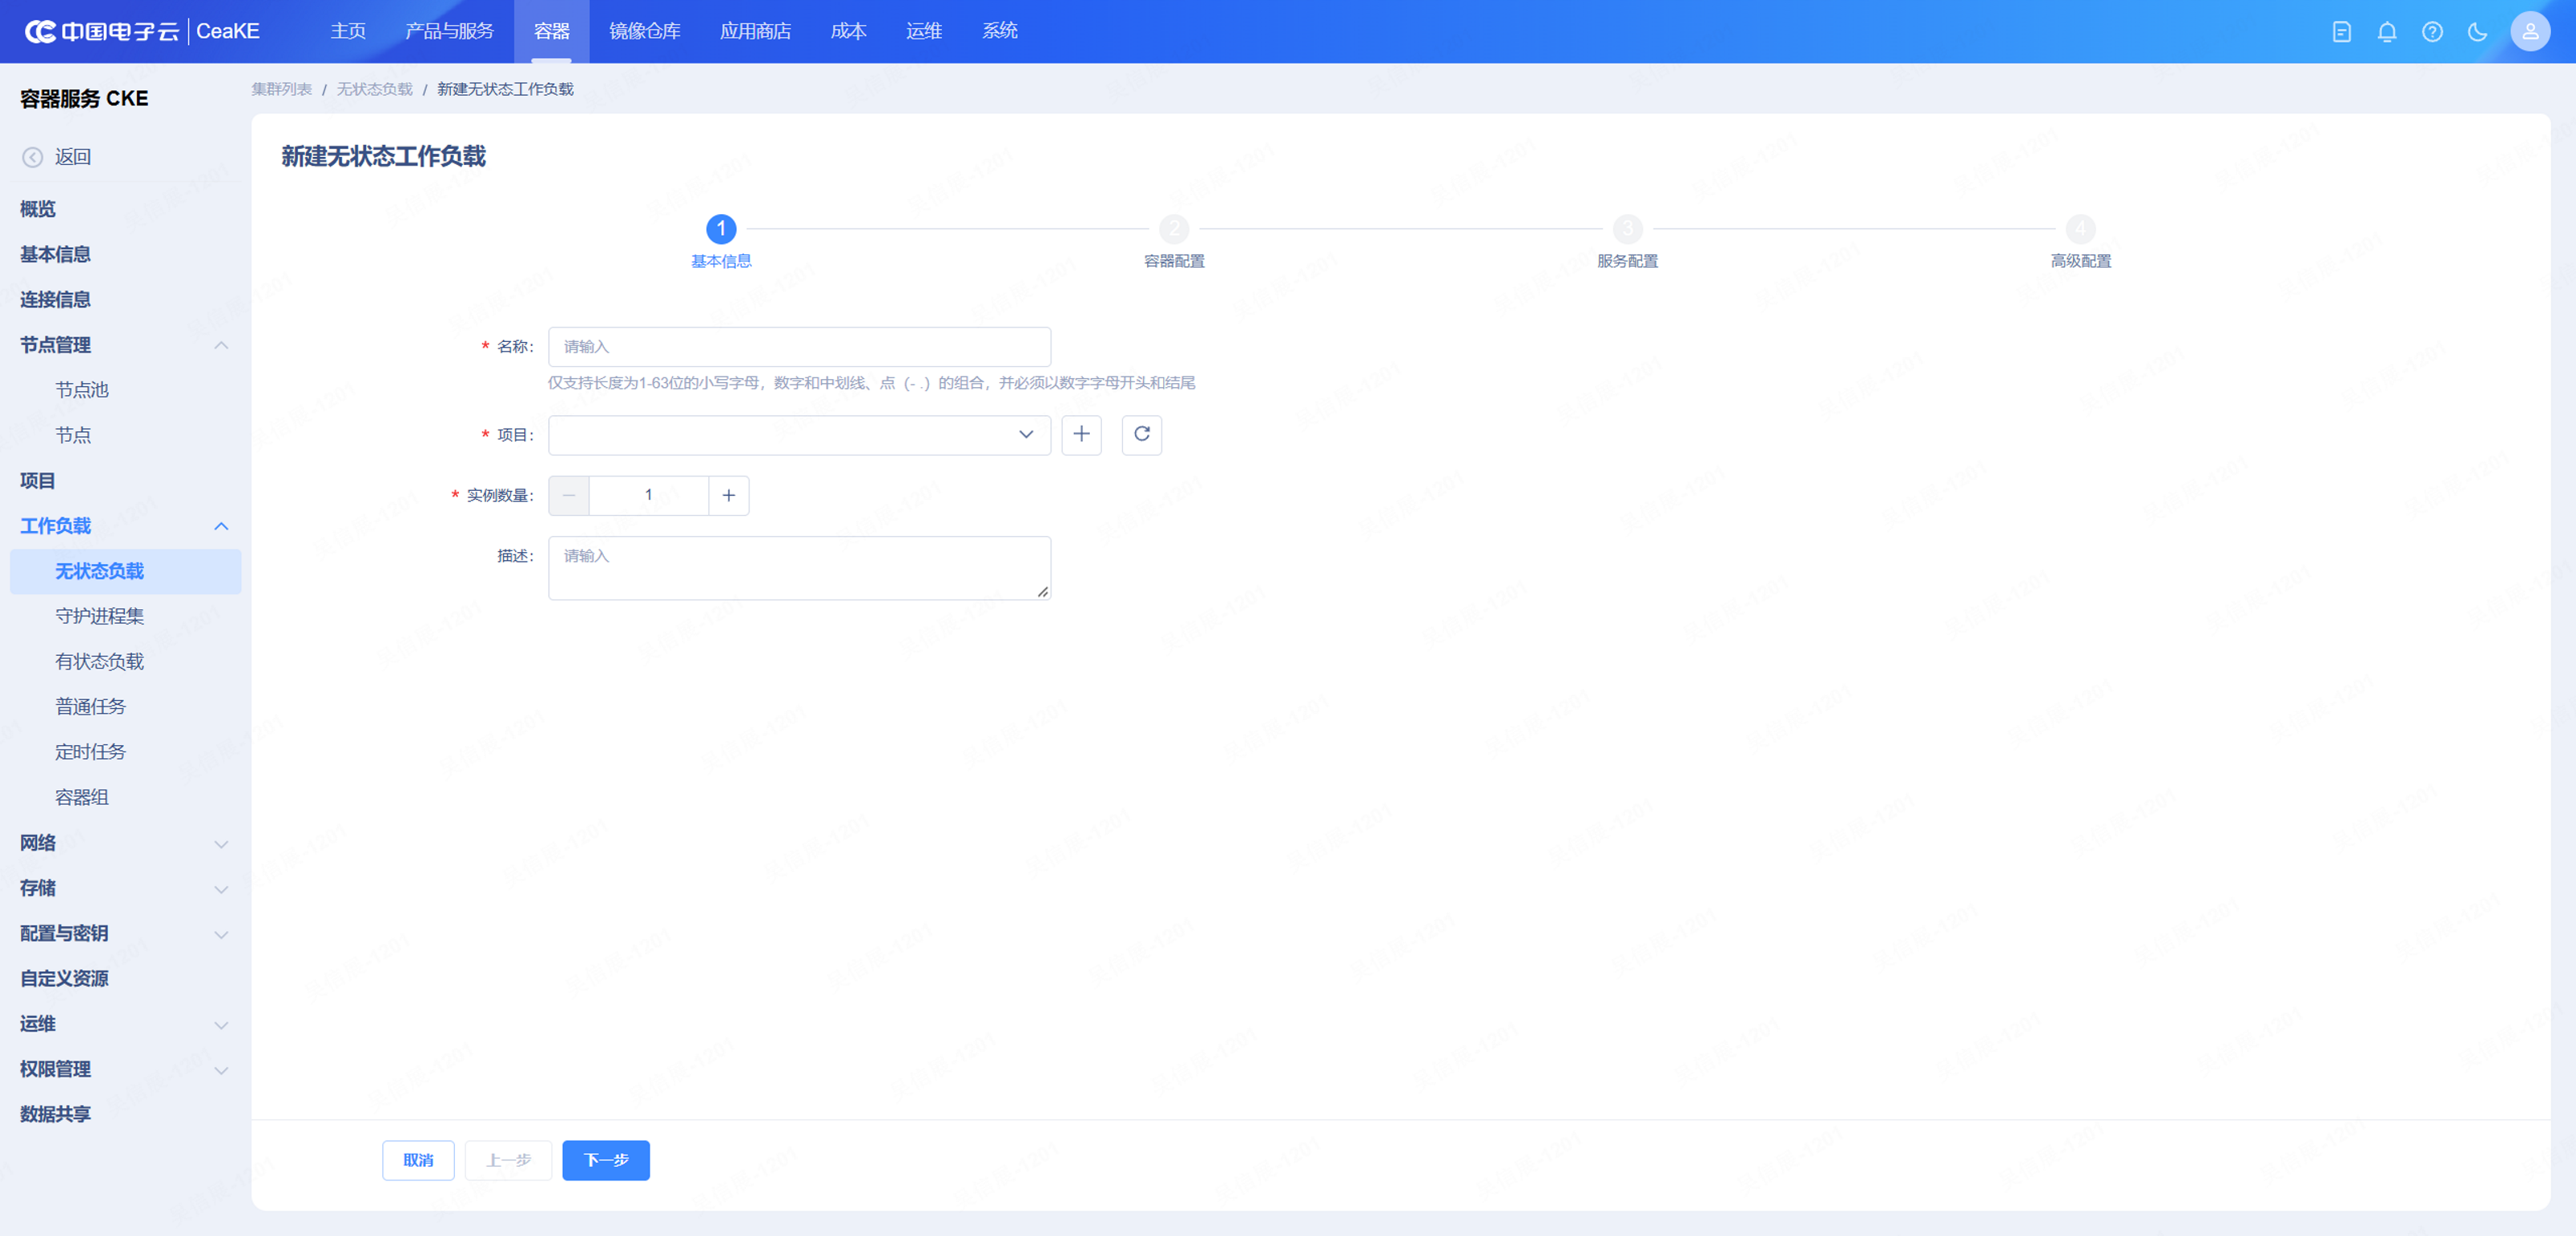
Enter the name, project (the Kubernetes namespace), replica count, and description. One replica is enough for an initial test; production commonly starts with at least two replicas and a rolling strategy that preserves availability.
Step 2: container configuration
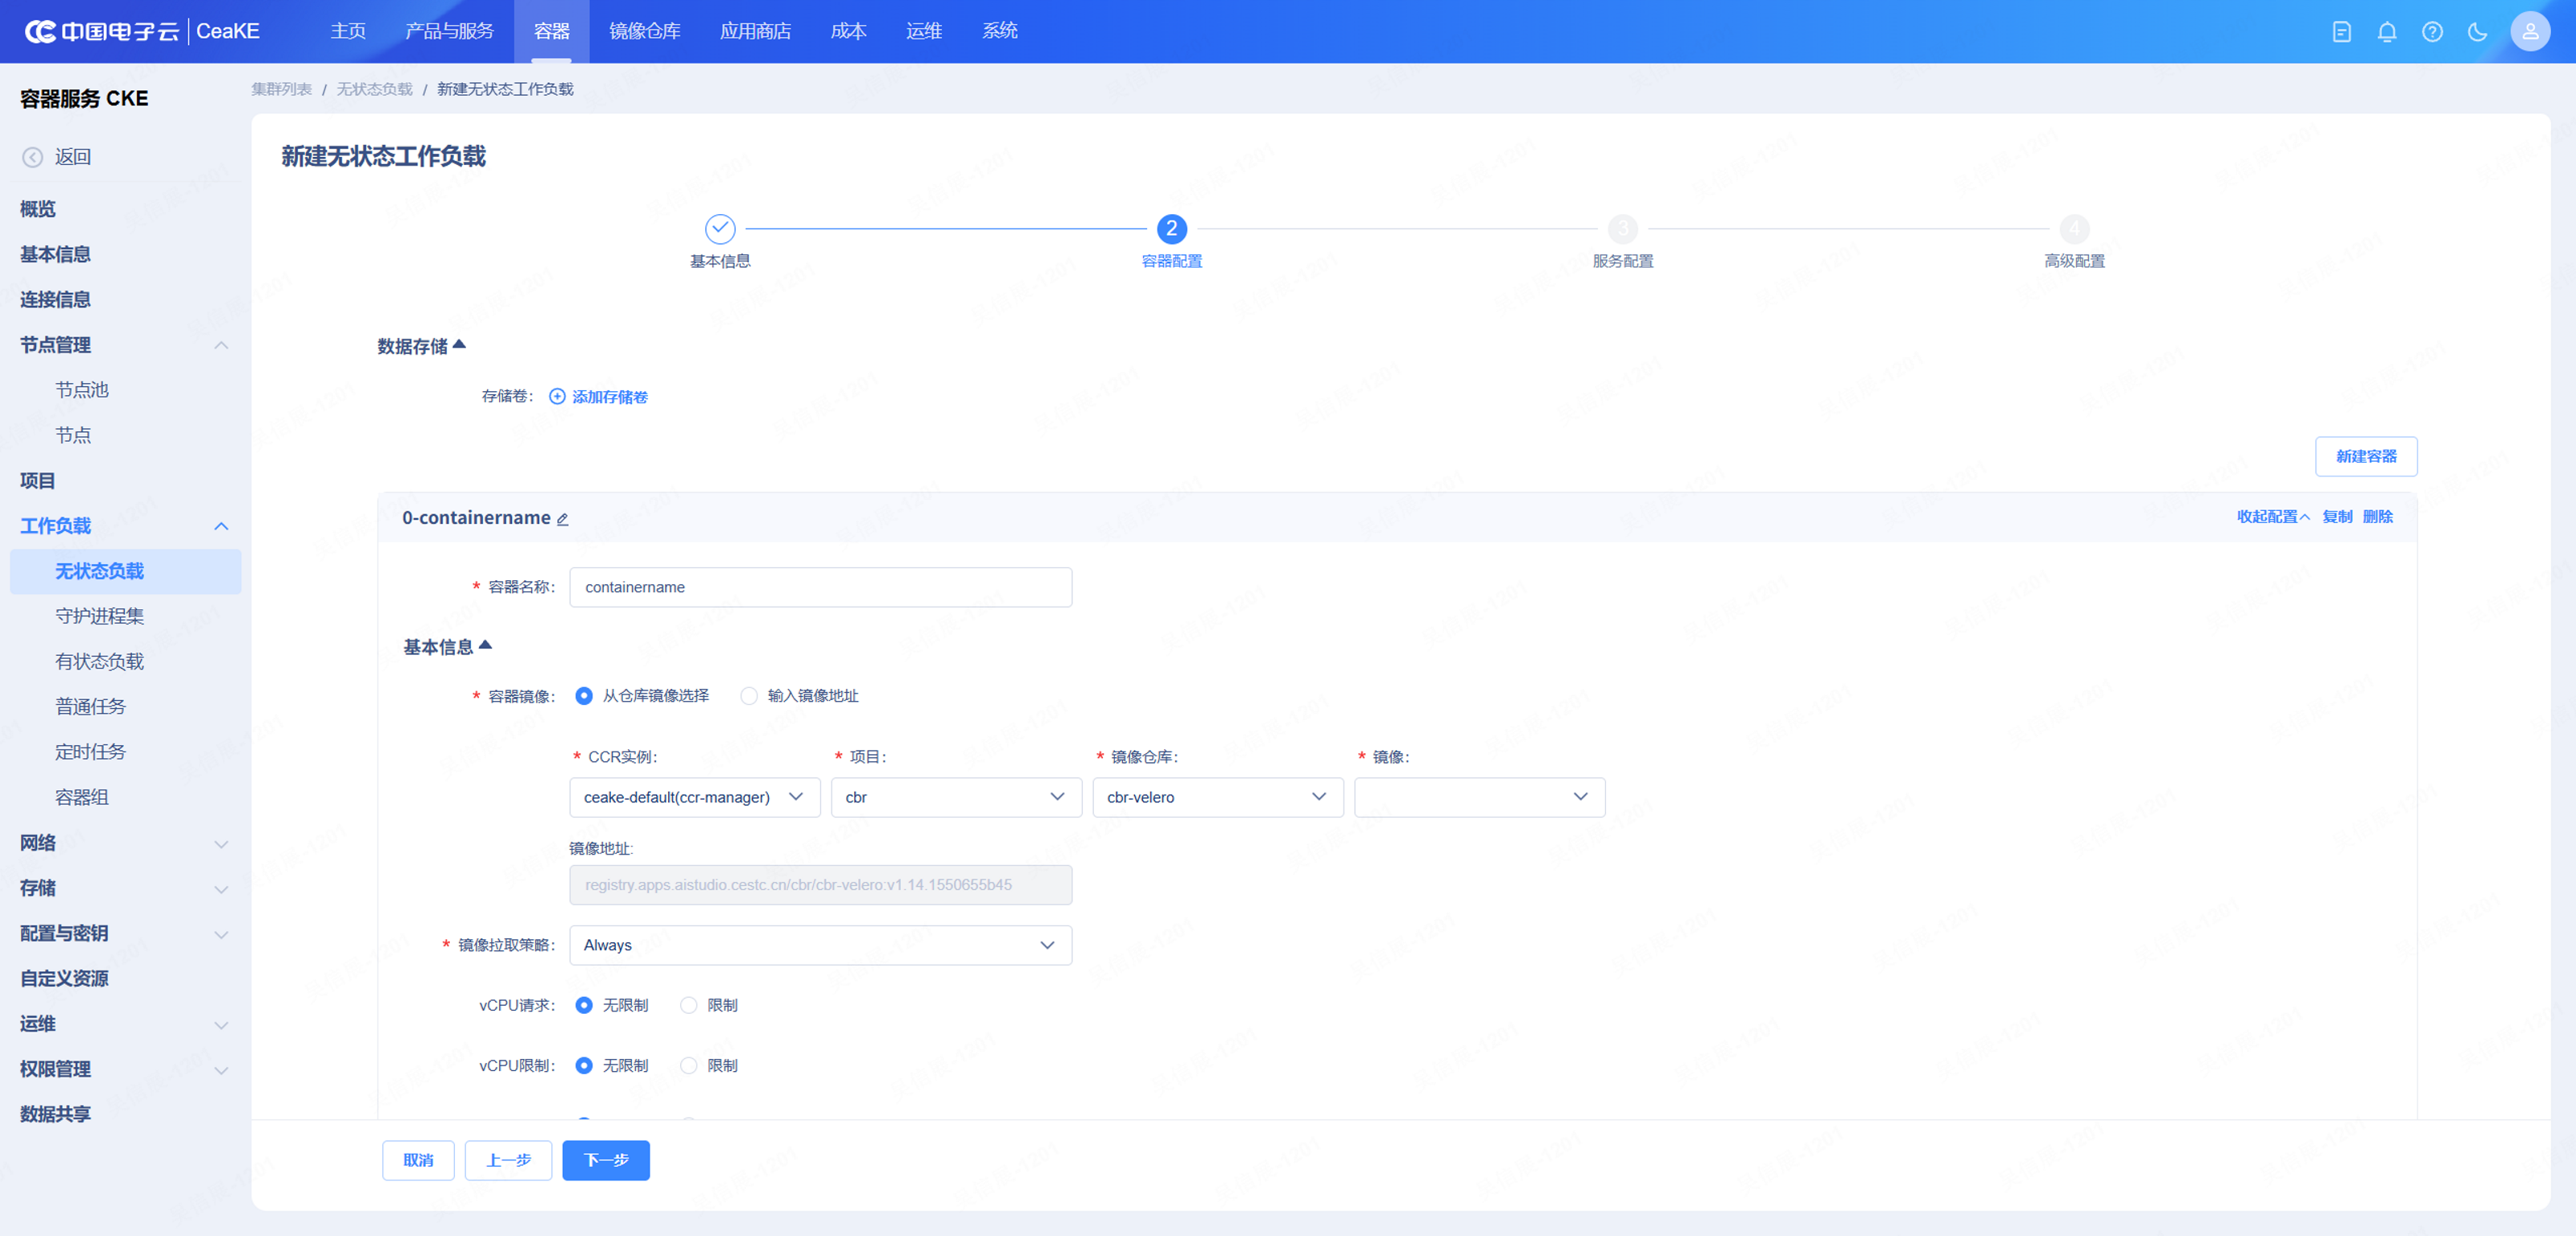
The image can be selected from the platform registry or entered as a full image reference. Verify the tag, pull policy, and vCPU/memory requests and limits:
IfNotPresentworks well with immutable tags. The screenshot showsAlwaysas the default; that is useful when tags can be overwritten, but production releases should still use unique tags.- Avoid leaving all CPU and memory controls unlimited. Set realistic requests, then define limits from load-test and monitoring data.
- The container name identifies a container inside the Pod; it does not have to match the Deployment, and a Pod can contain multiple containers.
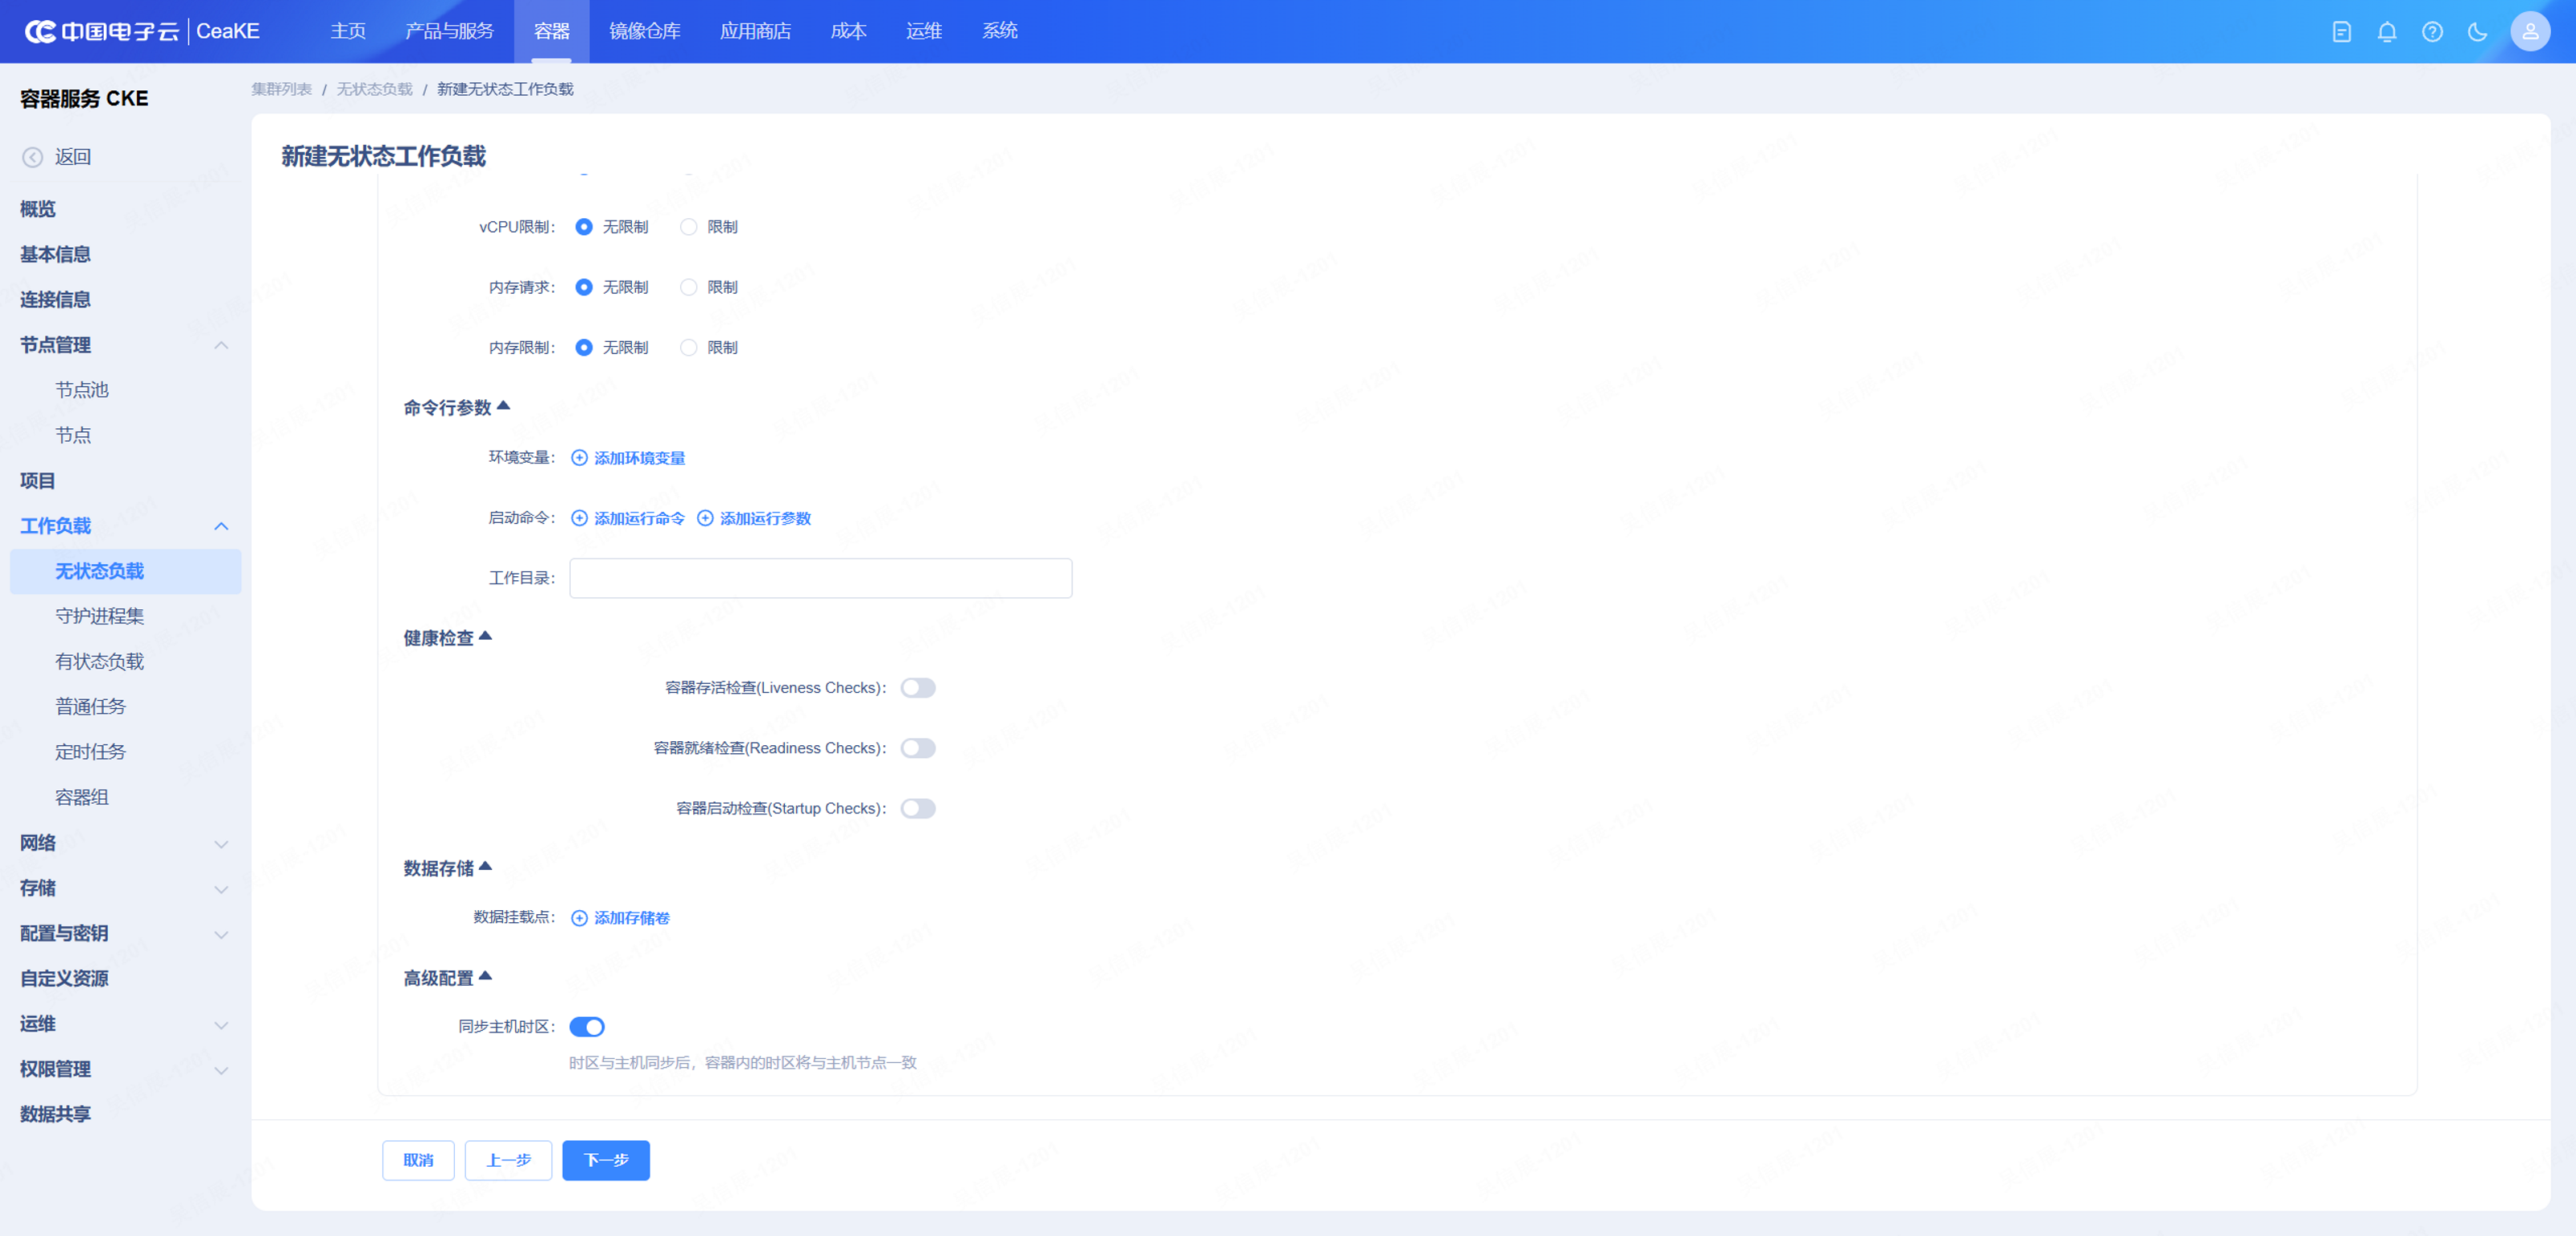
Further down, the form exposes environment variables, command and arguments, working directory, storage, and all three Kubernetes probes:
- Readiness decides whether the Pod is included in Service endpoints and should normally be enabled for a network service.
- Liveness decides whether Kubernetes should restart the container; avoid coupling it to unstable downstream dependencies.
- Startup protects slow-starting applications from being restarted by liveness checks before initialization completes.
Step 3: service configuration
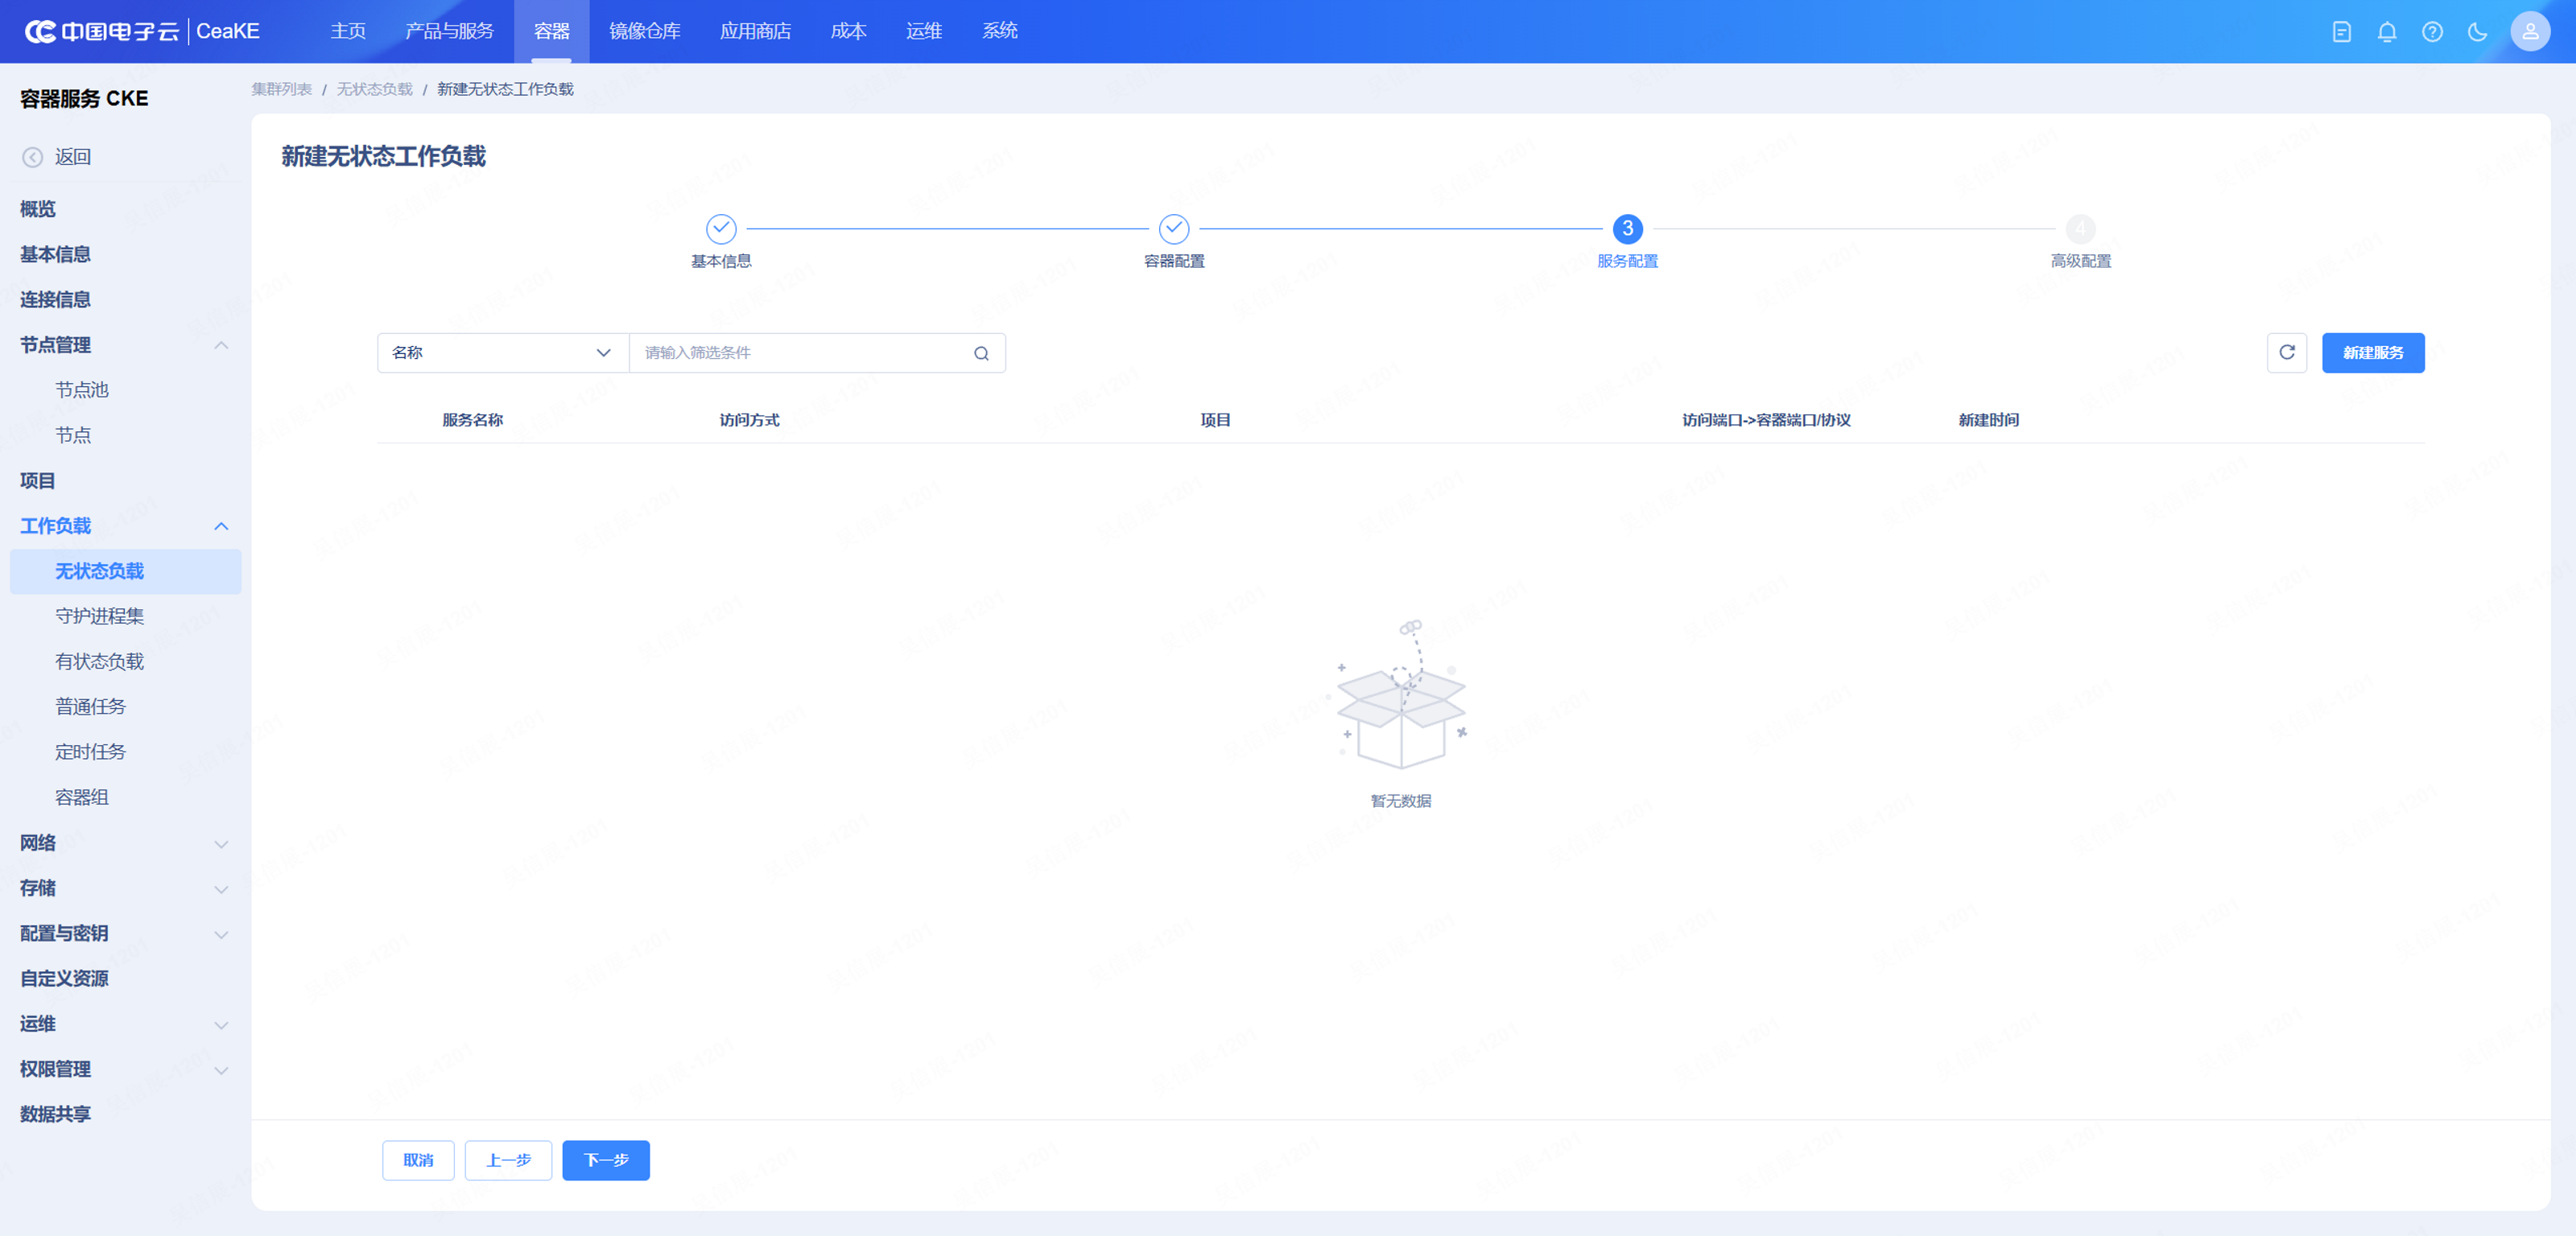
Bind an existing Service or create one directly from the wizard. This step can be skipped when the workload does not need an endpoint yet; a Service can be added later from the Network menu.
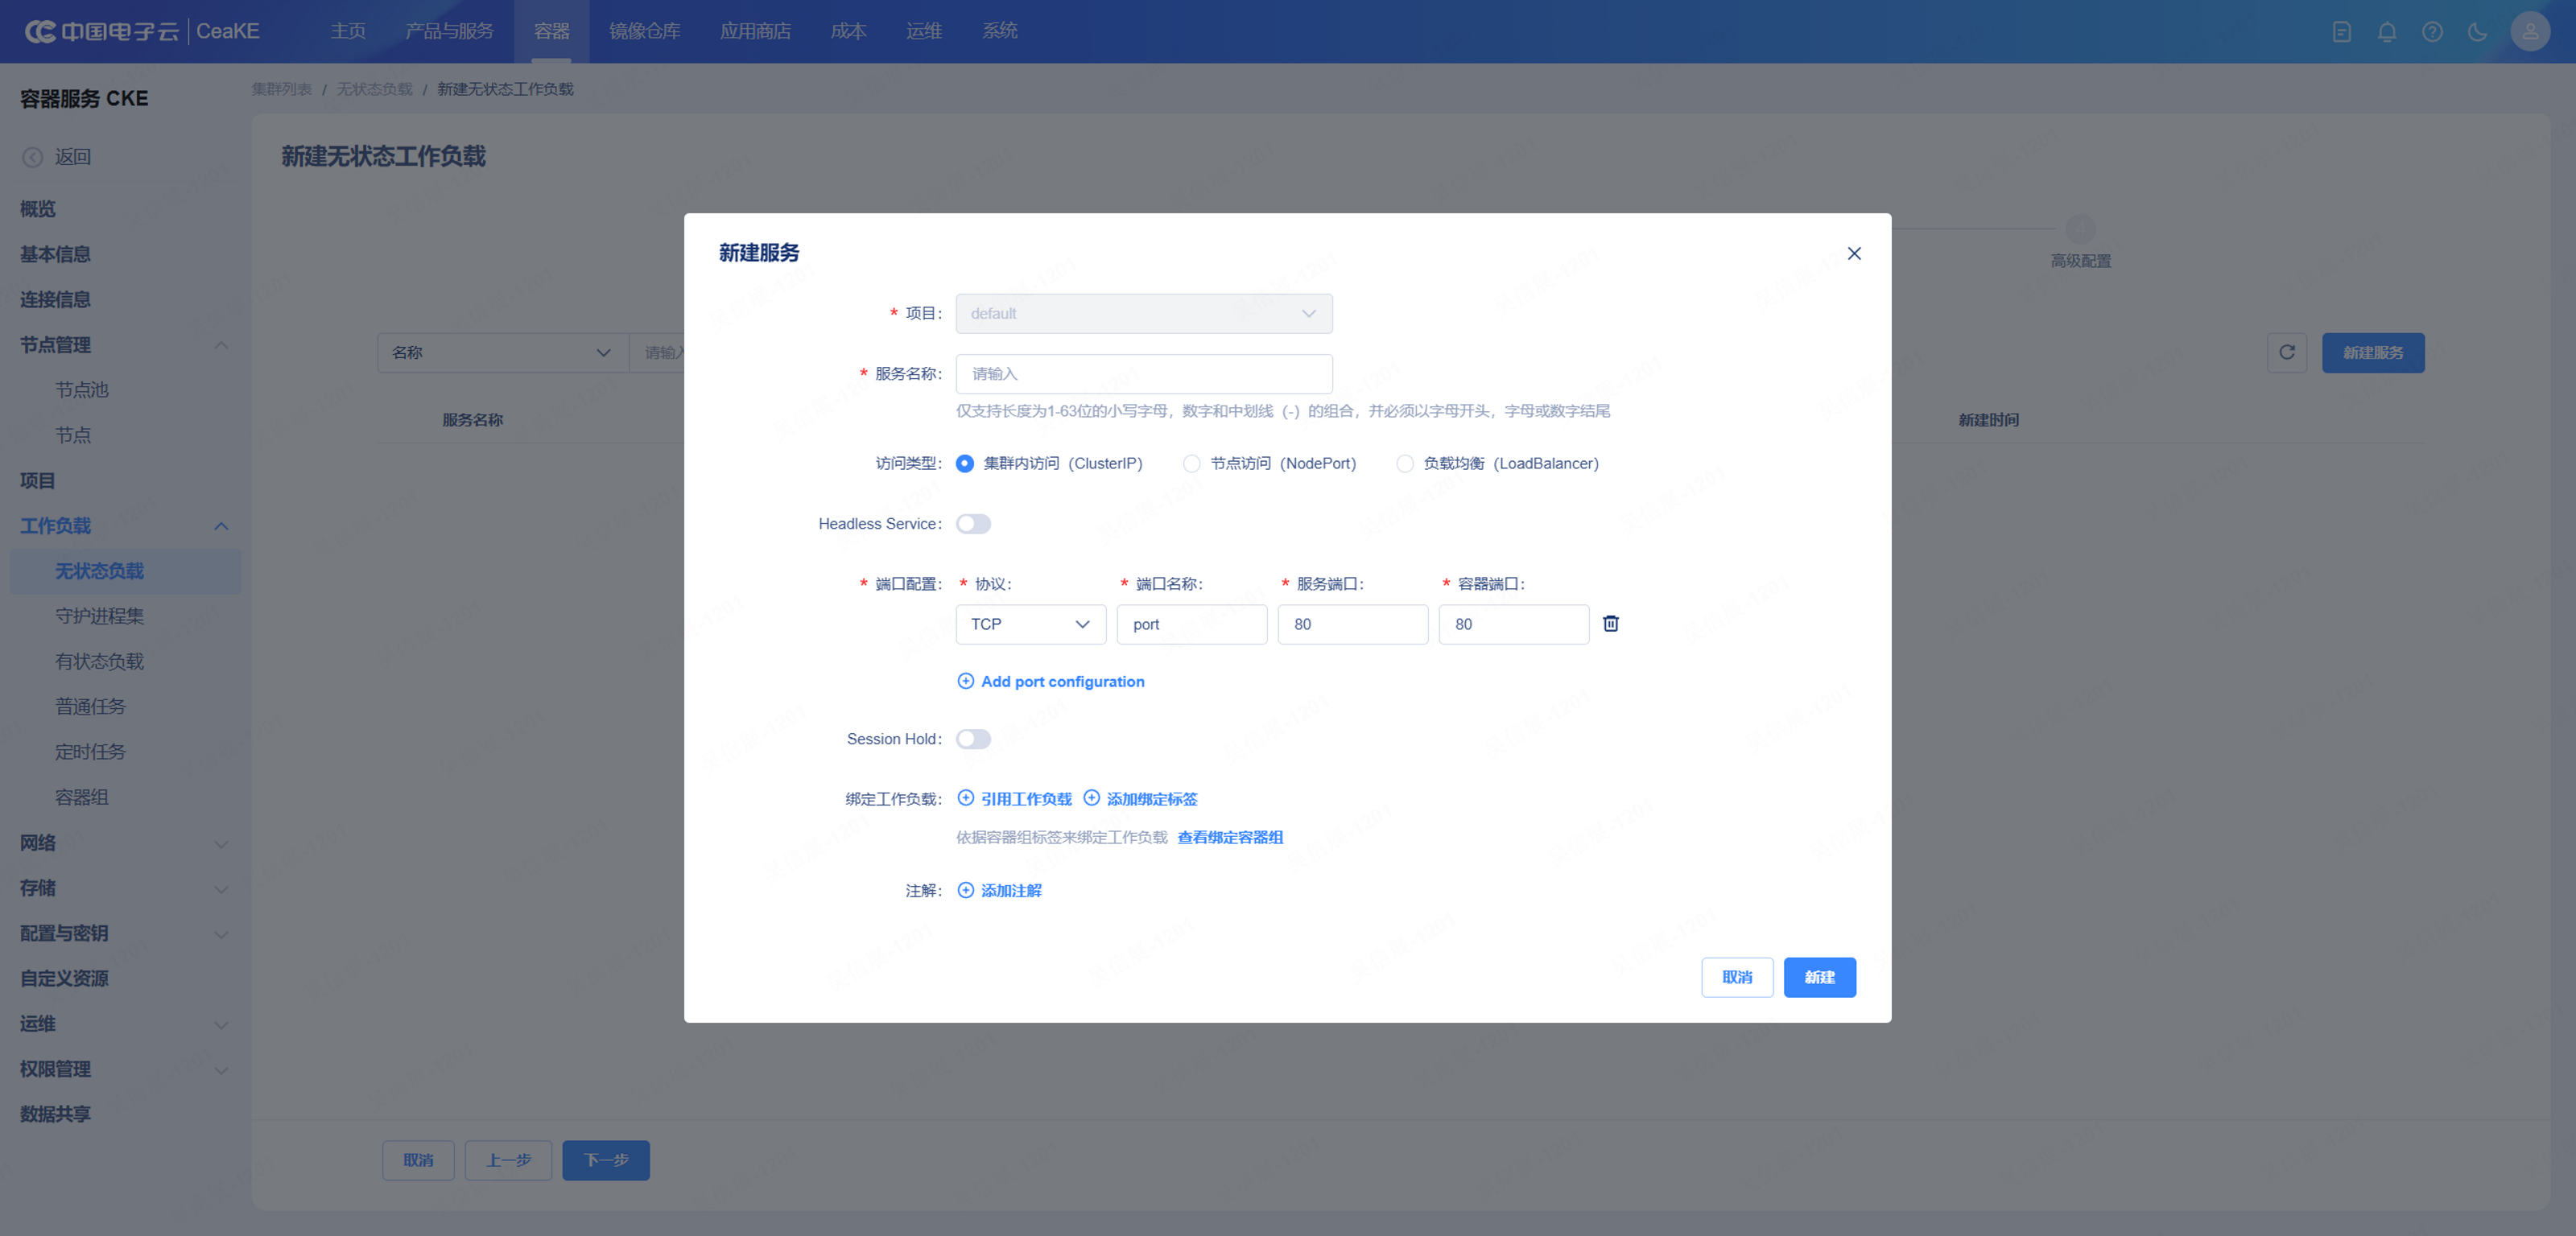
Select the access type, protocol, Service port, and container port. Prefer ClusterIP for ordinary internal services. NodePort opens a port on the nodes, while LoadBalancer depends on the cloud integration. Most importantly, the Service selector must match the workload labels or no endpoint will be created.
Step 4: advanced configuration
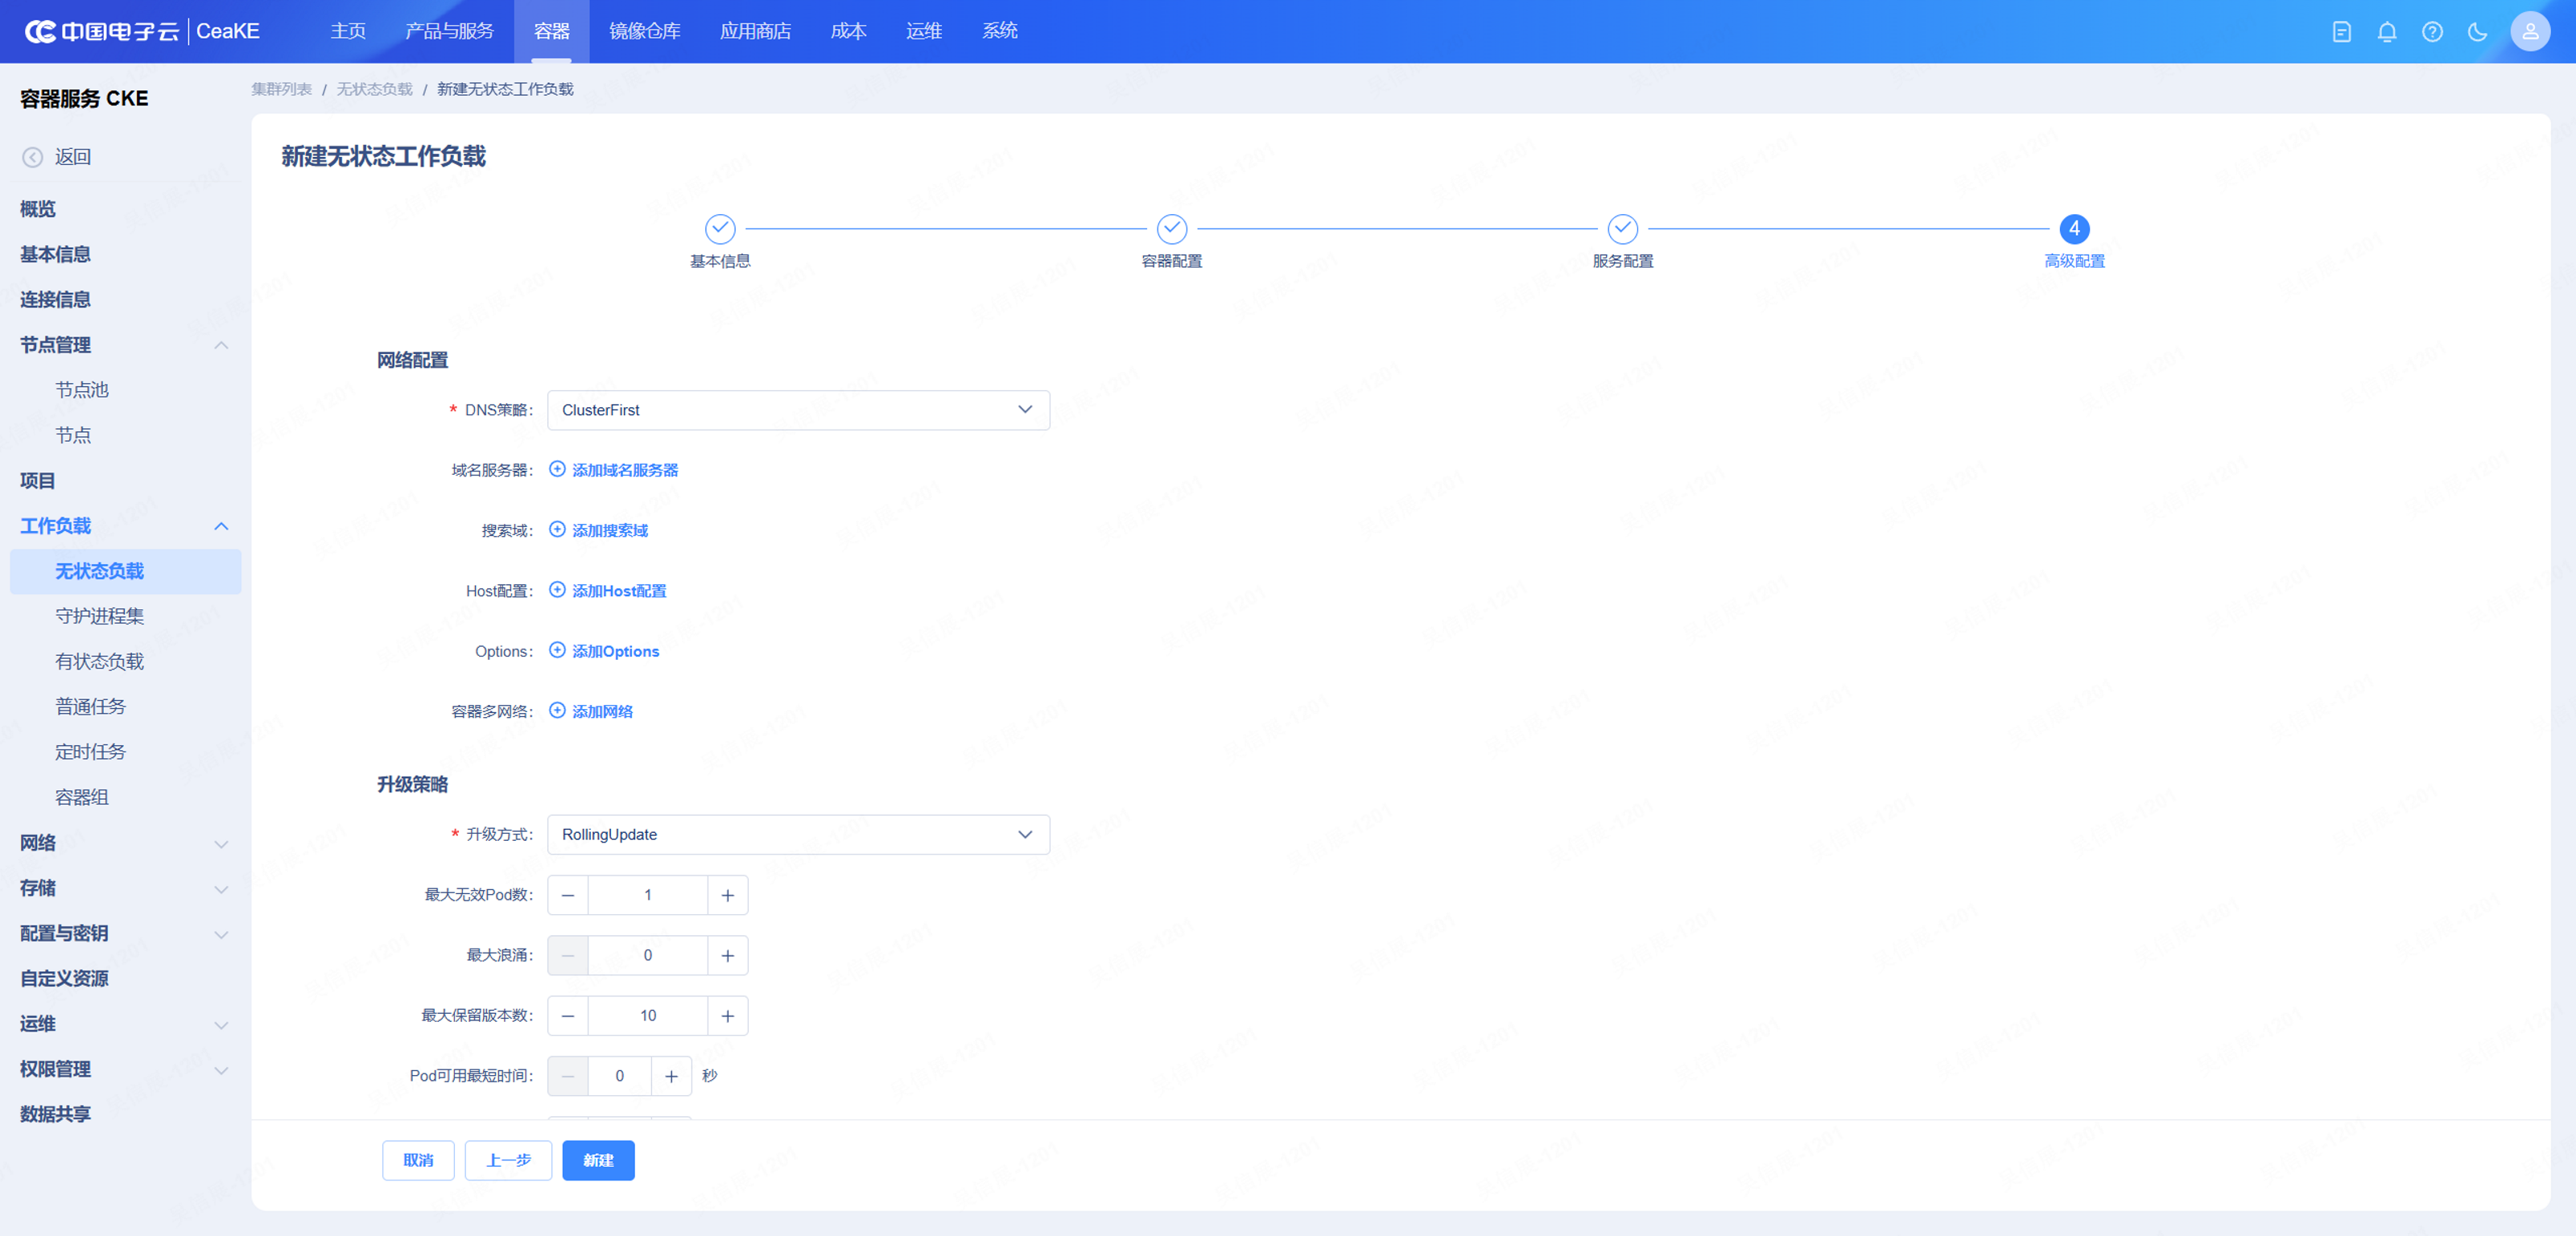
The first part contains DNS and additional host/network settings plus the rollout strategy. ClusterFirst is the usual DNS policy. With RollingUpdate, choose maxSurge and maxUnavailable together with the replica count; a single-replica service that allows one unavailable Pod will have downtime during a rollout.
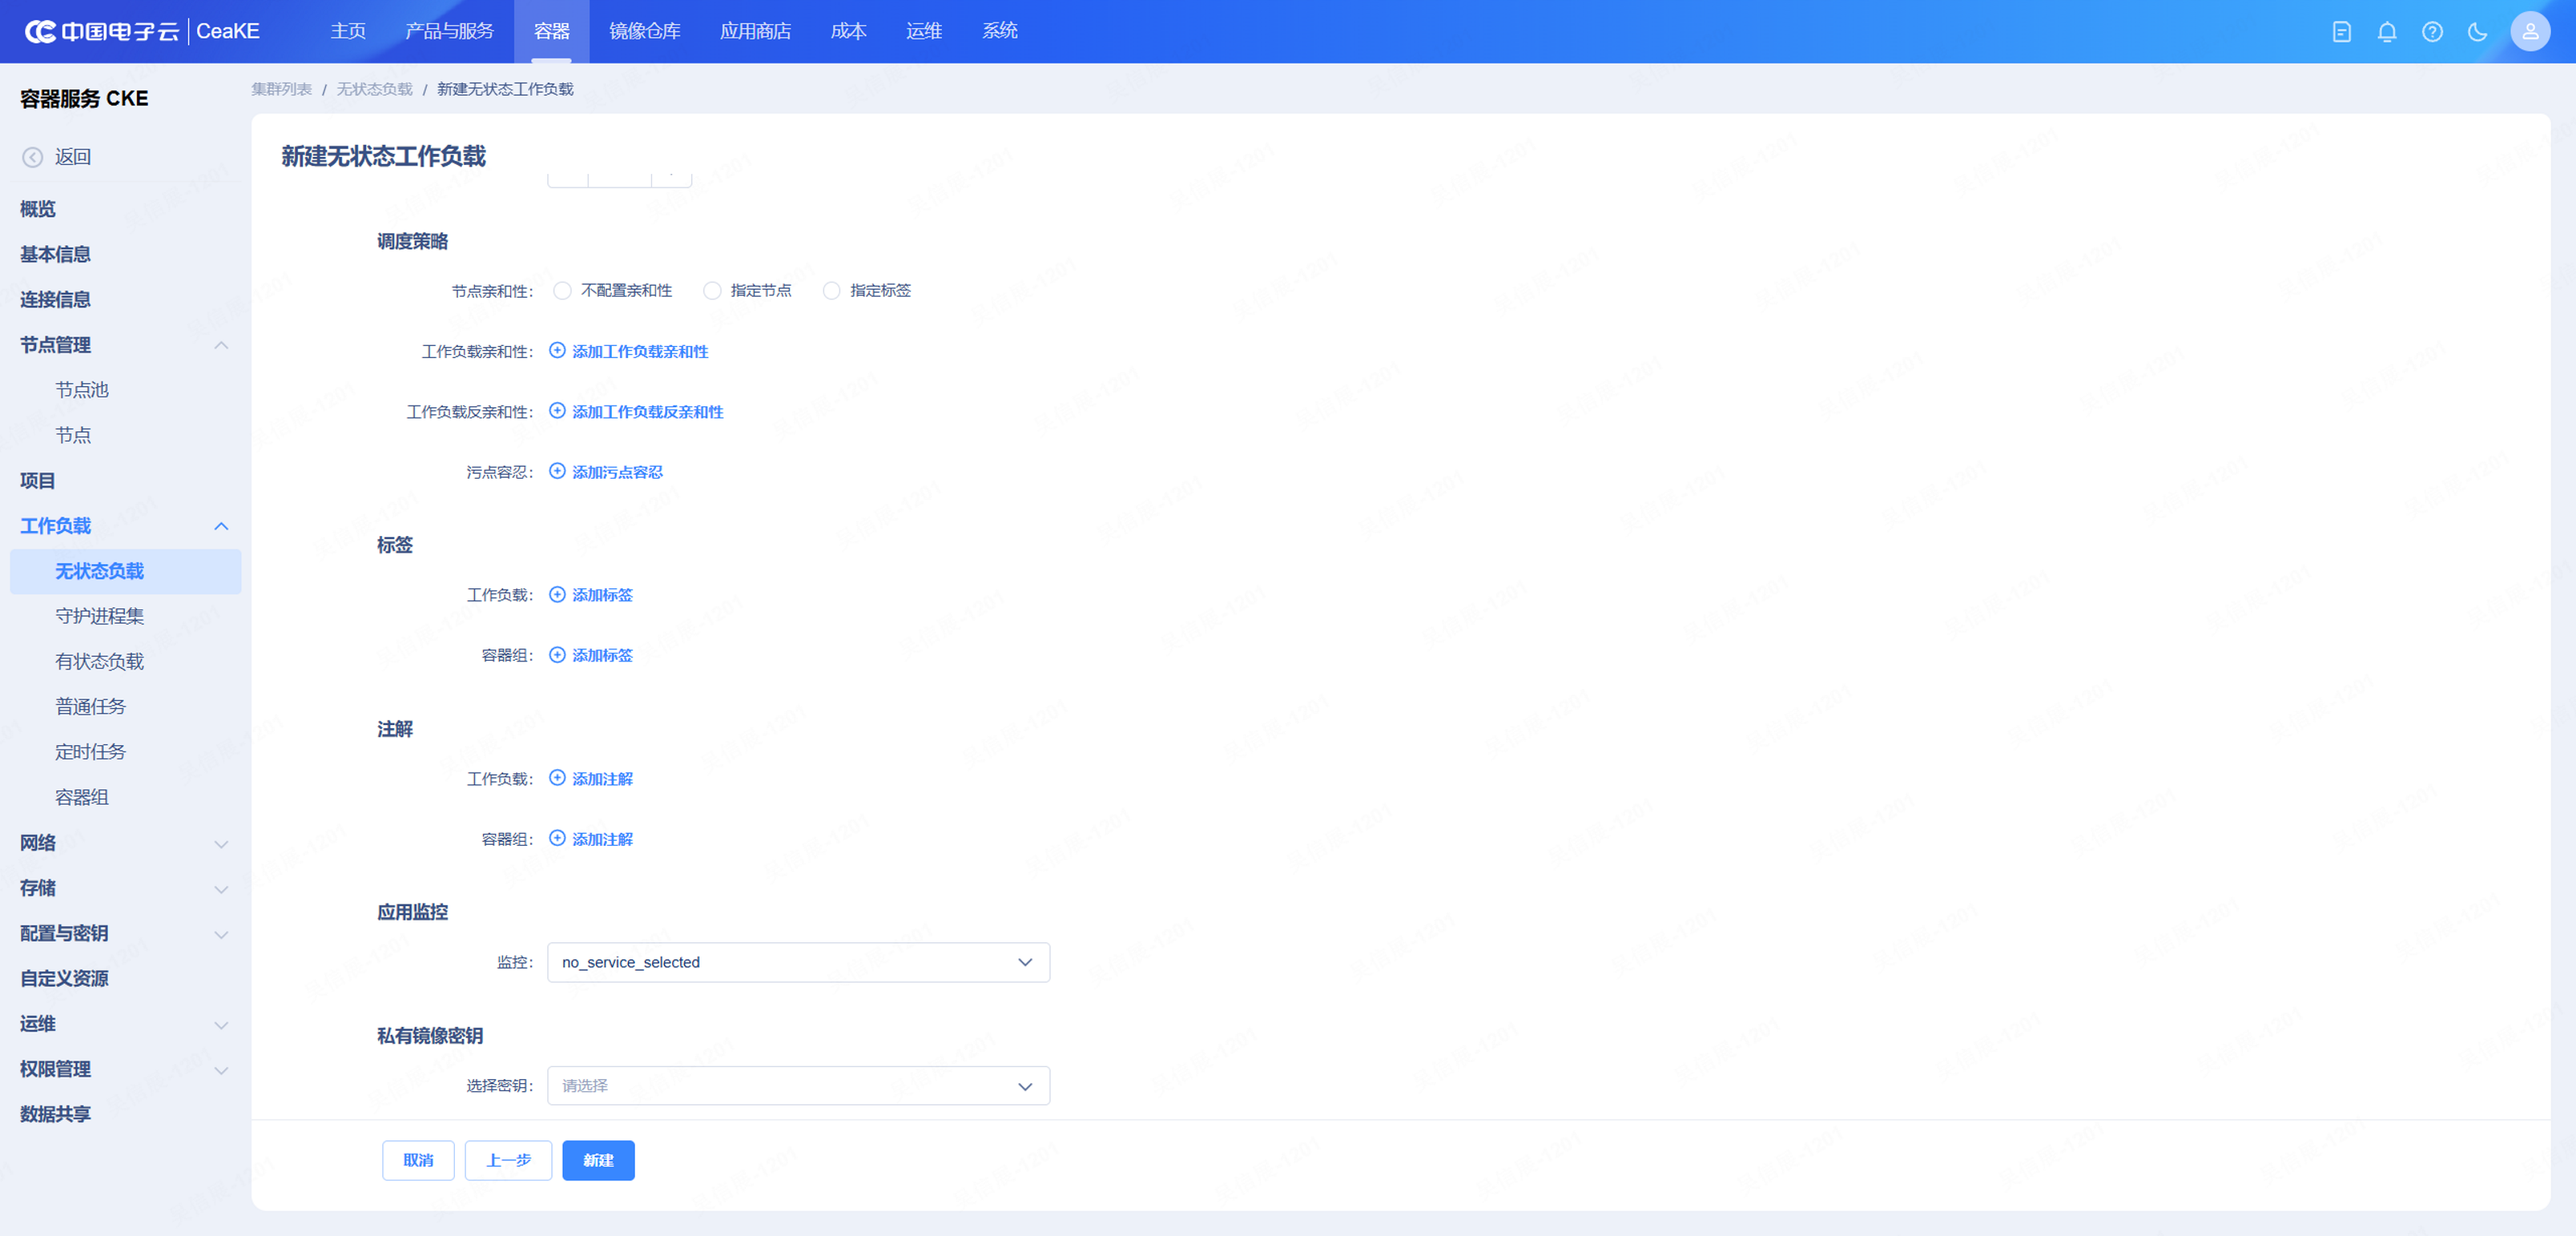
The remaining controls cover node affinity, workload affinity/anti-affinity, tolerations, labels, annotations, monitoring, and private image credentials. Change scheduling rules only for a real placement requirement, and select an image secret when the cluster must authenticate to a private registry.
The four-step form ultimately produces a Kubernetes Deployment. Use the following table as a field checklist:
| Field | Recommended value | Note |
|---|---|---|
| Application name | order-api |
Keep it close to the service name |
| Namespace | team-test / team-prod |
Separate environments and teams |
| Image | registry.example.com/pay/order-api:git-a18c3f2 |
Use the pushed image |
| Replicas | 1 for test, 2+ for production |
Production needs multiple replicas for rolling updates |
| Container port | 8080 |
Must match the real listening port |
| Environment variables | Platform form or ConfigMap | Do not bake environment differences into the image |
| Secrets | Secret | Do not put passwords in Dockerfile |
| CPU/memory | Start small, then tune | requests for scheduling, limits for upper bounds |
| Health check | /healthz or service health endpoint |
Readiness controls traffic routing |
| Pull credential | Registry secret | Required for private registries |
A typical Deployment:
|
|
The three most important fields are image, containerPort, and readinessProbe. If readiness does not pass, the Pod can be running but still receive no traffic.
4. Configure service entry
Deployment makes Pods run. Service and Ingress make them reachable.
Create a Service
The Network → Service page shows the access type, Cluster IP or external IP, and each Service-port-to-container-port mapping. ClusterIP, NodePort, and LoadBalancer expose the application at different scopes, so a port number alone does not tell you whether the service is publicly reachable.
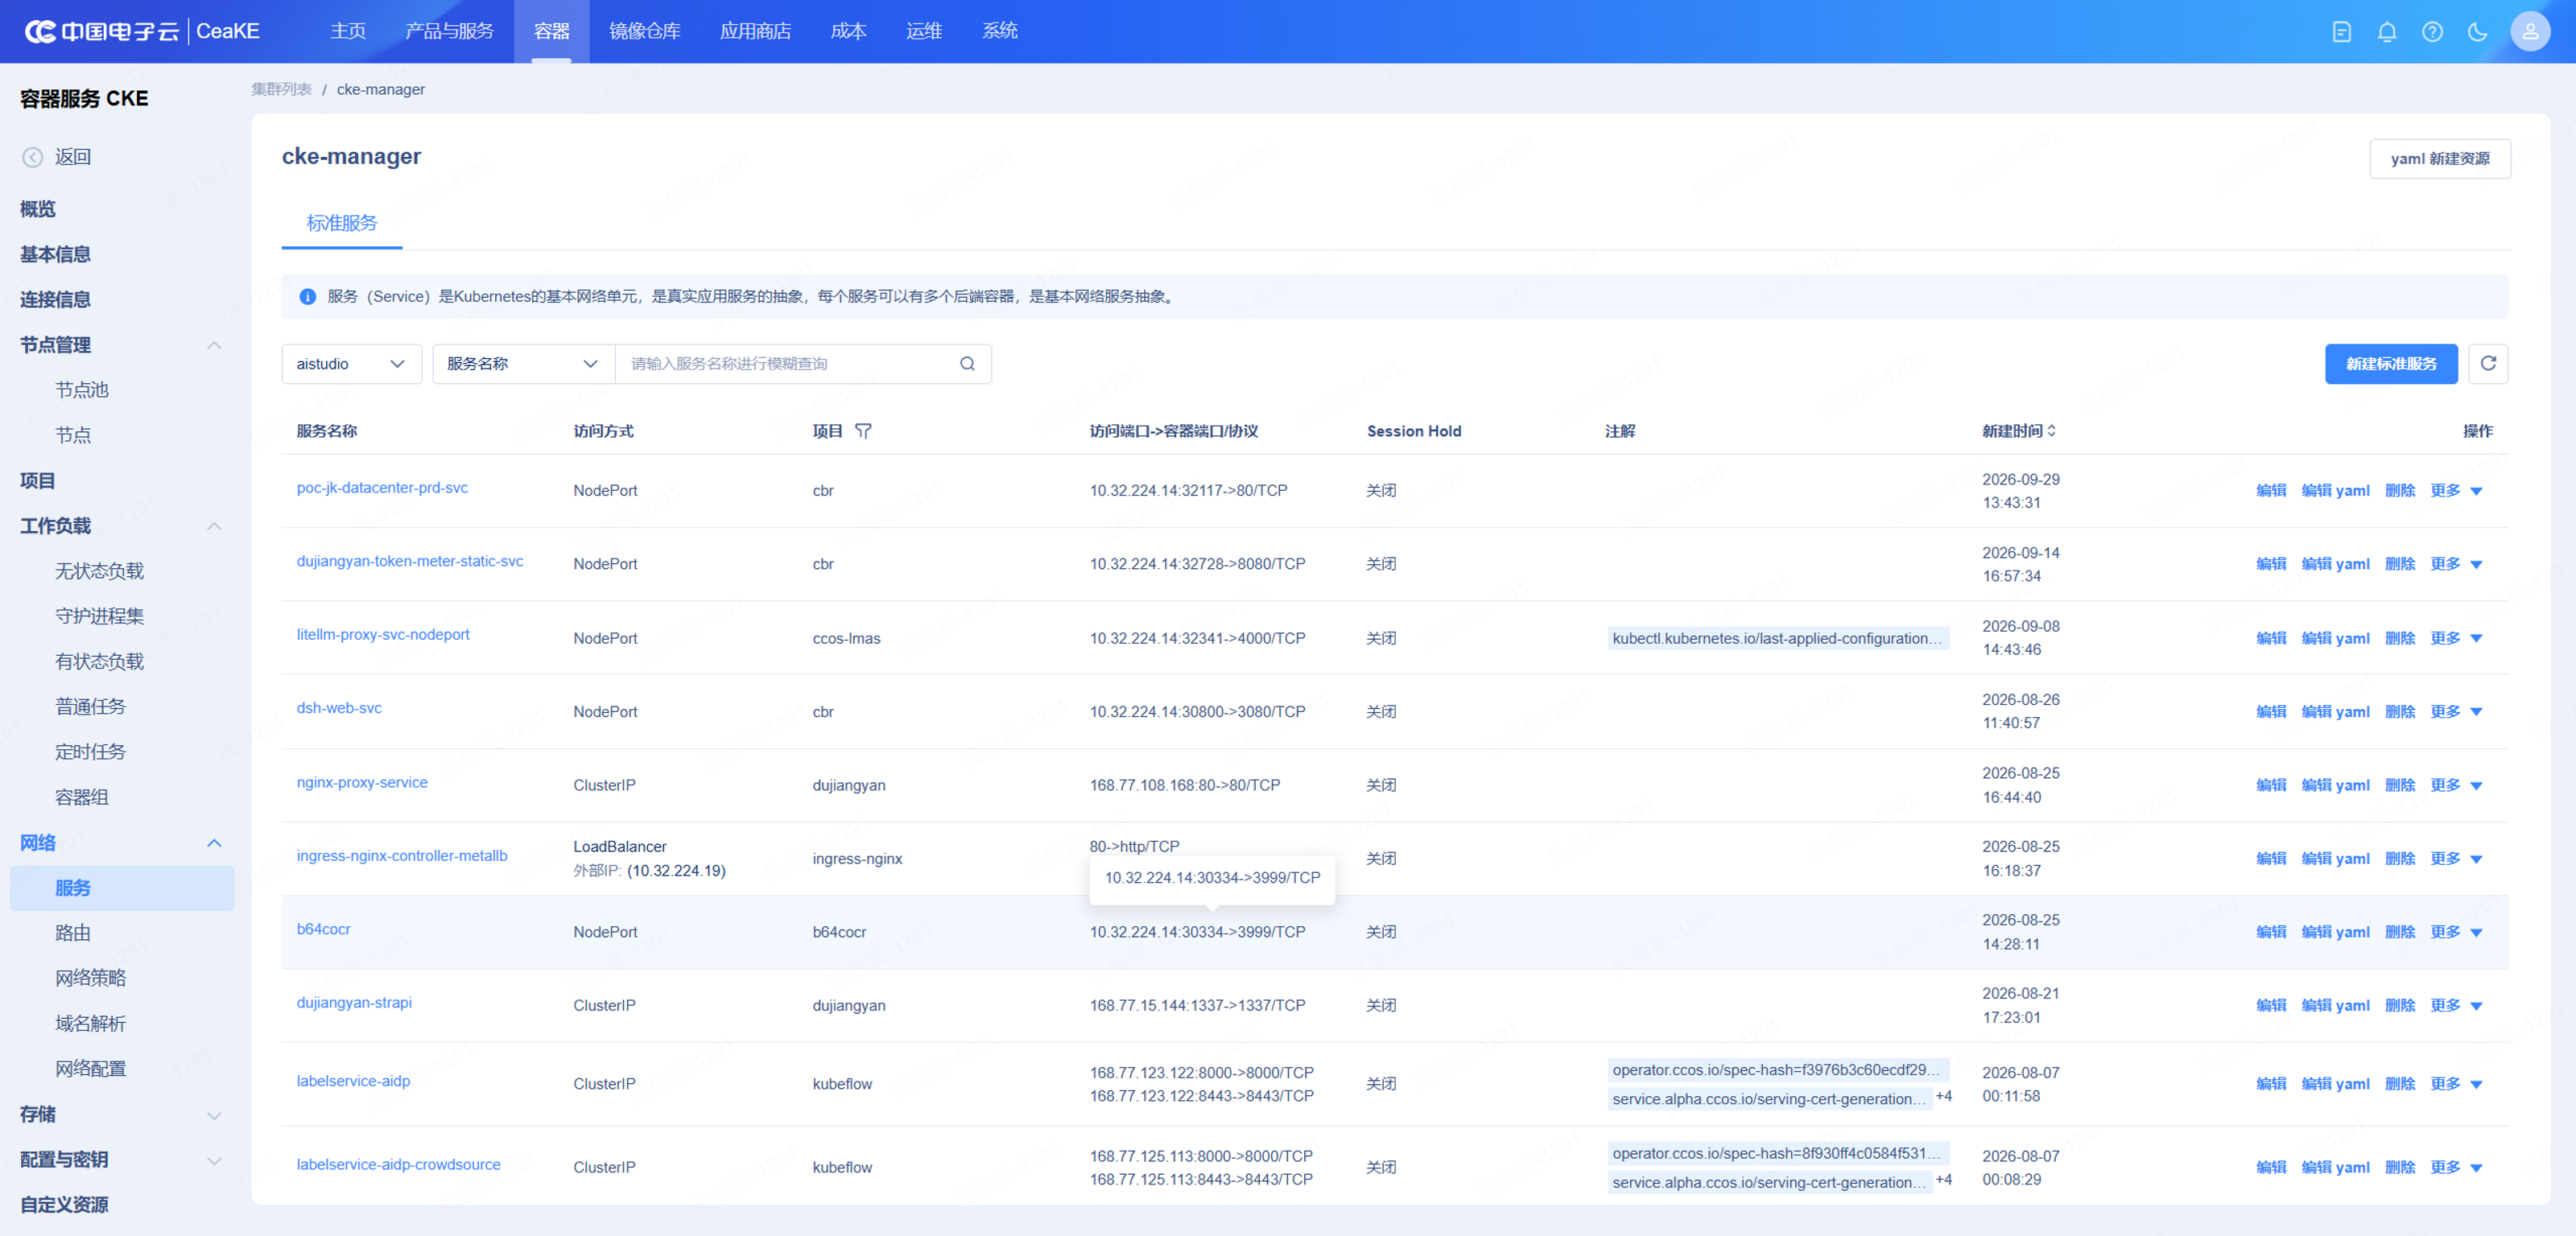
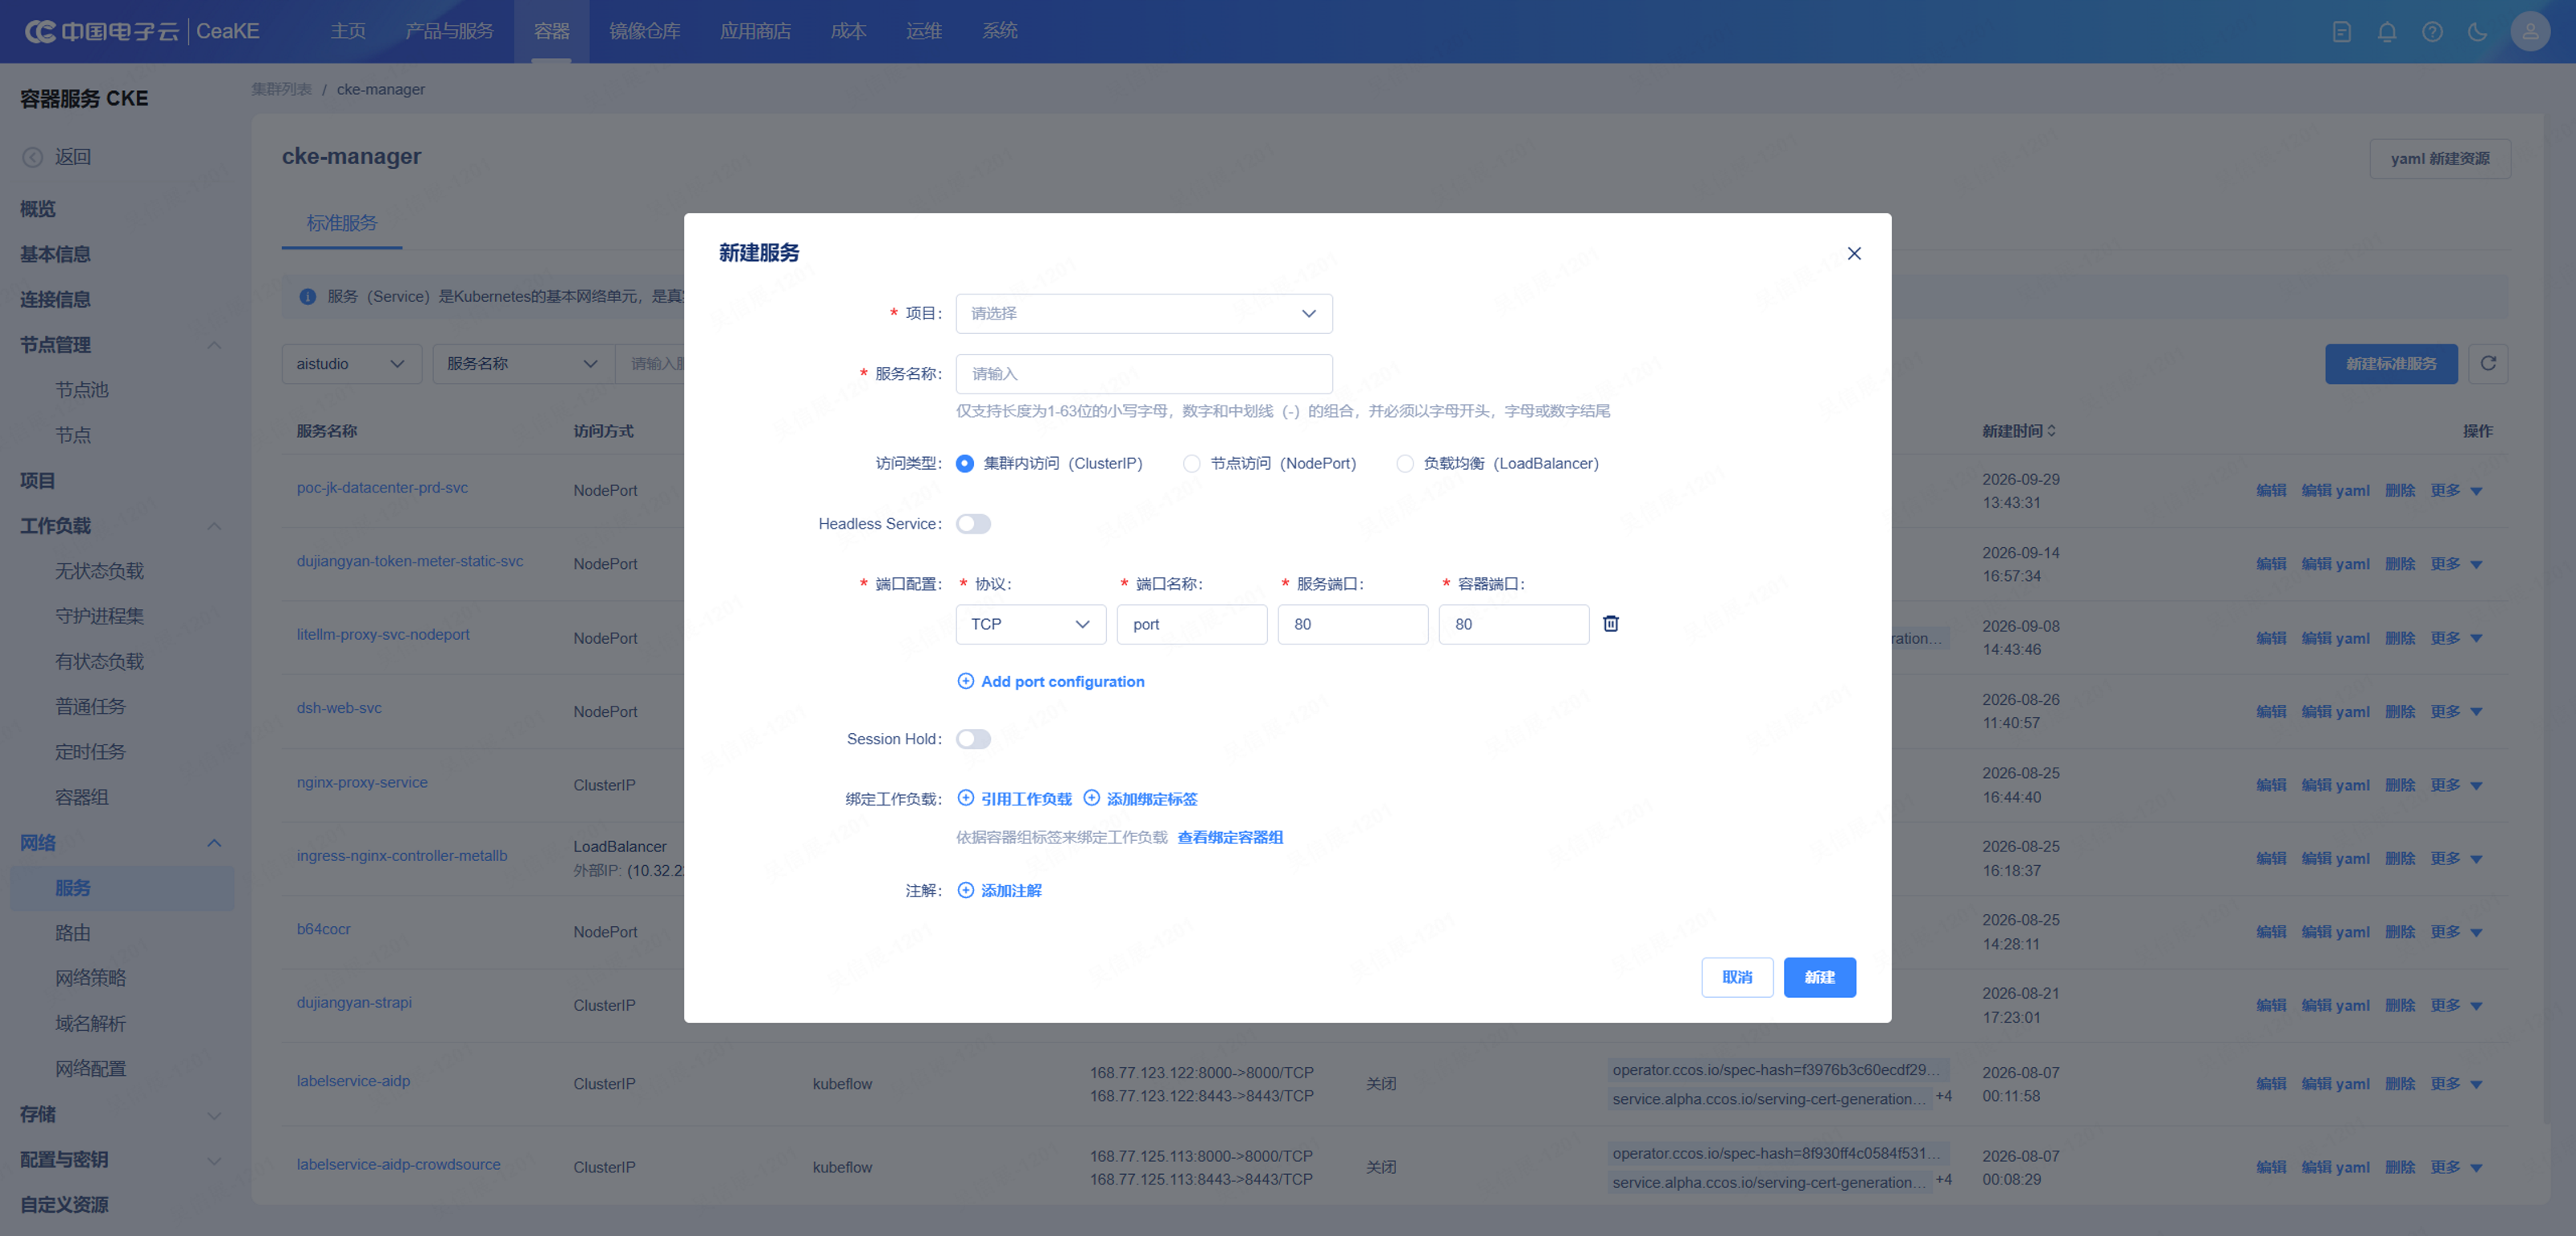
Choose the project and name, then set the access type and ports:
| Form field | Kubernetes field | Meaning |
|---|---|---|
| Service port | spec.ports[].port |
Port used by clients of the Service |
| Container port | spec.ports[].targetPort |
Port that receives the traffic in the Pod |
| Access type | spec.type |
ClusterIP, NodePort, or LoadBalancer |
| Workload/label binding | spec.selector |
Must match labels on the target Pods |
| Session Hold | sessionAffinity |
Enable only when the application requires sticky sessions |
Internal access usually uses a Service:
|
|
Other in-cluster services can call:
|
|
External HTTP/HTTPS access usually uses Ingress, Route, or a company gateway:
|
|
Create a Route (Ingress)
This platform exposes Ingress under Network → Route. The list shows the route name, bound Services, project, and type; a single route can contain multiple backend rules.
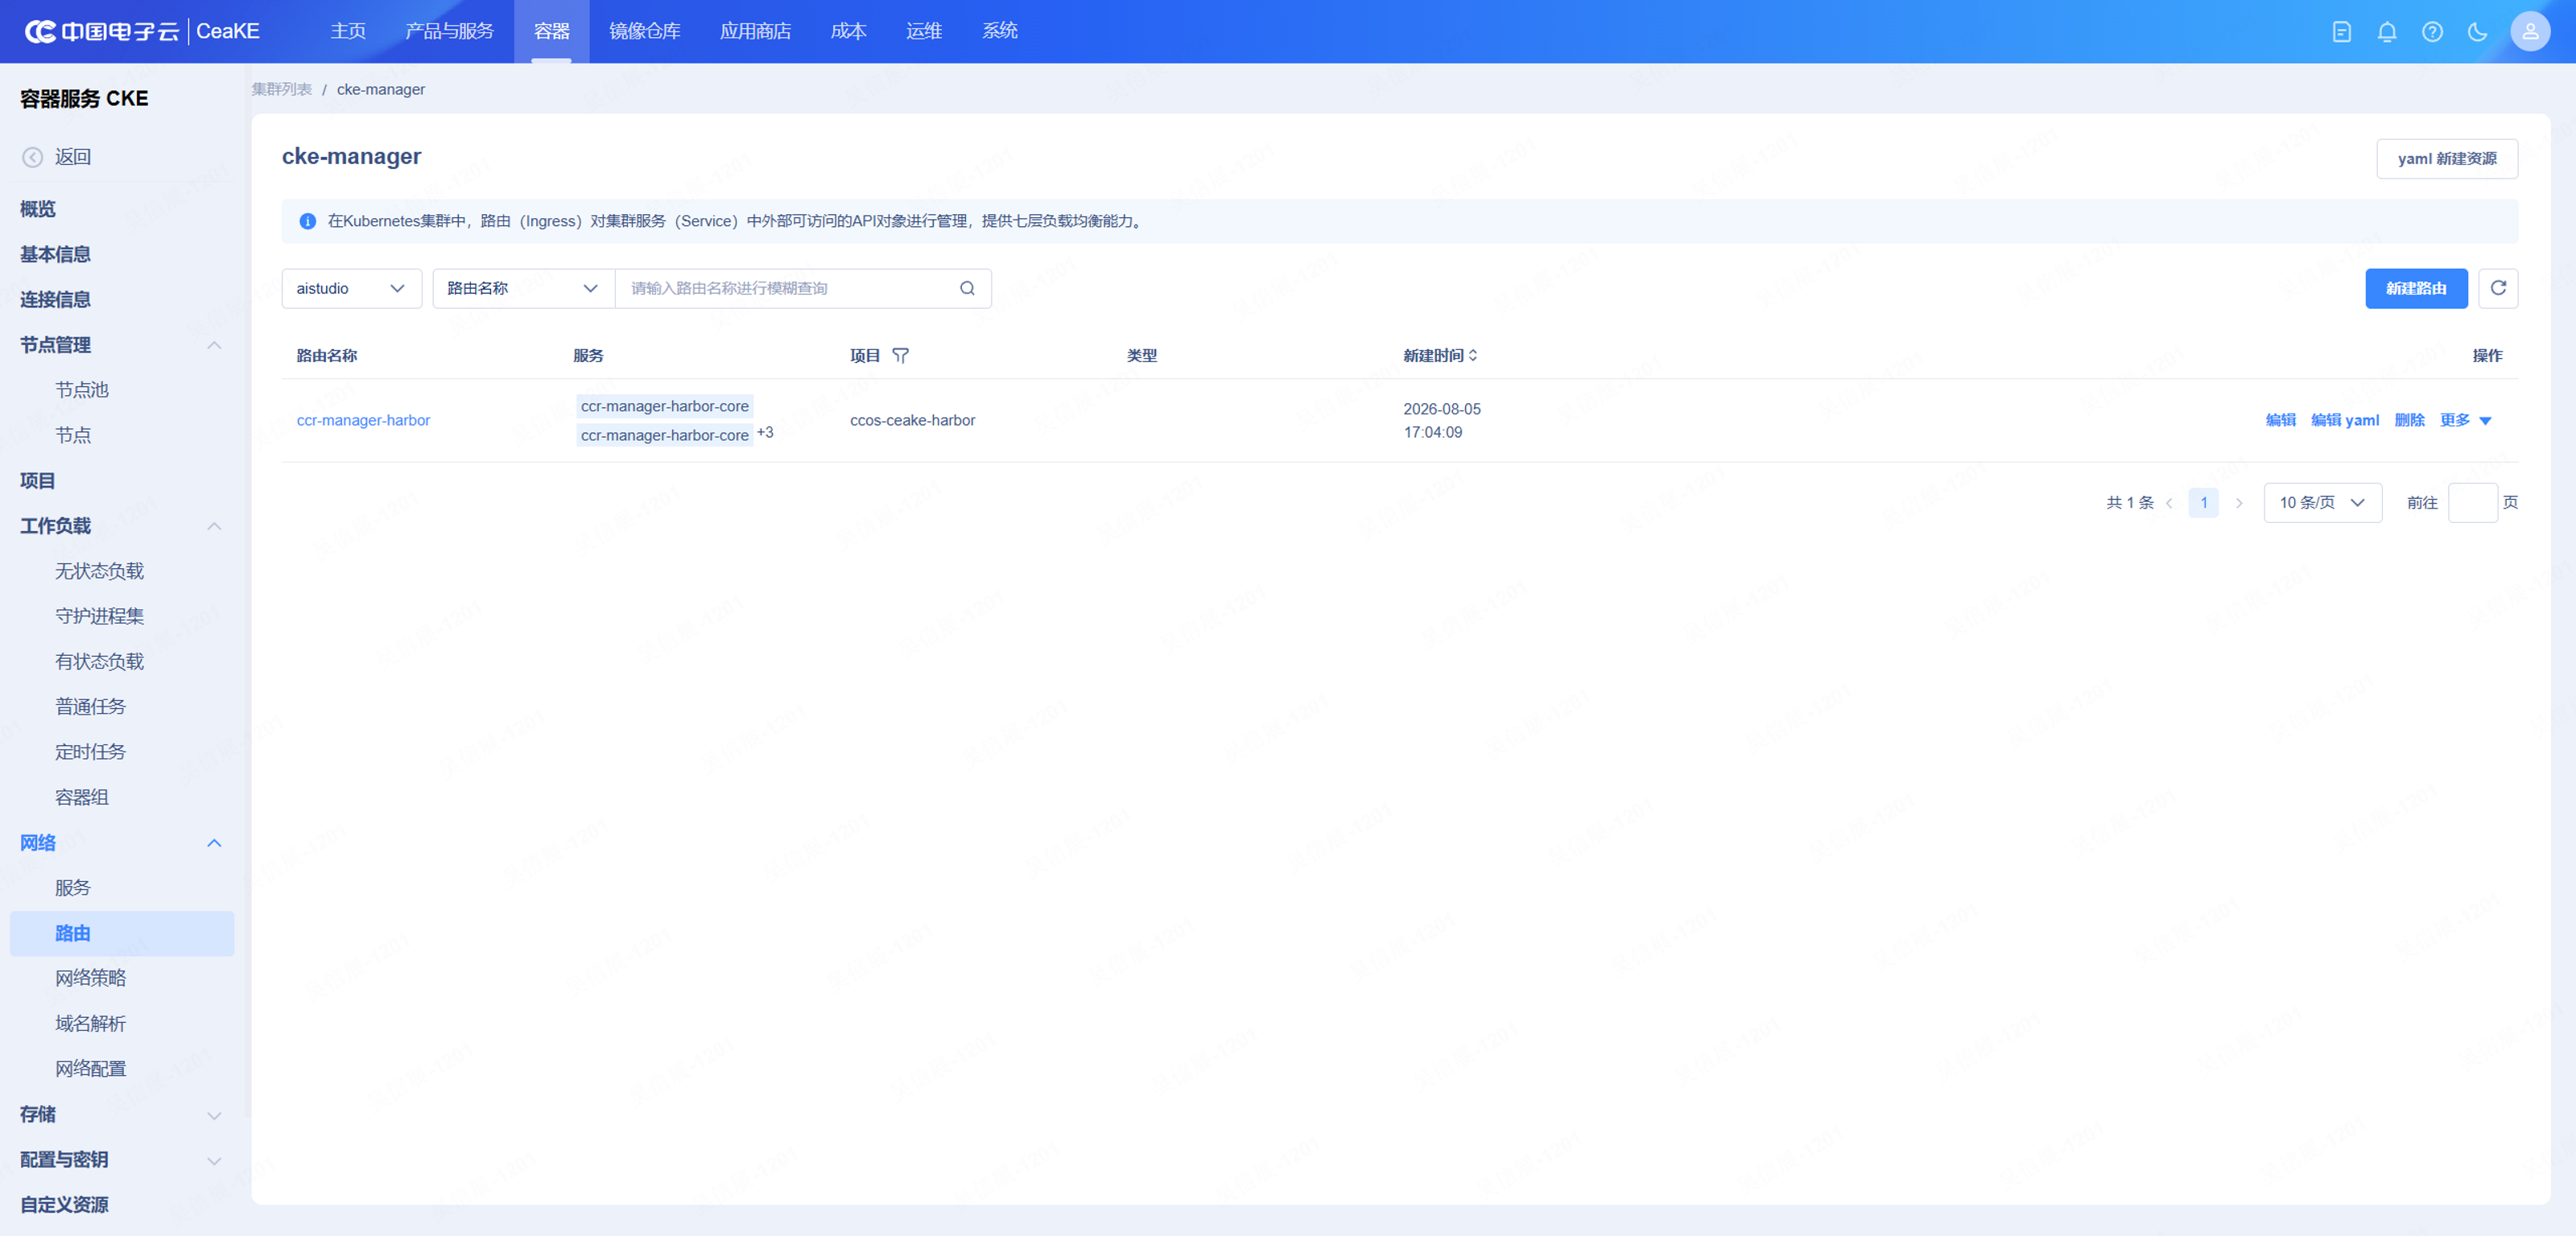
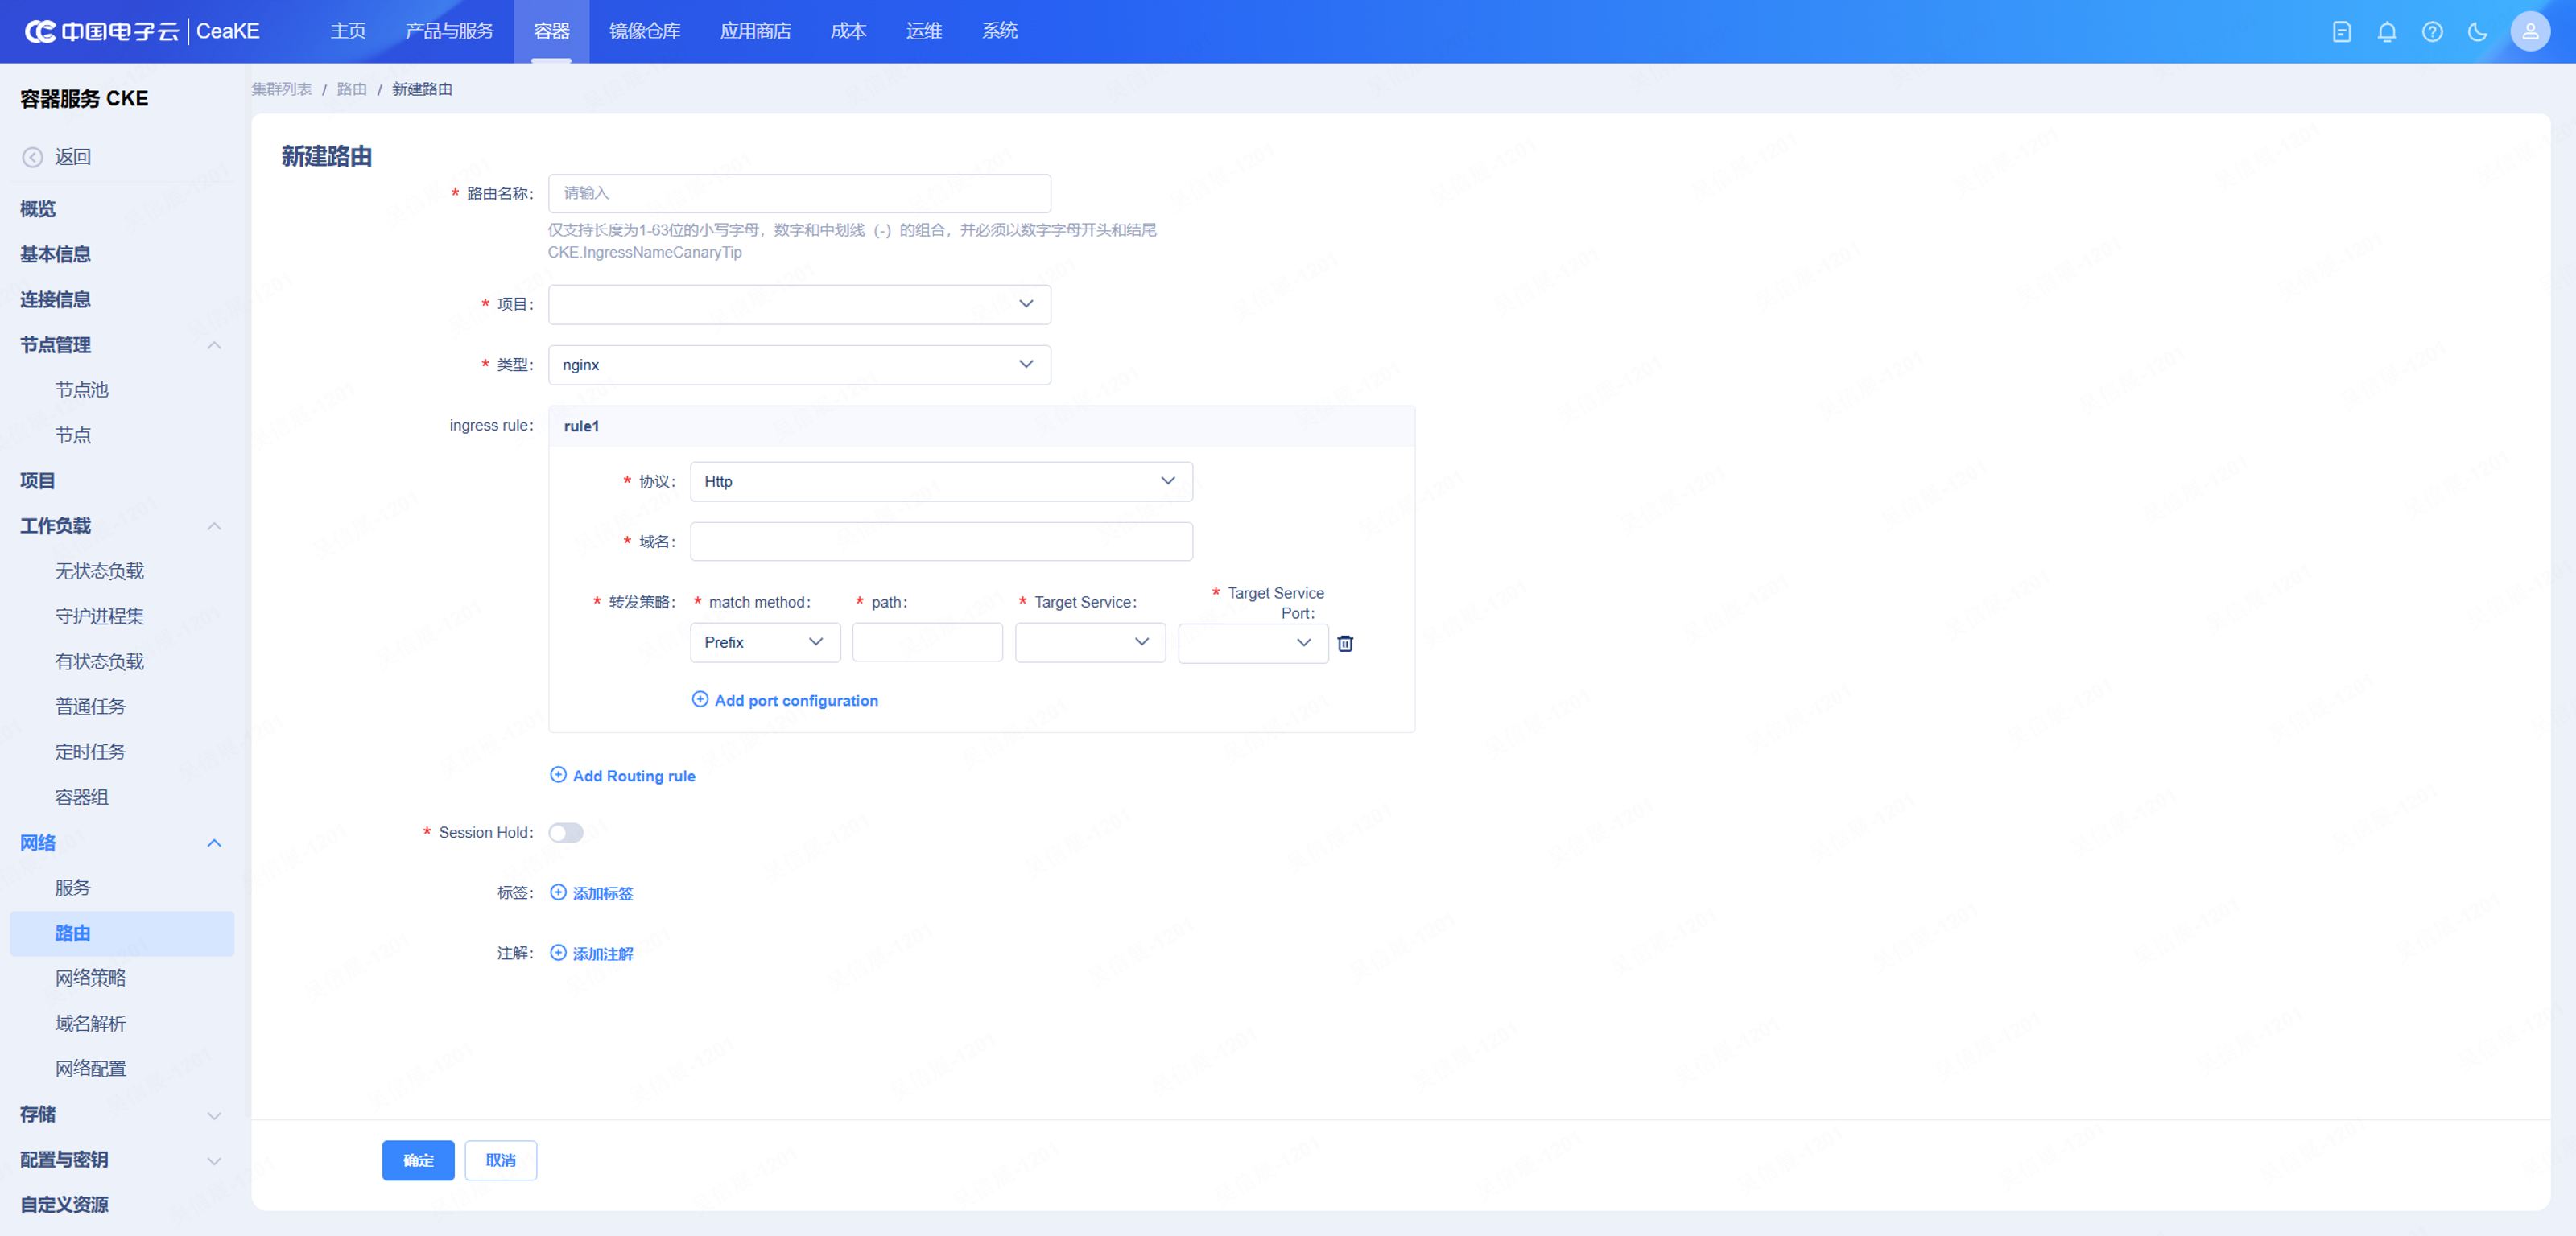
Enter the route name, project, Ingress type, protocol, host, path matching mode, target Service, and target port. The screenshot uses type nginx and match mode Prefix, which correspond to the Ingress controller and pathType: Prefix. HTTPS additionally requires the TLS certificate or Secret expected by the platform.
A console may call this object Ingress, domain, route, layer-7 load balancer, or application entry. Whatever the label, troubleshoot the same chain: Route/Ingress → Service → Endpoint → Pod.
5. Validate release and prepare rollback
If YAML deployment is supported:
|
|
Useful checks:
|
|
Rollback:
|
|
Platform consoles usually expose the same behavior as version history, rollback, or redeploy actions.
6. Common troubleshooting table
| Symptom | Likely cause | Where to look |
|---|---|---|
ImagePullBackOff |
Wrong image, missing tag, registry permission issue | Registry, imagePullSecret, Pod events |
ErrImagePull |
Node failed to pull image | kubectl describe pod |
CrashLoopBackOff |
Container starts and exits repeatedly | kubectl logs --previous, startup command, env vars |
Running but 0/1 Ready |
Readiness probe fails | Health endpoint, port, timeout |
| External 404 | Ingress host or path mismatch | Ingress and gateway rules |
| External 502/503 | Service has no ready endpoint | Pod readiness, Service selector |
| Database connection failure | Secret, network policy, allowlist, DNS | Env vars, credentials, network |
OOMKilled |
Memory exceeded limit | Raise limit, inspect memory usage |
exec format error |
Image architecture mismatch | Rebuild with buildx --platform linux/amd64 |
| New image not picked up | Same tag reused and pull policy did not force pull | Use a new tag or adjust imagePullPolicy |
Recommended troubleshooting order:
7. Pre-release checklist
| Check | Pass criteria |
|---|---|
| Dockerfile is repeatable | docker build works on another machine or CI |
| Image runs locally | docker run passes the health check |
| Tag is traceable | Tag includes version, build number, or Git SHA |
| Image is pushed | The platform can pull it from the registry |
| Config is not baked into image | Environment differences use ConfigMap / Secret |
| Secrets are not in Dockerfile | No password in ENV, source, or image layers |
| Resources are set | Reasonable requests and limits exist |
| Probes are set | Readiness and liveness endpoints work |
| Service selector is correct | Service has Pod endpoints |
| Entry route is verified | Domain, path, certificate, gateway are correct |
| Rollback is clear | Previous image tag or Deployment revision is known |
| Logs and metrics are available | Operators can inspect runtime behavior after release |
Summary
The deployment path can be summarized as:
Use Dockerfile to turn the service into a runnable, traceable, pushable image; then let Kubernetes manage replicas with Deployment, provide stable access with Service, and route external traffic through Ingress or a platform gateway.
Four habits make this process much more reliable:
- run the image locally before pushing it;
- use a unique tag for every release instead of relying on
latest; - inject configuration and secrets from the platform instead of baking them into the image;
- prepare health checks, logs, and rollback before release.
Once this chain is stable, deploying through a container cloud platform becomes a standardized delivery workflow instead of trial and error in a web form.