FastAPI 实战教程:面向 Python 开发者的现代 API 入门
如果你已经会 Python 函数、类型提示、虚拟环境和一点 HTTP 基础,FastAPI 会给你一种很顺手的体验:你写普通函数和 Pydantic 模型,它负责把请求解析、参数校验、JSON 序列化和 OpenAPI 文档串起来。
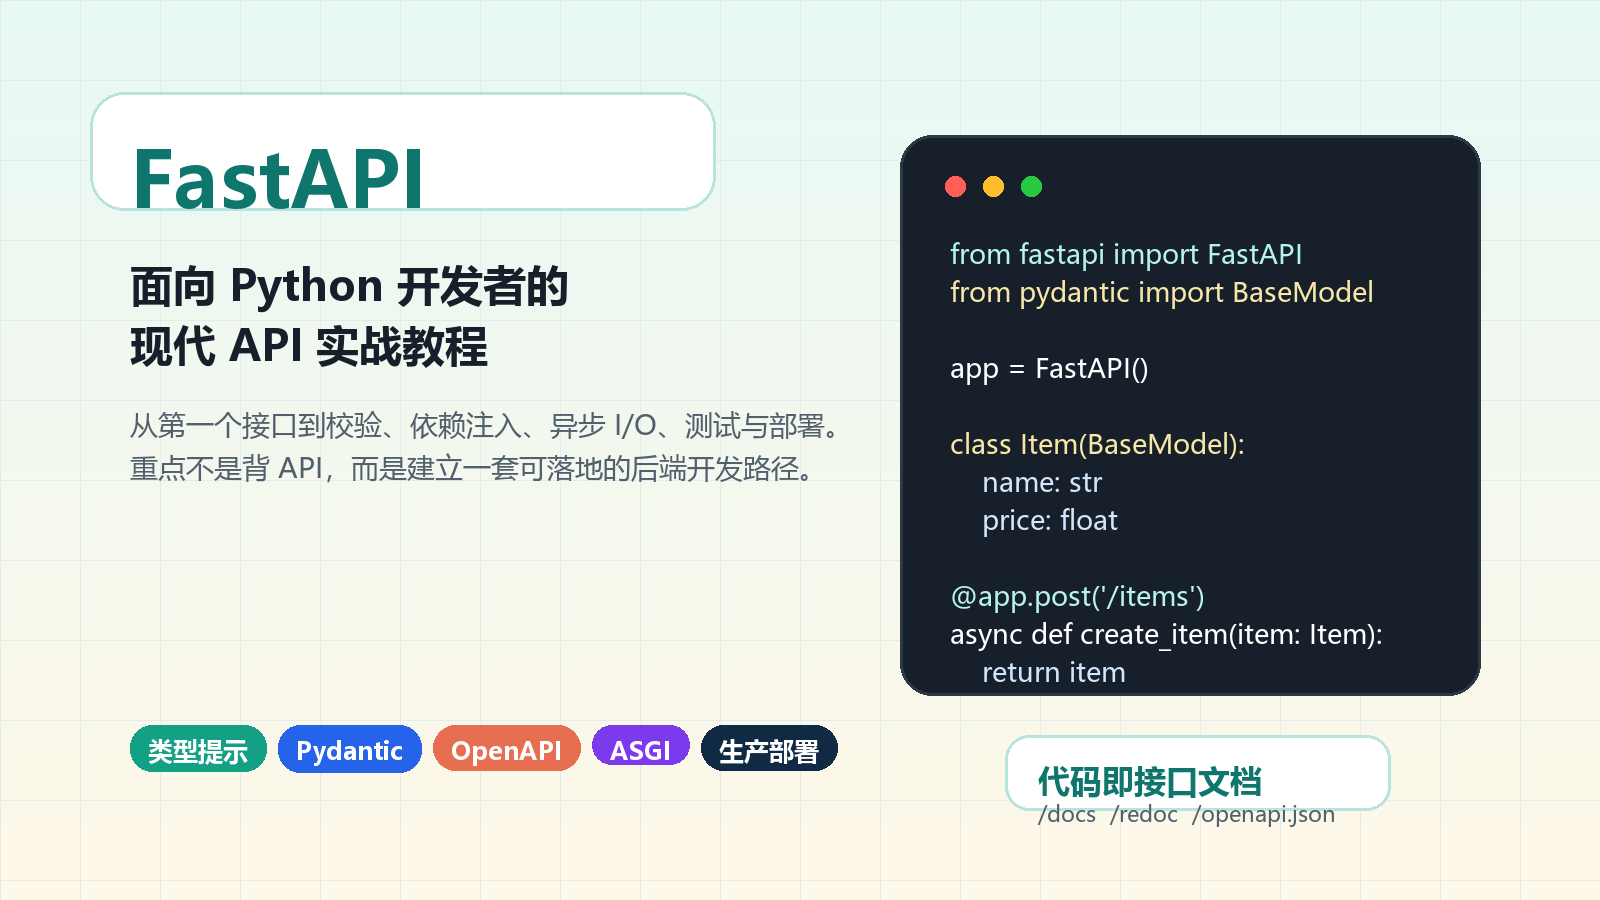
这篇文章不从“什么是 Web 框架”讲起,而是面向已经有 Python 基础的开发者,直接搭一个可运行的小 API,再逐步补上工程里绕不开的几件事:数据校验、错误处理、依赖注入、异步选择、项目拆分、测试和部署。
| 你已有的 Python 能力 |
在 FastAPI 中会怎样复用 |
| 函数与装饰器 |
一个路径函数就是一个接口处理函数 |
| 类型提示 |
自动解析路径参数、查询参数和请求体 |
| 类与数据模型 |
用 Pydantic 定义请求和响应契约 |
| 异常处理 |
用 HTTPException 表达 HTTP 错误 |
| 模块拆分 |
用 APIRouter 管理多组接口 |
| 测试习惯 |
用 TestClient 写接口级单元测试 |
一、FastAPI 解决的核心问题
FastAPI 的价值不是“少写几行 Flask 代码”,而是把现代 API 后端中高频出现的一组能力整合在一起:
- 基于类型提示的参数解析;
- 基于 Pydantic 的请求体和响应体校验;
- 自动生成 OpenAPI、Swagger UI 和 ReDoc;
- 支持同步函数和异步函数;
- 通过依赖注入组织鉴权、数据库会话、配置读取等横切逻辑;
- 基于 ASGI,天然适合高并发 I/O 场景。
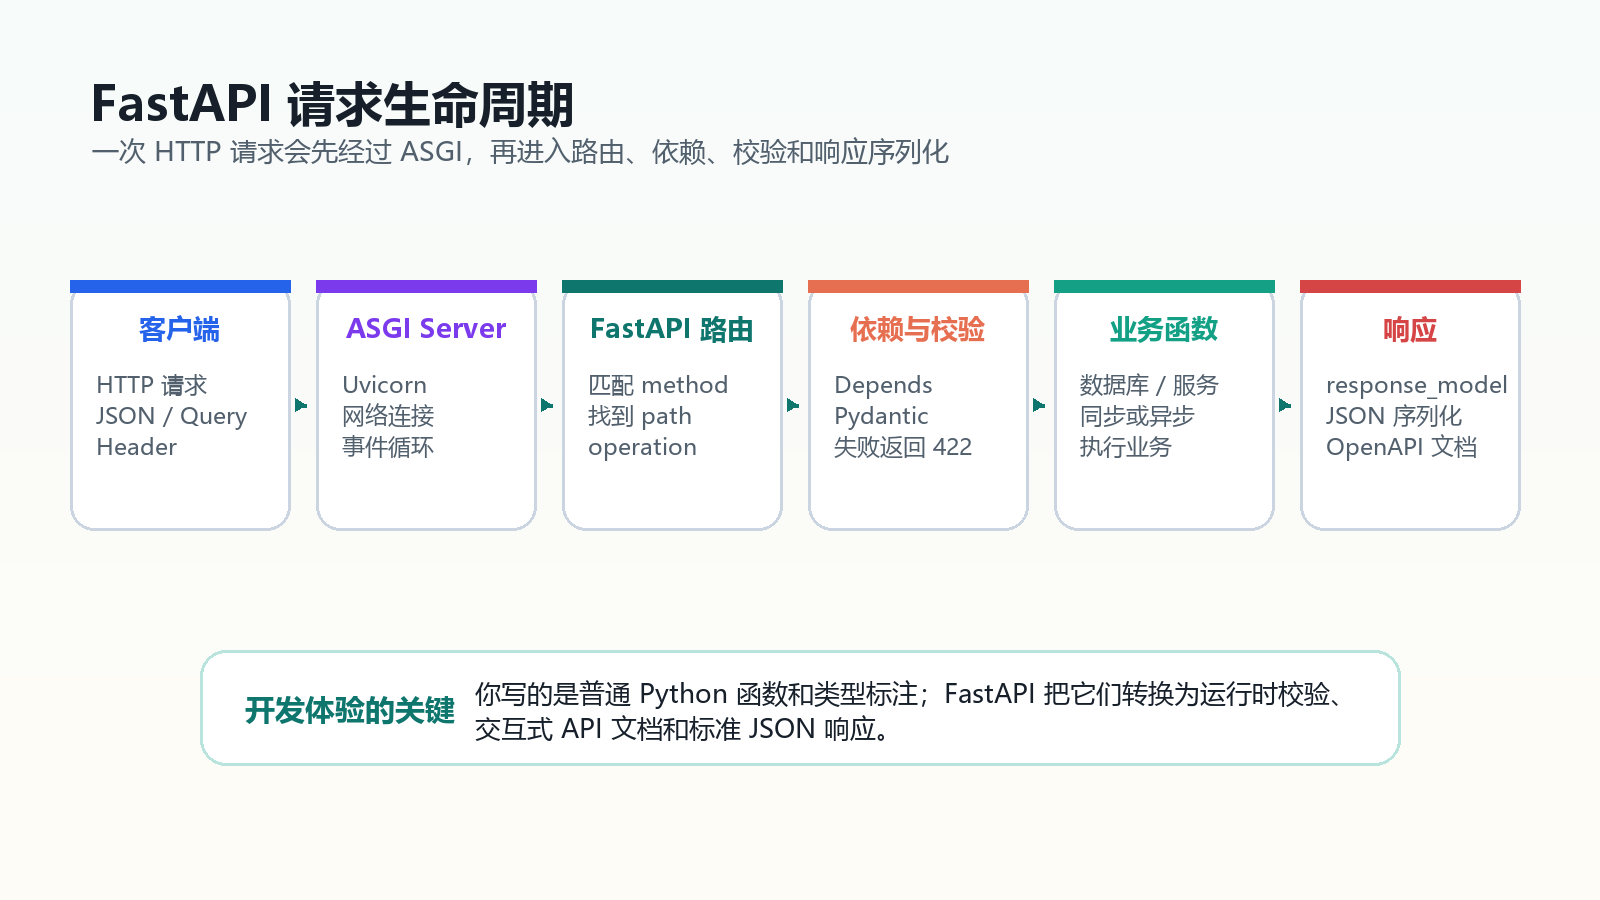
一次请求进入 FastAPI 后,通常会经过这样的链路:
- Uvicorn 这类 ASGI Server 接收 HTTP 请求;
- FastAPI 根据 method 和 path 找到路径函数;
- 解析 path、query、header、cookie、body 等输入;
- 用 Pydantic 做类型转换和约束校验;
- 执行业务函数;
- 根据
response_model 输出稳定 JSON 结构;
- 同步更新 OpenAPI 文档。
也就是说,FastAPI 希望你把“接口契约”尽量写进 Python 类型和模型里,而不是散落在注释、Wiki 和前端口头约定中。
二、环境准备
截至本文写作时,FastAPI 官方文档推荐安装标准依赖包:
1
|
pip install "fastapi[standard]"
|
建议从一个干净虚拟环境开始:
 1
 2
 3
 4
 5
 6
 7
 8
 9
10
11
12
|
mkdir fastapi-shop
cd fastapi-shop

python -m venv .venv

# Windows PowerShell
.\.venv\Scripts\Activate.ps1

# macOS / Linux
source .venv/bin/activate

pip install "fastapi[standard]"
|
其中 fastapi[standard] 会带上常用运行和开发能力,比如 ASGI Server、交互式文档相关依赖等。如果你在生产项目中追求更小依赖面,也可以研究 fastapi-slim,但入门和多数业务项目建议先用标准安装。
三、第一个可运行 API
先写一个单文件版本,文件名为 main.py:
  1
  2
  3
  4
  5
  6
  7
  8
  9
 10
 11
 12
 13
 14
 15
 16
 17
 18
 19
 20
 21
 22
 23
 24
 25
 26
 27
 28
 29
 30
 31
 32
 33
 34
 35
 36
 37
 38
 39
 40
 41
 42
 43
 44
 45
 46
 47
 48
 49
 50
 51
 52
 53
 54
 55
 56
 57
 58
 59
 60
 61
 62
 63
 64
 65
 66
 67
 68
 69
 70
 71
 72
 73
 74
 75
 76
 77
 78
 79
 80
 81
 82
 83
 84
 85
 86
 87
 88
 89
 90
 91
 92
 93
 94
 95
 96
 97
 98
 99
100
101
102
103
104
105
106
107
108
109
110
111
112
113
114
115
|
from typing import Annotated
from uuid import UUID, uuid4

from fastapi import Depends, FastAPI, Header, HTTPException, Query, status
from pydantic import BaseModel, Field


app = FastAPI(
    title="FastAPI Shop",
    version="0.1.0",
    description="A tiny shop API built with FastAPI.",
)


class ItemCreate(BaseModel):
    name: str = Field(..., min_length=1, max_length=80, examples=["Keyboard"])
    price: float = Field(..., gt=0, examples=[299.0])
    tags: list[str] = Field(default_factory=list, max_length=10)


class ItemUpdate(BaseModel):
    name: str | None = Field(default=None, min_length=1, max_length=80)
    price: float | None = Field(default=None, gt=0)
    tags: list[str] | None = Field(default=None, max_length=10)


class ItemRead(BaseModel):
    id: UUID
    name: str
    price: float
    tags: list[str]


items: dict[UUID, ItemRead] = {}


def require_token(
    x_token: Annotated[str | None, Header(alias="X-Token")] = None,
) -> str:
    if x_token != "dev-token":
        raise HTTPException(
            status_code=status.HTTP_401_UNAUTHORIZED,
            detail="Invalid token",
        )
    return x_token


@app.get("/health")
def health() -> dict[str, str]:
    return {"status": "ok"}


@app.get("/items", response_model=list[ItemRead])
def list_items(
    token: Annotated[str, Depends(require_token)],
    q: Annotated[str | None, Query(min_length=1, max_length=30)] = None,
) -> list[ItemRead]:
    result = list(items.values())

    if q is None:
        return result

    keyword = q.lower()
    return [item for item in result if keyword in item.name.lower()]


@app.post("/items", response_model=ItemRead, status_code=status.HTTP_201_CREATED)
def create_item(
    data: ItemCreate,
    token: Annotated[str, Depends(require_token)],
) -> ItemRead:
    item = ItemRead(id=uuid4(), **data.model_dump())
    items[item.id] = item
    return item


@app.get("/items/{item_id}", response_model=ItemRead)
def read_item(
    item_id: UUID,
    token: Annotated[str, Depends(require_token)],
) -> ItemRead:
    try:
        return items[item_id]
    except KeyError:
        raise HTTPException(
            status_code=status.HTTP_404_NOT_FOUND,
            detail="Item not found",
        )


@app.patch("/items/{item_id}", response_model=ItemRead)
def update_item(
    item_id: UUID,
    data: ItemUpdate,
    token: Annotated[str, Depends(require_token)],
) -> ItemRead:
    item = read_item(item_id, token)
    updates = data.model_dump(exclude_unset=True)
    updates = {key: value for key, value in updates.items() if value is not None}
    updated = item.model_copy(update=updates)
    items[item_id] = updated
    return updated


@app.delete("/items/{item_id}", status_code=status.HTTP_204_NO_CONTENT)
def delete_item(
    item_id: UUID,
    token: Annotated[str, Depends(require_token)],
) -> None:
    if item_id not in items:
        raise HTTPException(
            status_code=status.HTTP_404_NOT_FOUND,
            detail="Item not found",
        )
    del items[item_id]
|
启动开发服务器:
如果你的环境没有 FastAPI CLI,也可以用 Uvicorn:
1
|
uvicorn main:app --reload
|
打开:
http://127.0.0.1:8000/healthhttp://127.0.0.1:8000/docshttp://127.0.0.1:8000/redochttp://127.0.0.1:8000/openapi.json
试着创建一个商品:
1
2
3
4
|
curl -X POST "http://127.0.0.1:8000/items" \
  -H "Content-Type: application/json" \
  -H "X-Token: dev-token" \
  -d '{"name":"Keyboard","price":299,"tags":["peripheral"]}'
|
如果你把 price 改成负数,FastAPI 会直接返回 422 Unprocessable Entity,并告诉你哪个字段不符合约束。你不需要在业务函数里手写一堆 if price <= 0。
四、类型提示如何变成接口契约
FastAPI 里有三类输入最常见:
| 输入位置 |
示例 |
FastAPI 如何识别 |
| 路径参数 |
/items/{item_id} |
函数参数名与路径模板一致 |
| 查询参数 |
/items?q=key |
函数参数不在路径里,且不是 Pydantic body |
| 请求体 |
JSON body |
参数类型继承自 BaseModel |
例如:
1
2
3
4
5
6
|
@app.get("/items/{item_id}")
def read_item(
    item_id: UUID,
    q: Annotated[str | None, Query(min_length=1)] = None,
) -> dict[str, str]:
    return {"item_id": str(item_id), "q": q or ""}
|
这里 item_id: UUID 会让 FastAPI 自动把字符串转换为 UUID 对象;如果传入的路径不是合法 UUID,请求会在进入函数前失败。
Annotated 的好处是把“类型”和“接口约束”分开:
1
|
q: Annotated[str | None, Query(min_length=1, max_length=30)] = None
|
读作:q 的业务类型是 str | None,同时它作为查询参数时必须满足长度约束。这样写比把校验逻辑塞进函数体更清晰,也能同步生成文档。
五、Pydantic:把边界数据变可信
Pydantic 是 FastAPI 的数据契约核心。请求进入系统时,外部世界给你的都是“不可信字符串或 JSON”;经过 Pydantic 模型之后,业务函数拿到的是已经转换和校验过的 Python 对象。
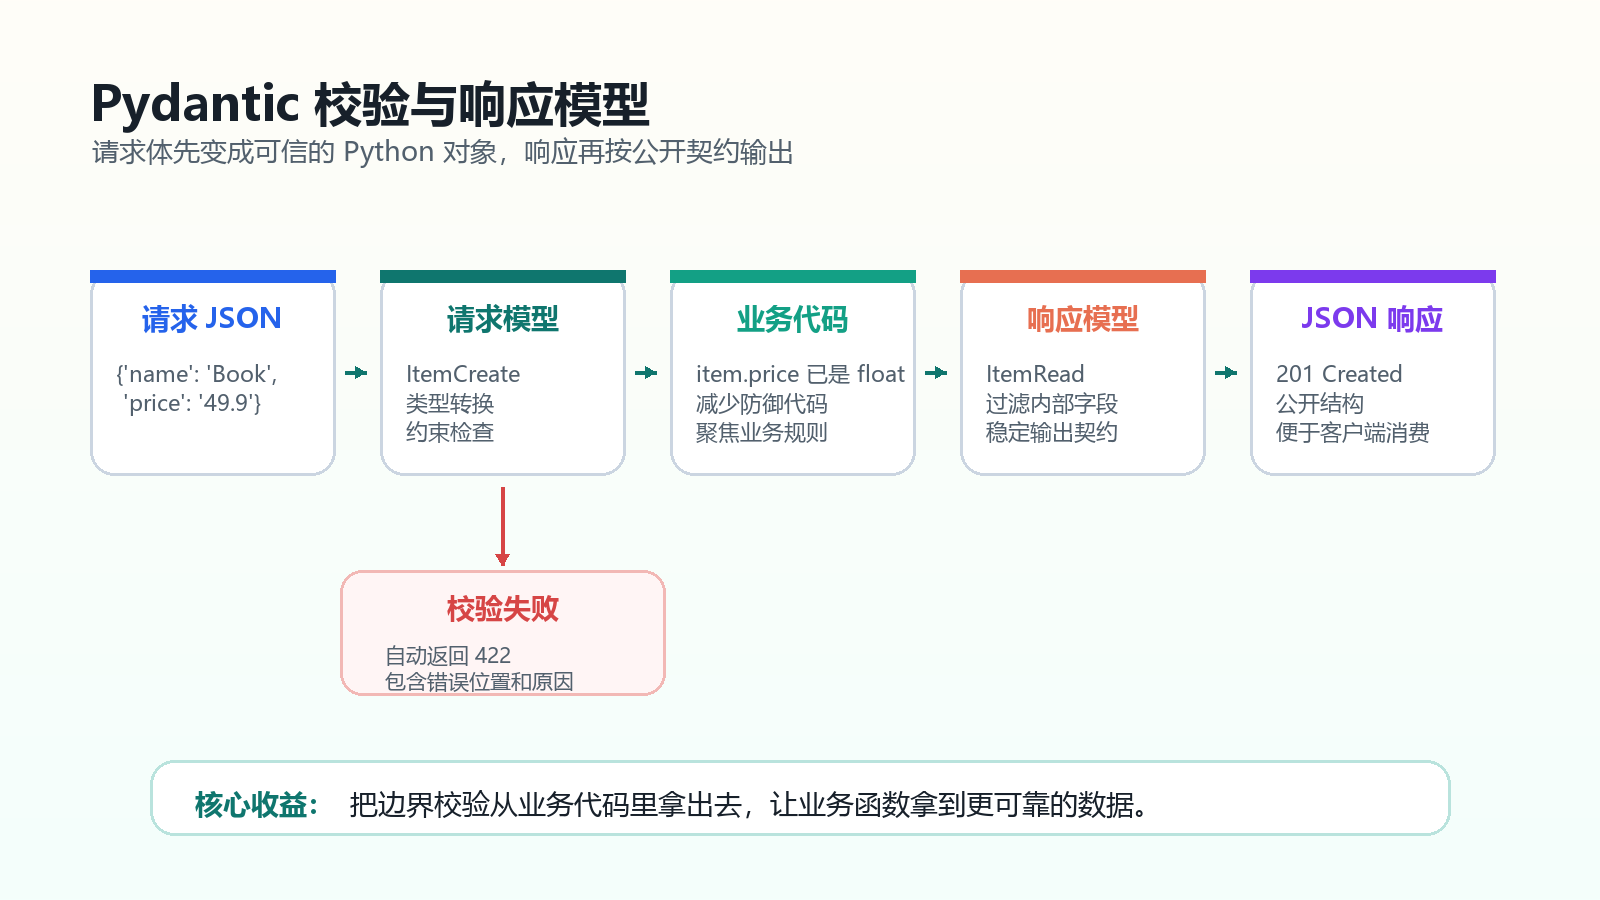
请求模型和响应模型建议分开写:
1
2
3
4
5
6
7
8
|
class UserCreate(BaseModel):
    email: str
    password: str


class UserRead(BaseModel):
    id: UUID
    email: str
|
这样做有两个直接收益:
password 可以出现在创建请求里,但不会从响应里泄漏出去;- 数据库模型、请求模型、响应模型不再互相污染。
response_model 还有一个经常被低估的价值:它能过滤掉你不想暴露的字段。
1
2
3
4
5
6
7
|
@app.post("/users", response_model=UserRead)
def create_user(data: UserCreate) -> dict[str, object]:
    return {
        "id": uuid4(),
        "email": data.email,
        "password_hash": "internal-only",
    }
|
即使函数返回值里有 password_hash,最终响应也只会保留 UserRead 声明的字段。对于 API 稳定性和安全边界,这一点很重要。
六、依赖注入:把横切逻辑拿出接口函数
开发业务 API 时,很多逻辑并不属于某一个接口:
- 读取当前登录用户;
- 校验 Token;
- 创建数据库 Session;
- 读取配置;
- 记录审计日志;
- 检查权限。
FastAPI 用 Depends 处理这类逻辑。前面的 require_token 就是一个最小例子:
1
2
3
4
5
6
|
def require_token(
    x_token: Annotated[str | None, Header(alias="X-Token")] = None,
) -> str:
    if x_token != "dev-token":
        raise HTTPException(status_code=401, detail="Invalid token")
    return x_token
|
在接口中声明依赖:
1
2
3
|
@app.get("/items")
def list_items(token: Annotated[str, Depends(require_token)]) -> list[ItemRead]:
    return list(items.values())
|
这样接口函数会在执行前先运行 require_token。如果依赖抛出异常,业务函数不会继续执行。
依赖也可以继续依赖其他依赖:
1
2
3
4
5
6
7
8
|
def get_settings() -> Settings:
    return Settings()


def get_repository(
    settings: Annotated[Settings, Depends(get_settings)],
) -> ItemRepository:
    return ItemRepository(settings.database_url)
|
这种组合方式让 FastAPI 项目很适合做“薄接口层 + 明确业务层”的结构。
七、项目变大后怎么拆
单文件很适合入门,但真实项目通常会快速长出用户、订单、支付、后台管理、文件上传等资源。推荐按职责拆分,而不是按“今天写了哪个接口”随手堆文件。
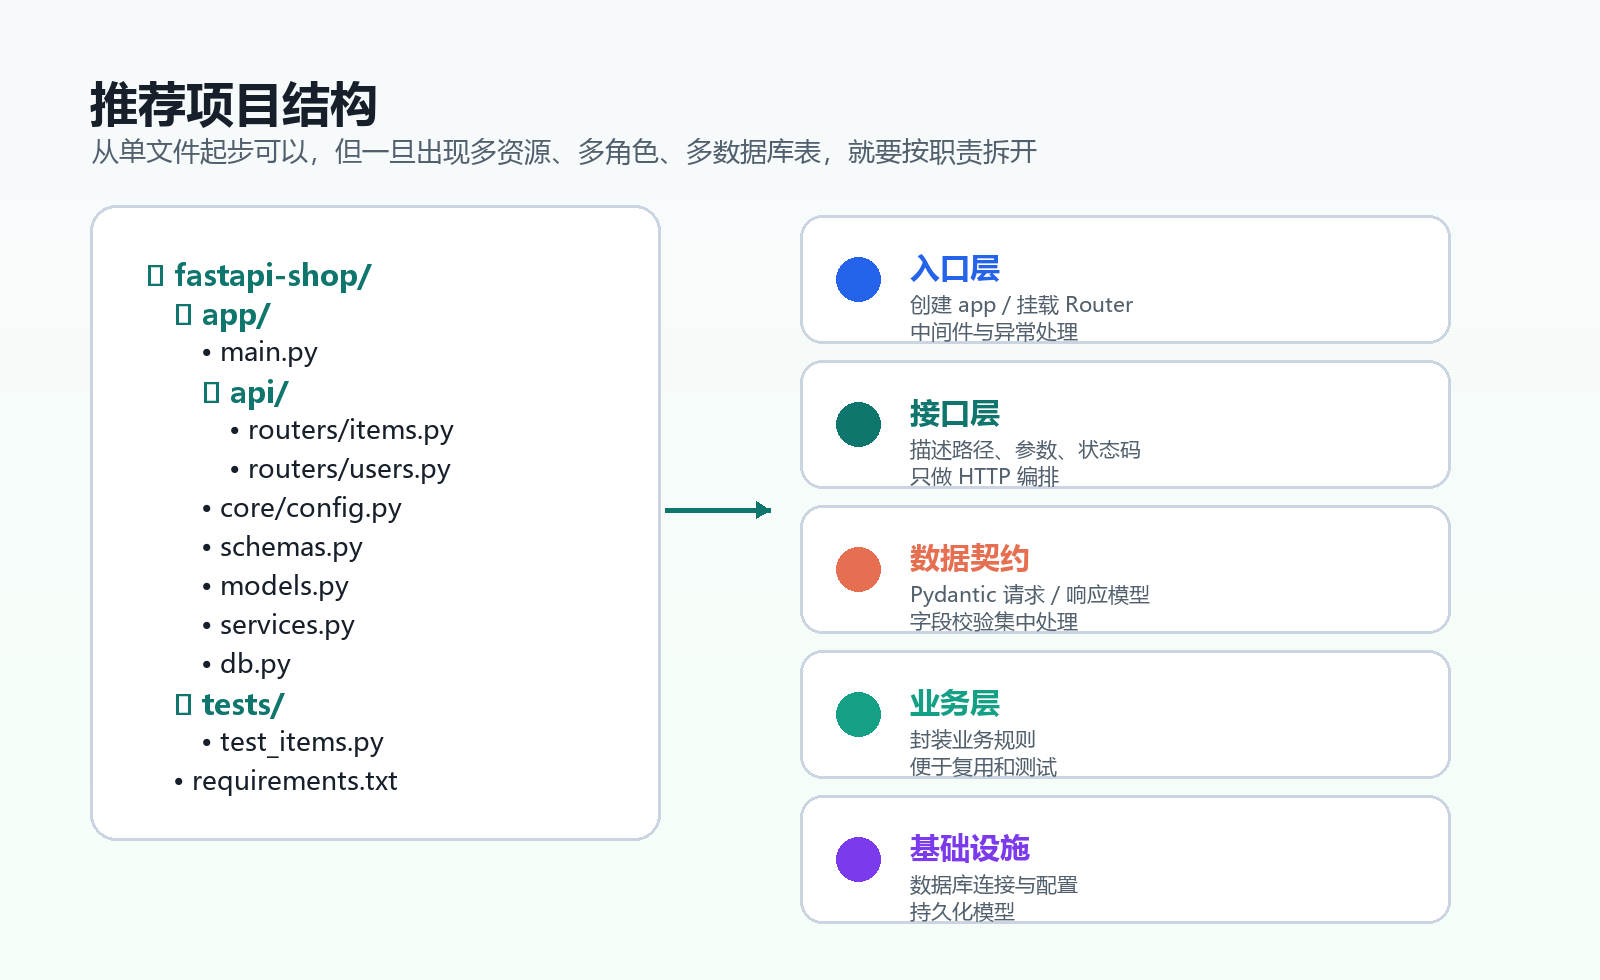
一个常见结构是:
 1
 2
 3
 4
 5
 6
 7
 8
 9
10
11
12
13
14
15
16
|
fastapi-shop/
├── app/
│   ├── main.py
│   ├── api/
│   │   └── routers/
│   │       ├── items.py
│   │       └── users.py
│   ├── core/
│   │   └── config.py
│   ├── schemas.py
│   ├── models.py
│   ├── services.py
│   └── db.py
├── tests/
│   └── test_items.py
└── requirements.txt
|
app/api/routers/items.py 可以这样写:
 1
 2
 3
 4
 5
 6
 7
 8
 9
10
11
12
13
14
15
16
17
18
19
20
21
22
23
24
25
26
|
from typing import Annotated
from uuid import UUID

from fastapi import APIRouter, Depends

from app.schemas import ItemCreate, ItemRead
from app.services import ItemService, get_item_service


router = APIRouter(prefix="/items", tags=["items"])


@router.post("", response_model=ItemRead, status_code=201)
def create_item(
    data: ItemCreate,
    service: Annotated[ItemService, Depends(get_item_service)],
) -> ItemRead:
    return service.create(data)


@router.get("/{item_id}", response_model=ItemRead)
def read_item(
    item_id: UUID,
    service: Annotated[ItemService, Depends(get_item_service)],
) -> ItemRead:
    return service.get(item_id)
|
app/main.py 只负责组装:
1
2
3
4
5
6
7
|
from fastapi import FastAPI

from app.api.routers import items


app = FastAPI(title="FastAPI Shop")
app.include_router(items.router)
|
这里有一个判断标准:如果路由函数开始出现复杂分支、数据库查询细节、外部 API 调用和权限规则,说明它已经不只是“HTTP 编排”了,应该把逻辑移到 service 或 repository 层。
八、async def 不等于自动更快
FastAPI 支持两种路径函数:
1
2
3
4
5
6
7
8
|
@app.get("/sync")
def sync_handler() -> dict[str, str]:
    return {"mode": "sync"}


@app.get("/async")
async def async_handler() -> dict[str, str]:
    return {"mode": "async"}
|
什么时候用 async def?先看函数内部在做什么。
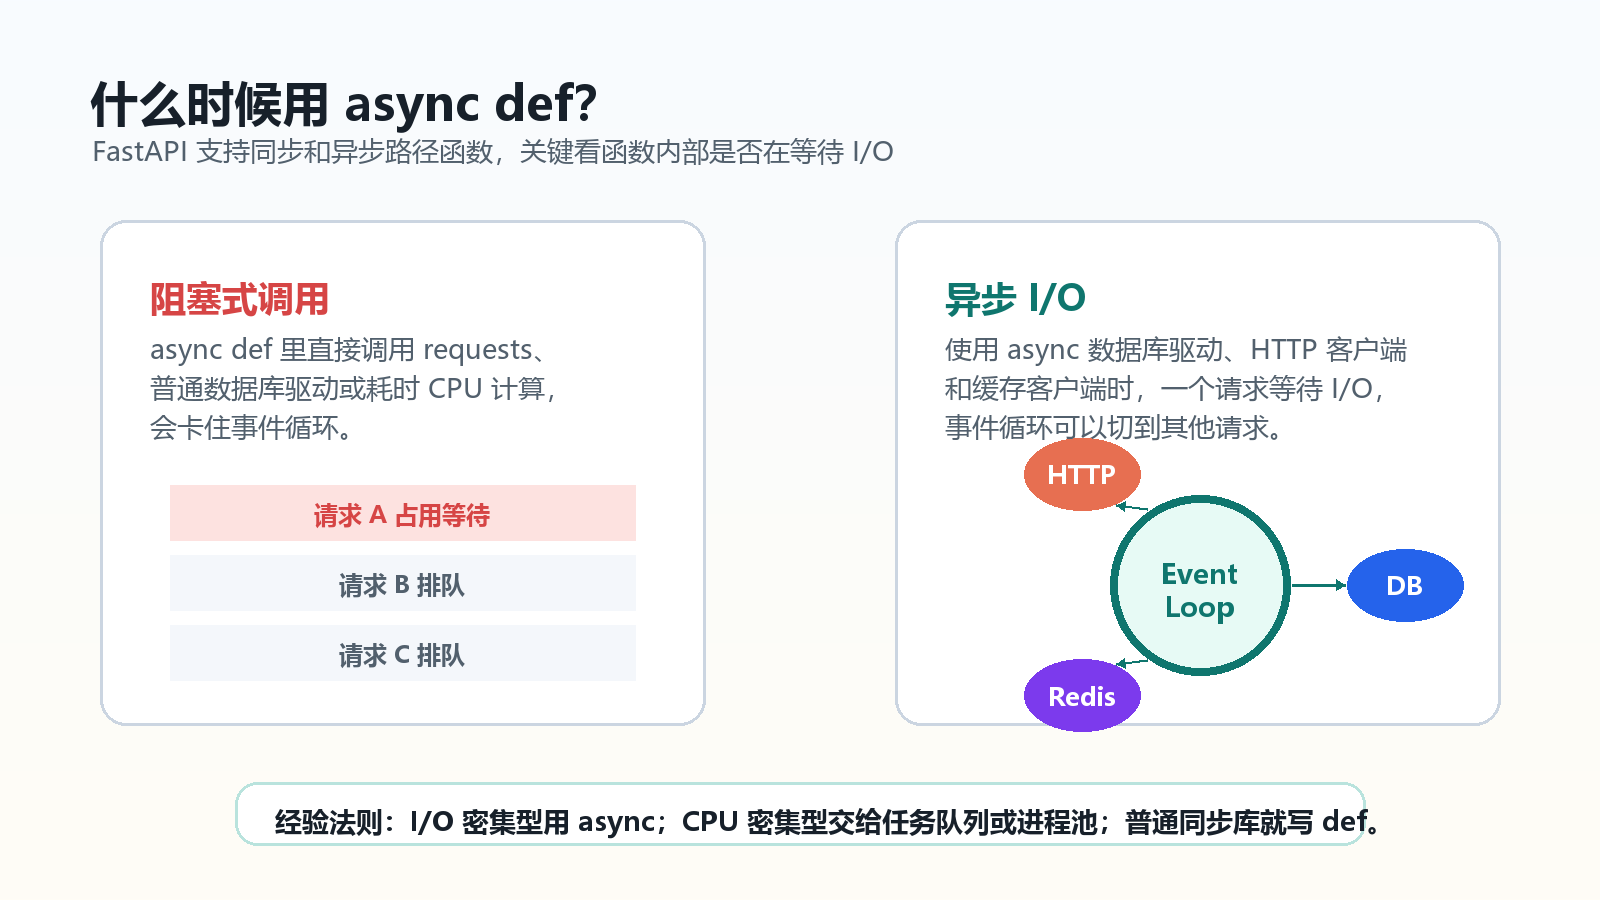
可以用这张表快速判断:
| 场景 |
建议 |
| 调用 async 数据库驱动,如 async SQLAlchemy、asyncpg |
用 async def |
| 调用 async HTTP 客户端,如 httpx.AsyncClient |
用 async def |
| 调用普通同步库,如 requests、同步数据库驱动 |
用 def,或放到线程池/任务队列 |
| 做大量 CPU 计算,如图像处理、模型推理 |
不要指望 async 提速,考虑进程池或后台任务 |
| 不确定库是否异步 |
先按同步写,确认后再改 |
最常见的坑是:写了 async def,但函数内部直接调用 requests.get() 或同步数据库驱动。这会阻塞事件循环,让其他请求也跟着等待。
如果需要在接口中调用外部 HTTP 服务,可以这样:
1
2
3
4
5
6
7
8
9
|
import httpx


@app.get("/exchange-rate")
async def get_exchange_rate() -> dict[str, float]:
    async with httpx.AsyncClient(timeout=5) as client:
        response = await client.get("https://api.example.com/rate")
        response.raise_for_status()
    return response.json()
|
注意:异步不是语法装饰,它是一种 I/O 调度模型。只有你的数据库、HTTP 客户端、缓存客户端等调用链也支持 async,收益才会明显。
九、错误处理与状态码
HTTP API 不应该只返回 200,然后把错误塞进 JSON 里的 code 字段。状态码本身就是协议的一部分。
常用状态码可以这样理解:
| 状态码 |
适用场景 |
200 OK |
查询、更新成功并返回内容 |
201 Created |
创建资源成功 |
204 No Content |
删除成功且不返回 body |
400 Bad Request |
请求语义不合法 |
401 Unauthorized |
没有有效身份凭证 |
403 Forbidden |
已登录但没有权限 |
404 Not Found |
资源不存在 |
409 Conflict |
资源状态冲突,如重复创建 |
422 Unprocessable Entity |
参数类型或字段约束不通过 |
FastAPI 中可以用 HTTPException 表达业务错误:
 1
 2
 3
 4
 5
 6
 7
 8
 9
10
11
|
from fastapi import HTTPException, status


def get_item_or_404(item_id: UUID) -> ItemRead:
    item = items.get(item_id)
    if item is None:
        raise HTTPException(
            status_code=status.HTTP_404_NOT_FOUND,
            detail="Item not found",
        )
    return item
|
如果项目中错误结构需要统一,比如都返回 {"code": "...", "message": "..."},可以再引入全局异常处理器。但在入门阶段,先把正确状态码用好,比过早设计复杂错误体系更重要。
十、测试:用接口行为保护重构
FastAPI 提供 TestClient,可以像调用普通 HTTP 接口一样测试你的应用。
安装测试依赖:
tests/test_items.py:
 1
 2
 3
 4
 5
 6
 7
 8
 9
10
11
12
13
14
15
16
17
18
19
20
21
22
23
24
25
26
27
28
29
30
31
32
33
34
35
36
|
from fastapi.testclient import TestClient

from main import app


client = TestClient(app)


def test_create_item() -> None:
    response = client.post(
        "/items",
        headers={"X-Token": "dev-token"},
        json={"name": "Mouse", "price": 99.0, "tags": ["peripheral"]},
    )

    assert response.status_code == 201
    body = response.json()
    assert body["name"] == "Mouse"
    assert body["price"] == 99.0
    assert "id" in body


def test_reject_invalid_price() -> None:
    response = client.post(
        "/items",
        headers={"X-Token": "dev-token"},
        json={"name": "Mouse", "price": -1},
    )

    assert response.status_code == 422


def test_reject_missing_token() -> None:
    response = client.get("/items")

    assert response.status_code == 401
|
运行:
接口测试的重点不是追求行覆盖率,而是锁住 API 行为:状态码、响应字段、错误场景和鉴权路径。只要这些行为被测试保护,后面把内存字典替换成数据库时就安心很多。
十一、部署前需要想清楚的事
本地开发时可以用:
生产环境不要直接用开发命令。你可以使用 FastAPI CLI 的生产命令:
1
|
fastapi run app/main.py --host 0.0.0.0 --port 8000
|
也可以显式使用 Uvicorn:
1
|
uvicorn app.main:app --host 0.0.0.0 --port 8000
|
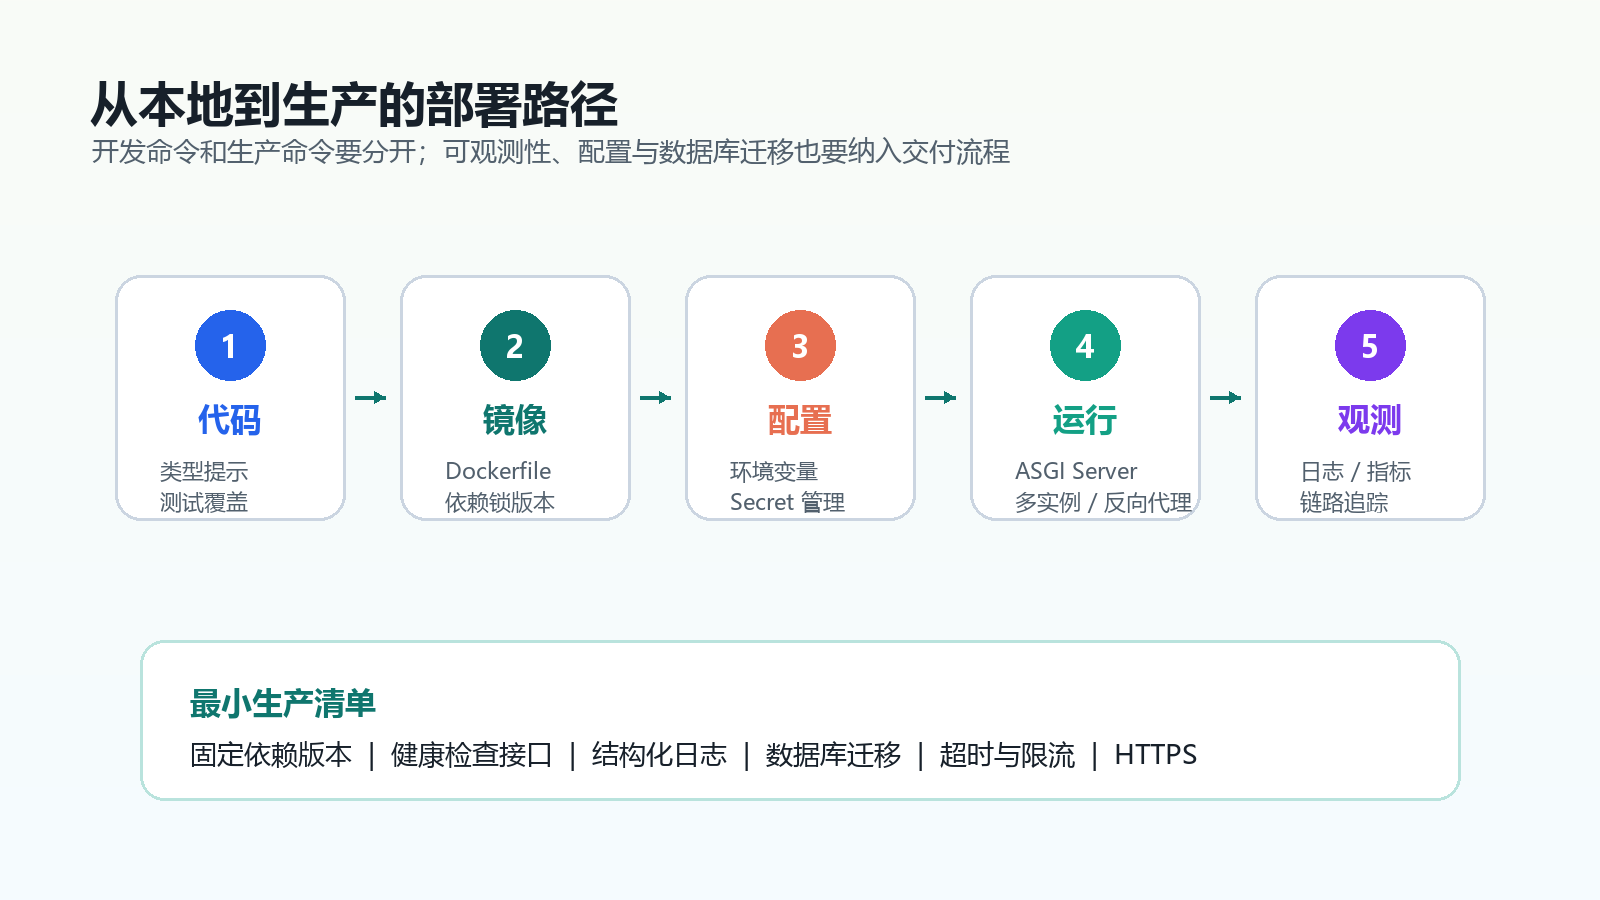
一个最小 Dockerfile 可以长这样:
 1
 2
 3
 4
 5
 6
 7
 8
 9
10
11
|
FROM python:3.12-slim

WORKDIR /app

COPY requirements.txt .
RUN pip install --no-cache-dir -r requirements.txt

COPY app ./app

EXPOSE 8000
CMD ["fastapi", "run", "app/main.py", "--host", "0.0.0.0", "--port", "8000"]
|
生产环境至少要补齐这些点:
| 项目 |
为什么重要 |
| 固定依赖版本 |
避免一次重新构建引入不可预期变更 |
| 环境变量管理 |
数据库地址、密钥、第三方 Token 不要写死在代码里 |
| 健康检查 |
让负载均衡和容器平台知道服务是否可用 |
| 结构化日志 |
方便按 request_id、user_id、status_code 排查问题 |
| 数据库迁移 |
用 Alembic 等工具管理 schema 变化 |
| 超时与重试 |
防止外部服务拖垮自己的接口 |
| 限流与鉴权 |
公开 API 必须考虑滥用和越权 |
| HTTPS 与反向代理 |
生产入口通常交给 Nginx、Traefik、云负载均衡等 |
十二、常见坑
| 坑 |
更稳的做法 |
把所有代码写进 main.py |
入门可以,变大后用 APIRouter、service、db 分层 |
| 路由函数里写大量业务分支 |
路由层只处理 HTTP,业务规则移到 service |
不写 response_model |
为公开 API 写响应模型,保护字段边界 |
async def 里调用同步阻塞库 |
同步库用 def,异步链路才用 async def |
返回 200 表示所有结果 |
正确使用 201、204、401、404、409、422 |
| 把密钥写进代码 |
用环境变量或 Secret 管理 |
| 不写测试就接数据库 |
先用行为测试保护接口,再替换持久化实现 |
十三、学习路线
到这里,你已经掌握了 FastAPI 最重要的主干。接下来可以按这个顺序继续:
- SQLAlchemy 2.x 或 SQLModel:把内存字典换成数据库;
- Alembic:管理数据库迁移;
- OAuth2 / JWT:实现真实登录鉴权;
- BackgroundTasks / Celery / RQ:处理慢任务;
- 中间件:统一日志、request_id、CORS、耗时统计;
- OpenTelemetry:接入链路追踪;
- Docker Compose / Kubernetes:把 API、数据库、缓存组成可部署系统。
FastAPI 的学习曲线很友好,但它不是“玩具框架”。当你把类型契约、依赖注入、测试和部署纪律一起用起来,它完全可以支撑严肃的生产 API。
参考资料